Search  for anything...

Outsunny 6' Drop Arm Manual Retractable Window Awning Sun Shade Shelter for Patio Balcony Outdoor, Aluminum, Cream White

  • Based on 236 reviews
Condition: New
Checking for product changes

Buy Now, Pay Later


As low as $15.83 / mo
  • – 6-month term
  • – No impact on credit
  • – Instant approval decision
  • – Secure and straightforward checkout

Ready to go? Add this product to your cart and select a plan during checkout. Payment plans are offered through our trusted finance partners Klarna, PayTomorrow, Apple Pay, and PayPal. No-credit-needed leasing options through Acima may also be available at checkout.

Learn more about financing & leasing here.

Selected Option

Free shipping on this product

This item is eligible for return within 30 days of receipt

To qualify for a full refund, items must be returned in their original, unused condition. If an item is returned in a used, damaged, or materially different state, you may be granted a partial refund.

To initiate a return, please visit our Returns Center.

View our full returns policy here.


Availability: In Stock.
Fulfilled by Amazon

Arrives May 11 – May 15
Order within 2 hours and 27 minutes
Available payment plans shown during checkout

Color: Cream


Features

  • CREATE SHADE OUTSIDE: Outsunny's retractable awning is a simple and stylish way to create shade on your patio or deck.
  • REDUCE DAMAGE INSIDE: Outsunny's patio awnings not only transform your outside, they reduce heat and sun damage on the inside of your home as well.
  • ADD OUTDOOR SPACE: By adding a retractable sun shade over your existing space you'll create an outdoor oasis that is protected from the sun and perfect for dining and entertaining.
  • UV AND SUN PROTECTION: The UV and water-resistant fabric material of the deck awning holds up to the sun's harmful rays without losing its durability or fading over time.
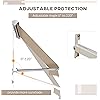
  • HEAVY-DUTY HARDWARE: The attachment brackets we've included are heavy-duty Aluminum fasteners for superior strength.

Material: Polyester


Color: Cream


Size: 6'


Brand: Outsunny


Item Weight: 10 Pounds


Material: Polyester


Color: Cream


Size: 6'


Brand: Outsunny


Item Weight: 10 Pounds


Product Dimensions: 27.5"D x 71"W x 86.5"H


Style: Modern


Fabric Type: other


Assembly Required: No


Operation Mode: Manual


Pattern: Solid


Item Weight: 10 pounds


Manufacturer: Outsunny


Country of Origin: China


Item model number: 01-0151


Is Discontinued By Manufacturer: No


Frequently asked questions

If you place your order now, the estimated arrival date for this product is: May 11 – May 15

Yes, absolutely! You may return this product for a full refund within 30 days of receiving it.

To initiate a return, please visit our Returns Center.

View our full returns policy here.

  • Klarna Financing
  • Klarna Pay in 4
  • PayTomorrow Financing
  • Apple Pay Later
Leasing options through Acima may also be available during checkout.

Learn more about financing & leasing here.

Top Amazon Reviews


  • Very nice light weight Awning
This Awning is very easy to install. I started at 8am and finished up by 10:30am. I was taking some short breaks and taking my time to study the install along the way. The unit comes retracted and secured with a strap cloth that holds items in place while working with the Awning. The 2 wall brackets are aluminum and mount easy to a wood house with vinyl siding. Just position them properly by measuring and projecting lines on the wall with masking tape. Always recheck measurements again before drilling. The brackets fit very tightly to the unit. Once they are snapped in place they do not let go in the reverse method. They must be removed by tapping them off each end of the unit housing so be certain before snapping them onto the unit. The plastic end caps on the unit must be removed to slide the brackets off the unit for installing them on the wall. Just do one end at a time. Get the first bracket on the wall then trial fit the unit for level and distance to the second bracket. You will need help. Do not snap the unit to the bracket. Just hold it up there where it will be located. Mount the second bracket after any adjustments and then you are ready to snap the unit to the wall brackets. Make sure you have the correct bracket at the drop cord since it has a hole in it for the cord. The unit housing is aluminum and you snap it in place by catching the top lip first on each bracket then press on the front of the unit until the bottom legs of the brackets snap into place. Now you are ready to pull the metal arms out from the secure cloth strap and let each one hang down in their natural position. Adjust their width inside the Awning about 2" from each end. This way wind should not dislodge them from the Awning. After locating the arm lower brackets vertical position to the wall with masking tape you are ready to lower the Awnings cloth shade. You will need help. Remove the secure cloth strap and allow the shade to extend being sure to support its weight at the same time. Lowering the cloth shade now will help to line up and install the spring loaded lower arm brackets to the wall. You want the top of the arms to be at the front of the unit when the cloth shade is retracted. This is how you find the optimum location for the arm brackets. After the lower arm brackets are mounted onto the wall you can now open and retract the Awning. Now install the cord keeper bracket onto the wall. The keeper comes on the cord from the factory in the operating position. Remember this position or take a reference picture of it for later. The cord keeper and the wall bracket will have the cord fed thru them from the factory and this can present a little issue when you need to mount the bracket to the wall earlier during the install. It is easy to remove the cord keeper and set aside for later but be careful not to loose the little cogged wheel on the inside that actually holds the cord in place. It is a loose little item inside the keeper assembly. Now feed the cord back thru the wall bracket hole and slip the cord thru the keeper bracket then push the little cogged wheel back into place inside the bracket. You will need help. Gently pull on the cord in the proper direction while simultaneously pushing the wheel into place with a flat blade screw driver. Now you can install the cord keeper bracket onto the wall but first before you let go of the keeper tie a little knot at the end of the cord so the keeper does not slip right off and end up on the ground. Just let the cord hang and let the Awning shade down as far as it will go. Now find a location for the cord keeper bracket on the wall where it looks good and the cord is straight. There should be some cord still hanging out of the keeper to hold onto when adjusting the shade. Mount the cord keeper to the wall and your done with the install on a wood house. I had to replaced the supplied screws with self tapping cadmium plated outdoor grade wood screws and used the washers that were supplied. This way a drill can be used to drive the screws into the wood without having to drill pilot holes. This helps reduce install time onto wood and is still a very strong installation method. The basic ideal is to have the Awning where it will produce the best shade for your needs and look pleasing to the eye. This Awning fits the bill. Be sure to follow all the supplied instructions and be careful. Know where all your electrical wiring is located. Remember to wear safety glasses as a minimum. Always take breaks when working in the heat for fluid intake to keep hydrated. This Awning comes pretreated to resist rain water and should last for years to come. Remember to retract it during bad weather and cold conditions. I used mine to shade an Air Conditioner and it is working great. The inside temperature of the house dropped about 4 degrees since the AC is not having to cool itself first. This should extend the lifetime of the AC unit. I do recommend this product to all looking for an affordable way to create some needed shade. ... show more
Reviewed in the United States on September 2, 2013 by William C. Adams

  • Work great!
Color: Red
Keeps the sun out. House ten degrees cooler. Instructions are Bare minimum.
Reviewed in the United States on May 29, 2023 by Tom Hamblin

  • OK, poor instructions, here are some insights:
Color: Cream
The supplied mounting instruction in english, french, spanish, are not very clear and using metric measures. It says to mount the awning "at a height of 2.5m (98.4") only on a reinforced concrete wall or massive brickwork", but we only have 5/8" thick stucco, so I am hoping it is strong enough to hold the not too heavy awning. If I could have found studs in the wall, I could have placed the bracket centers 64" apart, assuming 16" stud spacing. Actually, I did hit wood with my masonry bit, so start with smallest one in case you only need the wood screw without the expansion plastic anchor. I did slice the plastic anchor off 1/2" and pounded it in the stucco wall when a stud was not in place. One person can easily install the awning once the holding brackets are in place. Measure and level carefully. The fabric is polyester. I mounted my unit so the bottom of the two hook/snap holding brackets was at 100 inches up. Used a 4ft level to mark across the stucco wall instead of measuring up from the patio, which was not level. I used the maximum distance between the centers of the holes of the two brackets = 69-1/4", no more. Not sure what the minimum between the brackets could be and support the awning properly. Overall length of awning shell is 71-1/4". Next, while keeping the awning tied up in the center, install the rope holder device as shown on this product page, not as shown in the instructions, as it must be able to grab the flat rope as it would go up. Beware the little brass grab gear inside this rope holder can fall out without the rope threaded through it. It was mounted about 26" below the awning bottom (instructions show 700mm = 27.5"). Looks like rope could be moved to opposite side if needed as there is a spool for it on both ends. The flat rope has to be moved in/out from the wall to get it to engage the grip or to let it loose. Finally, the center of the arms' hinges were mounted 28-1/2" (~3-5/16", btw holes, or 1-21/32" up/down from center mark). I placed the arms in about 2" from the ends of the awning fabric holder. I think a strong gusty wind could beat up the awning, so beware, it might be wise to pull it up in a windstorm or use a bungee cord to add some downward pressure to keep the awning from bouncing as much. The arms have a tension spring that gives some tension to the awning down to where the arms are perpendicular to the wall. After that, the awning would rely on its slight weight to pull itself down. Not sure why one would go further down with the awning than when the arms are perpendicular to the wall, but the awning length does allow to go another 45 degrees down. The awning at 90 degrees down sticks out 29", the awning length at this point is 37". Also, since I mounted the bottom of the holding brackets at 100", the bottom of the awning arms and awning is 72" at 90 degrees, with the wavy edge hanging down another 5". Check with camelcamelcamel before you buy as there is a lot of fluctuation within a few days. I am hoping that these awnings will keep some sun out of my windows and off the wall to limit heating of the house. Hoping the awnings will last 20 years, but the sun can be tough on fabrics. ... show more
Reviewed in the United States on May 3, 2020 by keplertwostars

Can't find a product?

Find it on Amazon first, then paste the link below.