Search  for anything...

FLSUN S1 3D Printer,1200mm/s Max High-Speed FDM 3D Printers, 350°C Direct Extruder with Real-time Intelligent Monitoring, Stable Delta Structure,Fully Auto Leveling, Works Right Out of Box

  • Based on 0 reviews
Condition: New
Checking for the best price...
$999.00 Why this price?

Buy Now, Pay Later


As low as / mo
  • – Up to 36-month term if approved
  • – No impact on credit
  • – Instant approval decision
  • – Secure and straightforward checkout

Ready to go? Add this product to your cart and select a plan during checkout.

Payment plans are offered through our trusted finance partners Klarna, Affirm, Afterpay, Apple Pay, and PayTomorrow. No-credit-needed leasing options through Acima may also be available at checkout.

Learn more about financing & leasing here.

Free shipping on this product

30-day refund/replacement

To qualify for a full refund, items must be returned in their original, unused condition. If an item is returned in a used, damaged, or materially different state, you may be granted a partial refund.

To initiate a return, please visit our Returns Center.

View our full returns policy here.


Availability: Only 8 left in stock, order soon!
Fulfilled by FLSUN Official US

Arrives Apr 1 – Apr 15
Order within 3 hours and 51 minutes
Available payment plans shown during checkout

Protection Plan Protect Your Purchase
Checking for protection plans...

Features

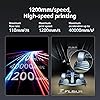
  • High-speed printing and high quality: The maximum speed can reach 1200mm/s, and the acceleration can reach 40000mm/s2. The Flsun S1 3D printer has an ultra-stable all-metal frame and a unique Delta structure to ensure smooth and stable printing, ensuring high-speed printing while ensuring printing quality.
  • High-temperature extruder & extremely fast cooling: The FLSUN S1 has a dual-gear direct-drive extruder and a titanium alloy core wheel, which ensures printing at a full-speed feed flow rate of 110mm3/s at temperatures up to 350C. The newly printed model is quickly cooled by the CPAP turbo fan, and the single-layer cooling time is 40000 rpm/min: 1s. The model hardens before any drawing and warping occurs.
  • Out of the box and easy to operate: The whole machine is delivered, and you can unbox and print within 10 minutes. FLSUN 2.0 advanced algorithm enables fully automatic one-button leveling. The Al camera on the side of the cavity monitors spaghetti failures, foreign objects, etc. It reminds you when an error occurs, and supports real-time monitoring and time-lapse shooting.
  • Intelligent monitoring and control: For the first time, a more precise control and monitoring module is added, using advanced Microtac radar control, WIFI real-time connection, visual operation interface, mobile phone and PC can realize intelligent adjustment and monitoring to ensure printing quality and accuracy
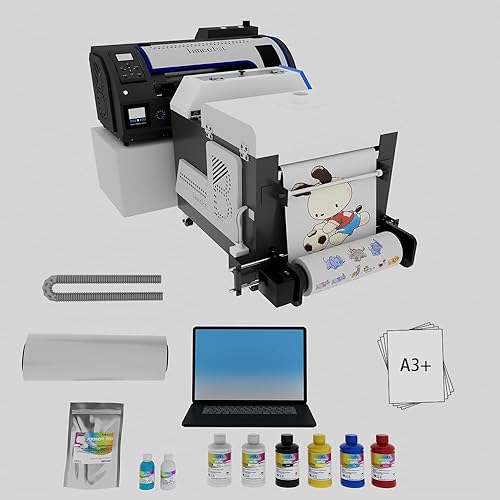
  • Large printing size & support for multiple materials: 13"x13"x17"in large build volume allows multiple models to be printed at the same time. Not limited by size, greatly improving printing efficiency. Supports a wide range of materials, including PLA, PETG, TPU, ABS, ASA, PA, PC, PET, etc., making it very suitable for diversified printing.

Brand: FLSUN


Material: Metal


Color: Black


Product Dimensions: 21.6"D x 40.5"W x 23.2"H


Item Weight: 112 Pounds


Product Dimensions: 21.7 x 40.6 x 23.5 inches


Item Weight: 112 pounds


Date First Available: March 14, 2025


Manufacturer: FLSUN


Frequently asked questions

If you place your order now, the estimated arrival date for this product is: Apr 1 – Apr 15

Yes, absolutely! You may return this product for a full refund within 30 days of receiving it.

To initiate a return, please visit our Returns Center.

View our full returns policy here.

  • Klarna Financing
  • Affirm Pay in 4
  • Affirm Financing
  • Afterpay Financing
  • PayTomorrow Financing
  • Financing through Apple Pay
Leasing options through Acima may also be available during checkout.

Learn more about financing & leasing here.

Top Amazon Reviews


  • Excellent quality 3D delta printer
First week review 4/13/2020, will update over time: Assembly was a breeze out of the box. Albeit, my extruder stepper motor was not factory installed which the manual does not talk about installation. In the bag of screws (not the bag of extras), take two of the tiny screws out and use those to mount the assembled titan-clone bowden extruder I made sure to inspect all of the screws that were installed by the factory. I checked the z-stops at the top of the printer and needed to tighten the screws. I made sure to tighten the screws holding the 3 sides of rods for the top and bottom. I also checked the screws holding the arms to the platform. The stepper motors holders in the bottom case also were checked. If not tight, these holders might warp over time. So it's definitely a good idea to check everything yourself that was factory assembled, to avoid potential problems over time. Turned on the printer, plugged the included usb cable into my printer with stock out of the box firmware and my raspberry pi 3 model b loaded with OctoPrint, it connected immediately no problem (YMMV, power off on again if not connecting, maybe reflash the firmware). I left the connection settings to AUTO. For reference, the serial port I see connected is /dev/ttyUSB0 with baudrate at 115200 and printer profile default. I autoleveled the bed using the included autolevel switch that is held to the hotend platform by a magnet, with all heaters turned off. Then I pressed the adjust Z=0 height button on screen and the platform lowered to the autolevel z_0 point. I got a plain piece of printer paper and slid it under the nozzle on the bed and adjusted the platform down until there was slight resistance sliding the paper back and forth. That's a good z=0 height, so I pressed save and the platform homed back to the top position. Within minutes I was printing my first benchy with the included 200g of (190c hotend, 60c bed) white filament. Note: Its fans are quiet The Flsun qq-s pro (this model, with the highly accurate autolevel *switch*) is by comparison is equivalent to my gaming pc fans running in quiet mode. Out of the box printer calibration is accurate to a few mm off, make sure the arms bearings are screwed tight, print a calibration cube to confirm for yours. Mine was 2mm off out of the box. There is a very active fb owners group with new firmware and an unofficial Marlin firmware and many models and useful knowledge faq guide in the files section. I did not need to flash any firmware, only needed firmware that was factory installed stock. There are many models for this printer on thingiverse (flsun qq, flsun qq-s, pro) and I printed some of them to improve the aesthetic of the printer design. Included are pictures of the outcome. I installed 8-diodes TL-smoothers and they improved my prints, no more salmon skin effect caused by the stepper motors drivers providing not smooth power to the stepper motors. This printer uses a4988 stepper motor drivers which are affected by this easily mitigated issue with 8-diodes TL-smoothers. These diodes prevent power going back to the drivers from the motor and redirects it back to the motor. Included are pictures of the TL-smoothers in place with the controller board. This panel was accessed on the bottom of the printer. You will also find the power supply input voltage switch in here (115V or 220V). For US switch to 115V before turning on the printer. So far this is a fantastic addition to my collection of delta 3D printers. --- Update 4/24/2020 (week 2) The printer is still making fantastic prints. I cleaned the bed with isopropyl alcohol to clean off any fingerprints and debris that led to poor filament adhesion after a week of use. This restored great adhesion to the bed like new again. I am using Cura 4.5.0 with the OctoPrint plugin to generate gcode procedures from models and send the job to OctoPrint. I calibrated my extruder's e-steps per mm. The initial factory stock value for my extruder steps per mm was 367 according to M205 output. I marked the position of the filament 50mm from the stepper motor top and compared after it was done. For me, I overridden the value to the standard 415 steps per mm because when I told the printer to extrude 50mm it only extruded 45mm and the calculation from the faq guide adapted to my numbers was 367*50/44=417, this could be different for your printer. As for Cura 4.5.0 settings that worked best for my printer 0.4 nozzle with amazonbasics pla 1.75mm filament: initial layer height: 0.3 outer before inner walls: yes compensate wall overlaps: yes z seam alignment: sharpest corner seam corner preference: hide seam or smart hiding infill before walls: yes printing temperature (hotend): 225 ; hot for pla, yet amazonbasics pla is stubborn to melt in my environment; 230 for petg ; ymmv build plate temperature (bed): 70 ; hot for pla, yet this pla would not stick at 60 and somewhat stick at 65; 90 for petg ; ymmv flow: 100 ; this is after I calibrated my e-stops steps per mm initial layer flow: 100 ; this is after I calibrated my e-stops steps per mm print speed: 250 ; this is the max I use for ok draft quality, I make it go slower if I want more quality, ymmv, I keep it at 150 for good draft quality and less than 100 for even better quality with pla, make this slow for petg wall speed: auto calculated ; sometimes I set it slower if I want more quality initial layer speed 50 ; I slow this down if I see bad bed adhesion, or I stop the job and clean the bed thoroughly equalize filament flow: yes enable acceleration control: yes (update: on Marlin I disabled this) print acceleration: 3000 enable jerk control: yes (update: on Marlin I disabled this) print jerk: 40 enable retraction: yes ; ymmv, could be less stringing in prints retraction distance: 7.5 ; ymmv (update: worked for my pla) retraction speed: 70 ; ymmv (update: worked for my pla, for petg definitely slow this down to around 25) combing mode: not in skin retract before outer wall: yes avoid printed parts when traveling: yes avoid supports when traveling: yes z-hop when retracted: yes ; ymmv (update: may cause bumps on print, then set no) fan speed: 100% (I printed better air baffles and now I use 30% for pla and off for petg) minimum layer time: 2 lift head: yes build plate adhesion type: none ; (sometimes I use skirt or brim, I look at model height, definitely brim for petg) As for the start gcode, I used a post on the fb group that makes the platform go to the bed edge of the logo, extrude 30mm to clear the extruder making a mound, hop up, move to the left, and tap the plate to cut off the string. Then it continues with the rest of the job. It's pretty cool start gcode to watch in person. Experimental settings ymmv: infill travel optimization: yes enable coasting: yes ; ymmv (update: I set this to no for better quality) enable bridge settings: yes use adaptive layers: yes ; I set no when I want a faster print and quality does not matter, it has made beautiful prints for me when there are curves over z-height in a model (update: I don't use this with Marlin) So far, printing with this 3D printer is still a joy and I'm happy there were no problems after two weeks of heavy use. --- Update 7/21/2020 (month 3) Flashed open source Marlin firmware over the stock firmware on the board to gain linear advance pressure control, much improved advanced unified bed leveling for much better bed adhesion, and bed correction via the fade height feature. I also noticed several prints had wavy outer walls due to the infill pattern showing through the walls. I increased the wall thickness to have smooth walls on prints. I re-lubed the smooth rods the pulleys assemblies slide up / down through with dry lube PTFE spray and that stopped the noise from the rods I added a Wyze camera (flashed wifi disabled usb-a only firmware) rotated 90 degrees to view the whole print area of the machine and created a design mount to print that's published on Thingiverse. Wear: Hundreds of prints later, the nozzle has degraded in print quality due to wear and soon I will replace it with the spare whole hot-end assembly that came in the box with the printer. When the spare wears out I will upgrade to a full E3D V6 hot-end assembly. I am going to upgrade the bowden PTFE tube to a creality capricorn tube for its heat resistance at higher extruder temperatures to prevent PTFE carbonization/fumes exposure. So far, this is still a great printer and it is aging with normal wear from so much use. ... show more
Reviewed in the United States on April 18, 2020 by Mark

  • Plug n Play
The media could not be loaded. Edit: 5 days later... bought another one for my wife!!! We love this machine! Original review: I'm a complete newbie. Never had one of these things before and I'm not sponsored by anyone. I'm reviewing the FLSUN Super Racer filament printer. It takes about 1hr to assemble it. The manufacturer sends a very nice tool kit and an instruction manual with clear color photos and written instructions in plain English that mostly make sense. The auto leveling feature works flawlessly. It's a painless 5 minutes process to level the bed and then calibrate the Z axis to print. One feature that really impressed me was the ability to adjust the Z axis ON THE FLY ... while it's printing. This allows you to monitor the print as it's laid down and adjust the head up or down 0.05mm at a time for extreme precision. Being able to adjust the head on the fly makes it really easy to dial it in and get nice smooth, flat prints without a bunch of those unsightly lines so common with FDM machines. Changing the filament is super easy. Just preheat the head to 200c and run the z axis all the way down to within a few inches off the bed. That straightens the feed tube and makes installing the new filament a smooth process. Go to the EXCHANGE screen under TOOLS, and press the OUT button to take the filament out. Set up your new spool and feed it into the machine. Press the IN button and watch your filament go down the tube and into the head (which should be hot 200c). Extrude a few coils to get the color cleaned and you're done. Back out of the EXCHANGE menu and hit the HOME button to bring the Z back up to the top. Start printing! I've had this thing 3 days and I'm printing an rc airplane wing!!! It comes with a small 250g roll of white PLA that works fine to get you set up and printing right away. I can't hear it in the next room, so the noise isn't obtrusive or obnoxious at all. I would definitely buy one of these again. There is good value for the money with this product. Check my tiktok page for videos: cessna337b ... show more
Reviewed in the United States on August 20, 2024 by Anonymous User Anonymous User

  • So far so good.....great printer..updated
Ok well.....to start I can say that it was packed like sardines in a can. Definitely no way it was going to get any shipping damage. Next...was a ez job to put together being that I have lots of 3d printer background. If I was a new guy to printing I would have been lost. All 3 belts were twisted and I had to remove and redo them. Being of sound mind and a full adult male.....I did not watch the video or look at the book, I'm sure that would have helped. Next...once together...about a hour due to twisted belts...it was ez to level..set the z and load filament. The touch screen makes everything so ez to do. All adjustments are fast to make and ez to find. I'm 2 prints in and I have to say I am pleasantly surprised....runs very...and I mean VERY quiet..prints I did where on the card that came with it, the came out really good for me using the demo roll of filament. I have a big trade show end of August in Jersey so it will get lots of print time being it is faster then my other printers. I will follow-up in a few weeks on this is let you know how it weather's the storm..September 16 update. Printer is still running great. I did add 2209 drivers and led lights. Besides that it seems to be well worth the price so far. I have done about 25 lithophanes with it so far and it does a great job and faster then my other printers. ... show more
Reviewed in the United States on July 31, 2020 by Justin

Can't find a product?

Find it on Amazon first, then paste the link below.
Checking for best price...