Search  for anything...

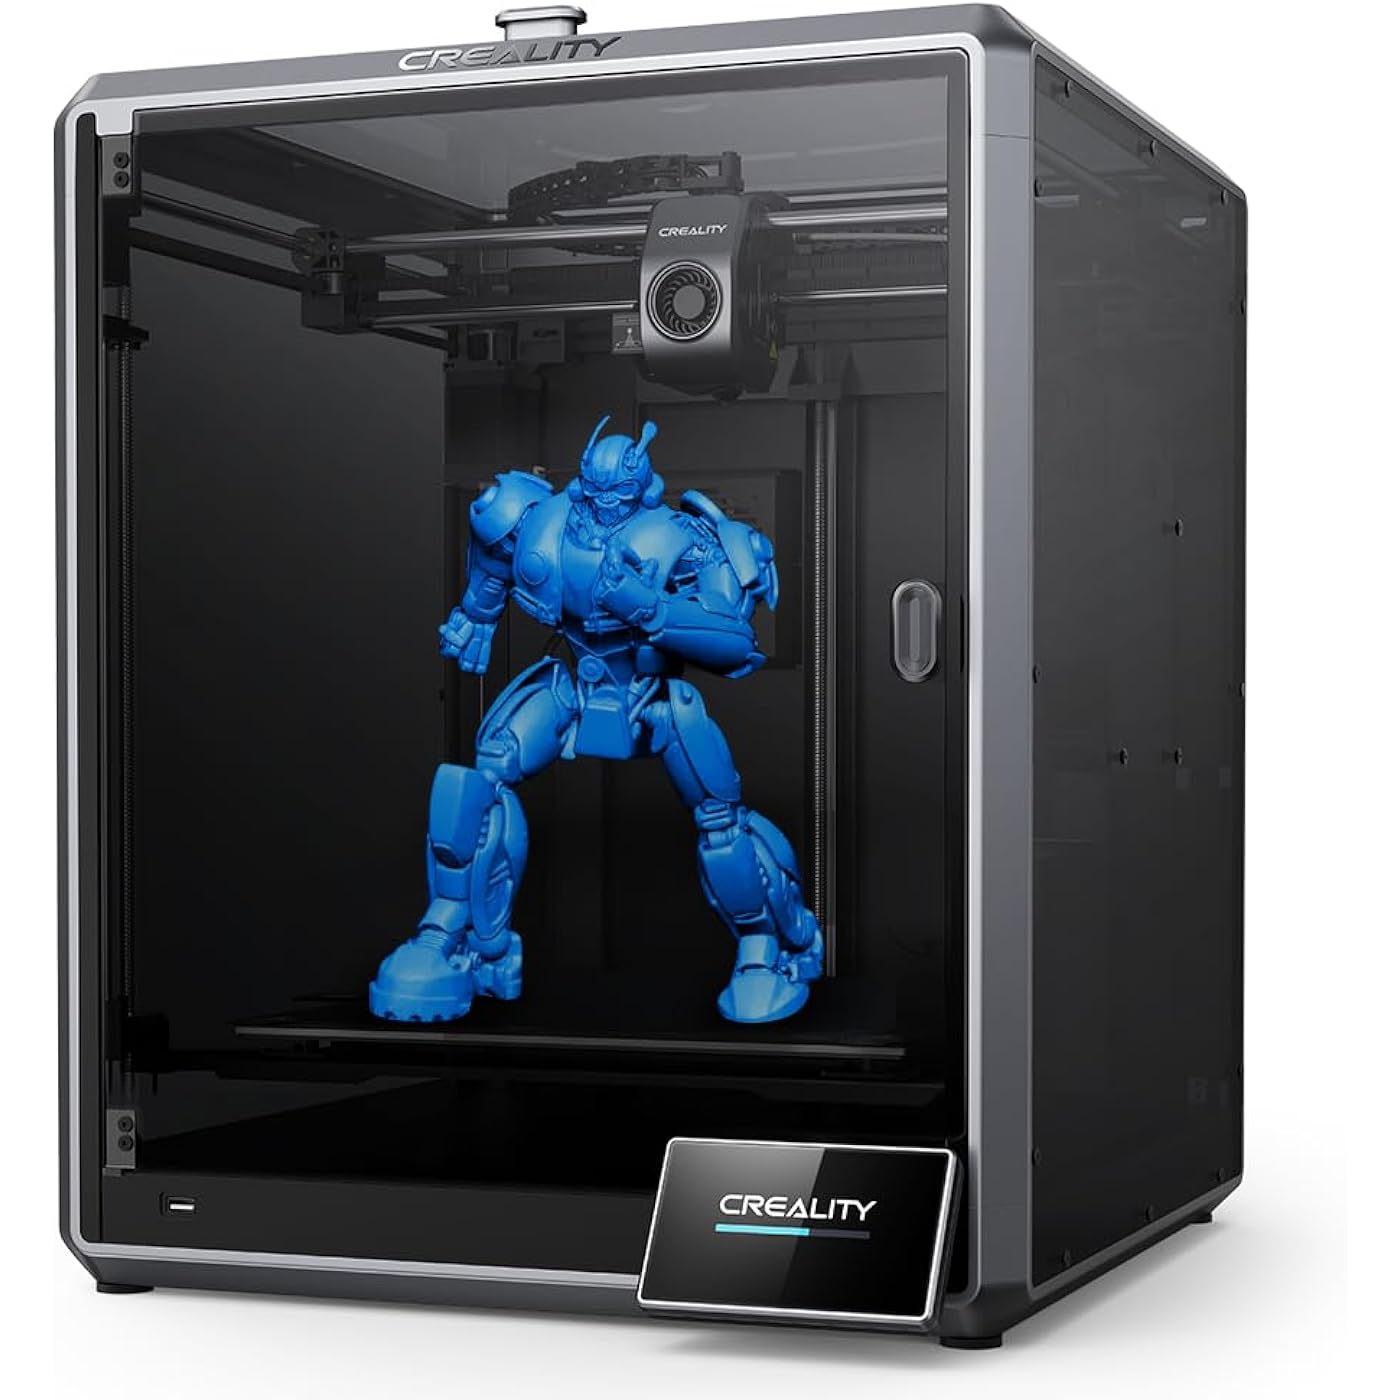
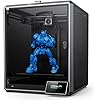
Creality K1 Max 3D Printer with Smart AI Function 600mm/s Printing Speed 20000mm/s² Acceleration, Core XY Structure 11.81x11.81x11.81 inch Large Build Volume Auto Leveling Dual-Gear Extruder

  • Based on 10,086 reviews
Condition: New
Checking for the best price...
$719.00 Why this price?
Save $135.00 was $854.00

Buy Now, Pay Later


As low as / mo
  • – Up to 36-month term if approved
  • – No impact on credit to apply
  • – Instant approval decision
  • – Secure and straightforward checkout

Ready to go? Add this product to your cart and select a plan during checkout.

Payment plans are offered through our trusted finance partners Klarna, Affirm, Afterpay, Apple Pay, and PayTomorrow. No-credit-needed leasing options through Acima may also be available at checkout.

Learn more about financing & leasing here.

Selected Option

Free shipping on this product

30-day refund / replacement

To qualify for a full refund, items must be returned in their original, unused condition. If an item is returned in a used, damaged, or materially different state, you may be granted a partial refund.

To initiate a return, please visit our Returns Center.

View our full returns policy here.


Availability: In Stock.
Fulfilled by Amazon

Arrives Wednesday, Apr 29
Order within 5 hours and 45 minutes
Available payment plans shown during checkout

Protection Plan Protect Your Purchase
Checking for protection plans...

Set name: K1Max


Features

  • Smart AI Function: Creality K1 Max equips 1 Micrometer Resolution AI Lidar, which scans the first layer, if there is any problem, it will stop the printing job giving you quality models. Observant AI Camera can recognize spaghetti failure, foreign matter, debris, etc. and support real-time monitoring and time-lapse filming
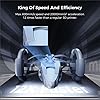
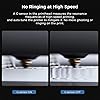
  • 12 Faster and More Efficient: Creality K1 Max 3d printer, equips printing speed 600 millimeter per second and acceleration 20000 millimeters per square second, it is12 times faster than the other normal 3d printer. Give good printing experience to customers and get a good model in short time
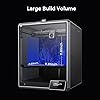
  • Size-efficient with Max Capacity: K1 Max offers a 11.81x11.81x11.81 inch large build volume, which meets more requirement of larger printing model, or you can get a print farm on this printer
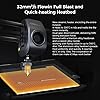
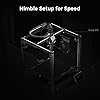
  • Dual Hands-free Auto Leveling: Creality K1 Max 3d printer, its strain sensors in the heatbed for more precise auto leveling without any operation or attention
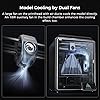
  • More Efficient Function: Core XY Structure of K1 Max makes the printing more stable. Prompt model cooling by a fan on the printhead with directional air ducts and also an auxiliary fan in the build chamber.

Brand: Comgrow


Material: Glass and Metal


Color: K1Max


Product Dimensions: 17.12"D x 18.18"W x 20.7"H


Item Weight: 39.7 Pounds


Product Dimensions: 17.12 x 18.18 x 20.7 inches


Item Weight: 39.7 pounds


Item model number: K1 Max


Date First Available: August 31, 2023


Manufacturer: Creality 3D


Frequently asked questions

If you place your order now, the estimated arrival date for this product is: Wednesday, Apr 29

Yes, absolutely! You may return this product for a full refund within 30 days of receiving it.

To initiate a return, please visit our Returns Center.

View our full returns policy here.

  • Klarna Financing
  • Affirm Pay in 4
  • Affirm Financing
  • Afterpay Financing
  • PayTomorrow Financing
  • Financing through Apple Pay
Leasing options through Acima may also be available during checkout.

Learn more about financing & leasing here.

Top Amazon Reviews


  • Ender 3 Pro is both Professional with a few upgrades and Beginner as is NICE
I was really surprised at what this printer can do. I have 5 of them now and use them for production parts in my valve and machine. I even print sprockets using a chain drive and PC carbon fiber PETG carbon fiber. I have upgraded all of them a bit. All have direct drive extruder and the all metal hot ends, as I print at 248C and the Teflon tube cannot take that temperature very long and will cause a blockage in the hot end. The hottest I have had to print so far is 255 and it works great. You can buy a cheap “heat break” that makes the Creality hot end “all metal”. Three have the dual Z axis kit on them, and the other two still single and print fine. But the single Z's need leveling more often. I put all aluminum extruders on and have no issues with feed. I have never had to adjust the E steps, nor have I upgraded the firmware, as they all work and print parts within .02 mm. The only issue I had was three of them had .4 mm nozzles were not .4 mm, from the factory, and that caused some funny prints with the walls separating. I used a digital caliper and measure the filament coming out of the nozzles at under .3 mm. Now with every nozzle install I run some filament out and see if it, shows 0.4 exactly on all the replacements. All the walls print strong now. I think that Creality got some .3 mm nozzles with .4 marking. To get perfect prints requires some testing and working on the printers. I print almost exclusively PETG and many different brands depending on he price. I noticed that some I bought direct from China were “wet” and so I bought dryers. All the PETG I dry before using and get no “blistering” where the moisture expands under heat. I just don't have time to keep reprinting because of moisture. I also print some TPU and at on time printed over 500 of these “rubber” grommets that our supplier stopped making during the COVID shortages. The main thing is to assemble it correctly so that the X bar is level and the wheels (with the pom tires) can actually spin with some friction. You can measure with a metric tape or rule and get it within .5 mm. I actually drilled a 5 mm hole in the vertical to be able to get the X axis perfect. The hole allows the Allen wrench to loosen the X cross member so you can level it without having to keep removing and adjusting the whole X axis bar. The verticals need to be square to the base and they are very close. On two I put the triangle rods to get it perfect. I used a machinist square to get it perfect. Smooth is the keyword. You don't want any "jump" from the Z axis (rising axis). Parallel and 90 deg to the bottom frames. After about 6 months I installed the dual Z axis and that was simple enough. This one change made it so I can print the same part over and over up to 100 times without having to tram the bed. Also called leveling. `After some time I learned that he Z limit switch will get out of calibration and that spraying it with canned air removes the dirt or whatever is changing the stop point. I think an LED version would be better. On the beds, every one of them has had loose axles on the wheels. The 5 mm screws with 8 mm nuts needed to be tightened. To do this you need to loosen the offset wheels so you can get them vertically stable. There should be absolutely NO wobble in the bed. If you feel any, stop and tighten the rollers. I have had to replace three rollers where the bearings were bad and the wheels wiggled on the shafts. Always adjust the cam 10mm so the wheels can move with slight friction. Over tight causes problems and too loose is also bad. Just so they spin with friction. No wobble side to side or when you lift the corners of the bed. Every screw on the printer needs to be checked for tightness. EVERY screw. Loose screws are a nightmare. Even on my $1000 big printers, all of them needed to have the screws tightened, even the screws under the bed. No wobble and you will have “happy printing”. I have not put the auto bed leveling on as it actually takes longer to print with it (on my other printers). I use only glass on the beds (I scrapped off the magnetic sheet and cleaned with alcohol) and still use the doubled standard printer paper to set the level. I just got “good” at it. Then when the print starts sometimes, but rarely, I will tweak the adjustments. I usually print a skirt with three lines so I can “feel” the thickness of the first layer. I did put the stronger bed springs on also, this gives more stability. I use the Ultimaker Cura (updated)and it has more adjustments than most beginners can use. But as you learn you can make slight adjustments and try them out and see things improve. One of the good things is this printer is so popular you can find lots of YouTube videos to help you. And parts can be found on Aliexpress for the same parts way less. The all come from China, anyway. I have five of these Ender 3 Pro's now, bought two from Comgrow Amazon, came with the glass bed plates. I print almost exclusively PETG at 248c Nozzle and 85C bed temp, (this makes for very good layer welding) and bought the Creality glass plates and the Bed Weld, water based adhesive so the PETG will let go. The higher temp is to insure both a good layer weld and that the cooling will cause the parts to just come of very easy. Once printed they just come off very easy. If I dry the filament I get almost NO stringing. I can't stress how important dry filament is for nice prints. The metal flex plates and the ones that come with the printers magnetic plastic do not work with PETG at all. They are ruined after two prints. Glass is the best with the Layerneer Bed Weld and I have no problems with adhesion and removal. Just have to wait for cooling. The prints come off as if nothing was holding them when it cools. The parts in the photo are actually functional parts that we can't get from a supplier.. So, naturally I made a CAD drawing and made them. The trick with functional parts is to make the plastic about 1/3 thicker than on injection molded, because of the tiny gaps caused by the space between the "lines" of print. It is not 100% solid even if it looks like it is. And most of my prints use 100% infill because hey are parts getting some heavy use. Overall, it is a good choice and a workhorse printer. For the money it still can't be beaten, That is why the 5 stars. But for those who are “technically challenged”, you may get frustrated with the learning curve. After a few hundred prints you will be a pro. Watch the videos as there are tons of them. There may be equally good or better printers for the price, but the availability of parts, upgrade parts and help resources for these printers is amazing. ... show more
Reviewed in the United States on September 1, 2021 by James Arjuna Sr

  • An awesome machine with great potential
(Attached are unboxing, partial assembly, and print quality pics) After much research and many YouTube videos over the past two years, I've finally decided to get into 3D printing by purchasing an Ender 3 Pro. And yes, while you can find it a little cheaper from other sellers, Comgrow had the best ratings and reviews on their Ender 3 Pro, so I felt spending a little more was a fair tradeoff in getting one from a trustworthy source. Do your research, watch assembly videos multiple times, watch them again, watch more videos on good and bad results, then put this together. I'm a tinkerer who doesn't back down from a DIY or self fix, but opening the box and seeing all the loose parts (mostly fasteners) even with the machine shipping partially assembled was still intimidating. I took my time and over the course of two hours made sure I had this machine assembled properly. Some people say they can assemble an Ender 3 in 40 mins. Hah, sure, if they've assembled one before. Take your time, lay out the parts packets, and only open them as needed while assembling, or you will end up hopelessly confused. Common Lego assembly rules apply. * edit* And DO NOT FORGET, those of you living in North America, to switch the red slider on the power supply from 240V to 120V (it comes 240 out of the box). If you don't do this: machine won't turn on (me, oops); machine turns on but takes forever to heat up; blown circuits constantly; hate, fear, suffering, and the Dark Side ruling your life. This is so easy to miss or forget to change, or even not know about.*edit* Out of the box, I installed an all metal extruder and Capricorn tube upgrades. I had also installed a spring upgrade for the bed, but failed to check the length of the "upgrade" bed springs, which I later found were way too long after trying to fix a bed leveling issue after a catastrophic failure mid print threw the bed way out of level. I've determined the too-long springs were the culprit after having gotten proper-length upgrade springs and getting consistent bed leveling results. I would definitely get the yellow "upgraded" springs as the stock springs are just way too soft/mushy in my opinion and will result in bed leveling issues on their own. As far as a glass bed upgrade out of the box, I advise using the stock magnetic bed for your first few prints, then get an upgraded glass bed to see the difference in results. It can go either way, both have their pros and cons. Using this machine is certainly a learning process, and _do not_ expect to get a perfect print on your first try; you might get lucky or you may have bed adhesion issues. There can be alot of trial and error, and endless calibration, before you start to see consistent results. And then WHAM, you get an unexpected failure and have to figure out how/why. Print failures _will_ happen for various reasons. Sometimes it's as simple as bad filament (read reviews!), sometimes it's a bed leveling issue or a temperature issue. This is part of the learning process with FDM printers, even the expensive ones. That said, at 0.2mm layer height and 200°C/50°C with PLA I have been getting excellent print quality more often than I've gotten failures (all failures due to bad bed adhesion). The key is getting a good first layer and bed adhesion. If either of those fail, your print is doomed. These all lead back to getting the bed level with the extruder nozzle and finding the sweet spot for nozzle/bed temperature combination, and different brands of PLA have their own/different sweet spots, hence you see 3D printer users pick a brand and stay with it. I recommend Comgrow PLA, I've had consistent results in print quality, bed adhesion issues not withstanding (remember, bed adhesion issues usually stem from an unlevel bed). So far, I'm absolutely loving this machine. Keep the above in mind, and don't get in a hurry--good quality prints, even of tiny objects, can take hours or days to complete. Have patience, and check that your bed is level at least every other print and you'll be fine. ... show more
Reviewed in the United States on November 16, 2019 by Anthony M.

  • Great printer
Set name: K1Max
I've had this about bit less than a year now, and it's my first 3D printer. It was pretty much ready to go and was a very easy first printer. It prints well, and has a large volume. I've tried various filaments and it has handled all of them (except one cheap PLA from "e-sun" but that's due to the poor quality filament). I did root it to use Orca and print wirelessly, but Creality software has gotten a bit better and you probably wouldn't even need to root anymore. Orca does have more options though. The creality app and cloud stuff is useless. If I did it all over again, I might look at the offerings from elegoo which are cheaper, but this is still a great deal IMO. I've put about 10 problem-free spools through it. I'm not into figurines and stuff, I mostly print tools or adapters for things around the house. I think if you want to do figurines you'd want a resin printer. ... show more
Reviewed in the United States on January 1, 2026 by Derek Zoolander

Can't find a product?

Find it on Amazon first, then paste the link below.
Checking for best price...