Search  for anything...
F2C

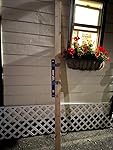
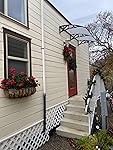
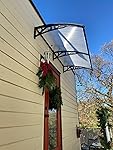
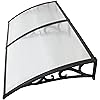
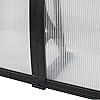
F2C 40"x 80" DIY Outdoor Polycarbonate Front Door Window Awning Patio Cover Canopy (Grey)

  • Based on 208 reviews
Condition: New
Checking for product changes

Buy Now, Pay Later


As low as $14.17 / mo
  • – 6-month term
  • – No impact on credit
  • – Instant approval decision
  • – Secure and straightforward checkout

Ready to go? Add this product to your cart and select a plan during checkout. Payment plans are offered through our trusted finance partners Klarna, PayTomorrow, Affirm, Apple Pay, and PayPal. No-credit-needed leasing options through Acima may also be available at checkout.

Learn more about financing & leasing here.

Selected Option

Free shipping on this product

This item is eligible for return within 30 days of receipt

To qualify for a full refund, items must be returned in their original, unused condition. If an item is returned in a used, damaged, or materially different state, you may be granted a partial refund.

To initiate a return, please visit our Returns Center.

View our full returns policy here.


Availability: In Stock.
Fulfilled by F2C Direct

Arrives Friday, May 24
Order within 23 hours and 52 minutes
Available payment plans shown during checkout

Color: Gray


Features

  • Specifically designed to resist weathering and rusting
  • Includes all assembly accessories
  • Install multiple awnings for wider coverage
  • Do-it-yourself awning kit, easily operation
  • Awning dimensions: 200*100cm;5mm Polycarbonate awning cover

Material: Polycarbonate


Color: Gray


Brand: F2C


Fabric Type: polyester blend


Assembly Required: Yes


Operation Mode: Found in image, Manual


Manufacturer: F2C


Is Discontinued By Manufacturer: No


Frequently asked questions

If you place your order now, the estimated arrival date for this product is: Friday, May 24

Yes, absolutely! You may return this product for a full refund within 30 days of receiving it.

To initiate a return, please visit our Returns Center.

View our full returns policy here.

  • Klarna Financing
  • Affirm Pay in 4
  • Affirm Financing
  • PayTomorrow Financing
  • Apple Pay Later
Leasing options through Acima may also be available during checkout.

Learn more about financing & leasing here.

Top Amazon Reviews


  • Very sturdy and beautiful
Color: Gray
2 month follow up: We had the worst wind in the mountains and even though my tiny house was shaking like crazy from the wind, there was no shaking in my awning! It is still up like new and is bringing me a lot of happiness and protection from rain! Amazing awning for my Tiny House and installed it myself. Things you will need To buy for this project to do it by yourself: -6 3” or 4” inch wood screws -6 large flashes for your screws -8ft 1x4 piece of wood -long level (for more accuracy) -painters caulk or paintable silicone -tape to tape the level -wood drill bits to match your screws The bolts that come with the awning are for cement or rock siding and will not work if you have a regular wood/vinyl siding, so don’t even bother with them and get yourself 6 3” or 4” wood screws with a flash, because the hole on the awning attachment is somewhat large and your screw will go through. 1. I pre-drilled the wood and made sure the holes fit perfectly while the awning was still on the ground. Made sure to measure the holes in the same distance on the wood. 2. Taped a long level on the top of my wood, so my holes are level while I’m drilling into my siding. I did the first side hole, then put a screw in and worked on the other two holes while I had the anchor from my first screw holding the wood in place. After the top holes are made unscrew the wood and tape a towel on one side of the wood so some can give you some support while you are trying to screw the awning in. Had my 10 yo daughter give me some support with an 8 foot wood while I was screwing the last screw. 3. Prefill the holes with the caulk and put the caulk on the shaft of your screws one at a time to prevent wood rottening in the future. Just wipe off the excess after the screw is in. 4. Instal the part of the awning with two sides first, because it’s easier to instal a one sided part after the two sided is already on. Don’t tighten the top screws hard , because you will need to adjust the bottom holes using a level and it’s hard to do if you tightened it too hard. 5. After the awning is on adjust the bottom holes using the level vertically, and drill your holes starting from middle. Make sure your awning is put tightly and doesn’t come apart, mine came apart in the middle and I had to readjust using the bottom holes. 6. Apply a line of caulk between the awning and siding to prevent water from sipping in. There is like 1/16 of a gap between awning and the siding. The rain and high wind literally started right after I installed this awning. I was worried it would fall apart as some other reviewers said their fell apart. It’s been 3 weeks and it is on and doesn’t even shake when it’s windy. I love it. P.S. I also attached a 1” foil tape to the middle part of the awning. I read some reviews that the bugs are able to crawl in and it doesn’t look good. So I bought a 2” foil tape and cut in in half and covered all the sides to prevent bugs from coming in. I hope you enjoy your project! ... show more
Reviewed in the United States on December 16, 2019 by Liliya Georgiyeva

  • It snapped off due to overnight snow accumulation
Color: Yellow
It lasted about 3 years, but the Chicago winter broke it. Due to the weight of the snow the plastic support snapped (the poly panels were ok). Before that, the plastic edge was dislodged by the wind so I used some fasteners to keep it in place. Not a lasting solution for locations that get a fair amount of snow and it needs some improvements. ... show more
Reviewed in the United States on June 9, 2022 by Lucian Perianu

  • I'm hanging these up right now. Once I inserted ...
I'm hanging these up right now. Once I inserted the wall metal retainer that will fit against the wall FULLY into the bracket (until the cut-out edge butts into the bracket) I took a center-to-center measurement on the mounting holes and got a 38-inch measure. The metal nose pieces that fit out at the end of the overhang were not cut to the same length as the piece I just referred to as the wall metal retainer. These appear to be designed to float in the brackets with a gap between their ends and the bracket. One problem that stalled me up for a few minutes was that I assumed the corrugations on the plastic (polycarbonate) cover ran parallel to the wall. They don't. They run perpendicular to the wall. Now that I know how far apart the brackets need to be, I can certainly drill the holes by myself. I will need an extra set of hands to put these up, because the polycarbonate cover is tricky to bend in shape to fit the arched brackets - and you definitely need someone to hold it in place while you put the second bracket up, bend the plastic and fit the nose pieces. I hope this thing holds up to wind and that snow slides off it readily. ... show more
Reviewed in the United States on May 21, 2017 by Amazon Customer

  • Great seller and great price
Color: Gray
I suggest you put the awning together and then lift the whole thing in place lining up with the anchor bolts…
Reviewed in the United States on January 12, 2022 by Amazon Customer

  • Perfect for my needs in mild climate
I put this over a set of French doors on the side of the house that seemed to leak a bit when it rained. Problem solved. It resembles the pretty glass-and-metal ones you see on European homes. I love the crazy good price and the fact that it is so lightweight and simple to install. Having said that, I'm in a climate that seldom sees rain, so I don't know how it would be in torrential weather or if it got loaded with snow. And it's on a side of the house that's not really viewed from anywhere else. I say that because it's clearly plastic, so I probably wouldn't show it off on a more visible door. But it serves its purpose beautifully for my needs. ... show more
Reviewed in the United States on August 2, 2018 by SM

  • how to install on facia board
pros: sturdy, good looking, and easy enough assembly if you are "handy" cons: very poor instructions. how to install details: The included instructions are worthless regarding how to attach this awning to anything. I installed on a 3/4" cedar facia board. Used 3/8 zinc bolts, washers and T-Nuts from home depot. When installing multiple the easiest way is to install 1 panel (2 beams) then mark a stick with the distance between beams and then mark the location. After marking the location, use a square to mark a vertical level line then hold up a beam and mark the drill holls. Drill pilot holes, then drill oversized holes, just big enough for the t-nut to snugly grip. will take about 20 minutes each additional panel. ... show more
Reviewed in the United States on March 6, 2018 by A

  • The one thing that would be helpful is to know ...
The one thing that would be helpful is to know the center to center dimension between brackets prior to installing. The only way you know is to do a pre-assembly on the "floor/ ground and than measure the spacing, if you are one person, you must disassemble the unit and re-erect the unit after mounting the bracket(s)/ pre-drilling/ installing mounting bolts. You can not use one as a common spacing, they all end up being different. ... show more
Reviewed in the United States on September 21, 2016 by Clyde J.

  • Not too bad for the price
Color: Gray
Item show up with some scratches on some of the parts. Probably and most likely the delivery person hates his/her job and don’t care if the packages get damaged. And the manufacturer should make it more sturdy by adding more ways or a better way of screwing the parts together.
Reviewed in the United States on January 23, 2020 by Amazon Customer

Can't find a product?

Find it on Amazon first, then paste the link below.