Search  for anything...

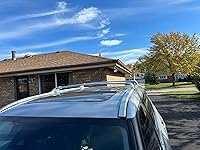
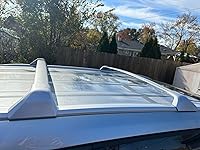
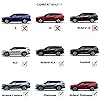
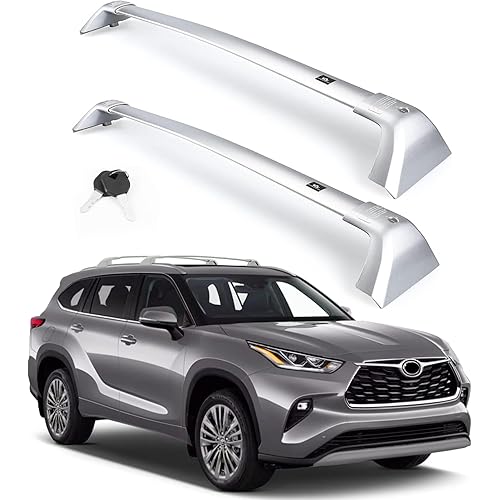
Snailfly Silver Cross Bars Roof Racks Fit for 2020-2024 Toyota Highlander XLE XSE Limited Platinum (Models with Side Rails)

  • Based on 133 reviews
Condition: New
Checking for product changes

Buy Now, Pay Later


As low as $16.50 / mo
  • – 6-month term
  • – No impact on credit
  • – Instant approval decision
  • – Secure and straightforward checkout

Ready to go? Add this product to your cart and select a plan during checkout. Payment plans are offered through our trusted finance partners Klarna, PayTomorrow, Affirm, Apple Pay, and PayPal. No-credit-needed leasing options through Acima may also be available at checkout.

Learn more about financing & leasing here.

Free shipping on this product

This item is eligible for return within 30 days of receipt

To qualify for a full refund, items must be returned in their original, unused condition. If an item is returned in a used, damaged, or materially different state, you may be granted a partial refund.

To initiate a return, please visit our Returns Center.

View our full returns policy here.


Availability: In Stock.
Fulfilled by Amazon

Arrives Friday, May 17
Order within 6 hours and 9 minutes
Available payment plans shown during checkout

Features

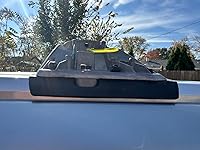
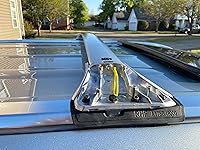
  • Rooftop Crossbars Fit for 2020 2021 2022 2023 2024 Toyota Highlander XLE, Limited, Platinum, XSE. ONLY FOR MODELS WITH SIDE RAILS (NOTE: NOT for Highlander L , LE and Hybrid LE)
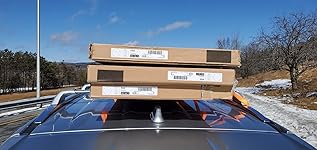
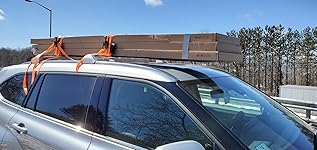
  • Maximum 154lbs loading capacity when distribute the weight of the cargo evenly. Perfect and durable for all kinds of luggage carrier, bikes, kayaks, snowboards, and etc
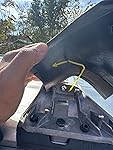
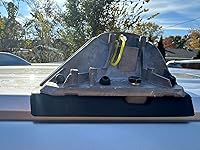
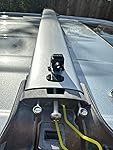
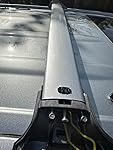
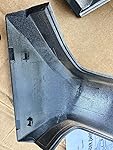
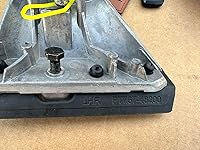
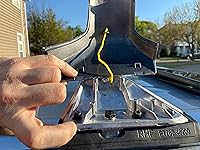
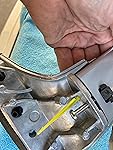
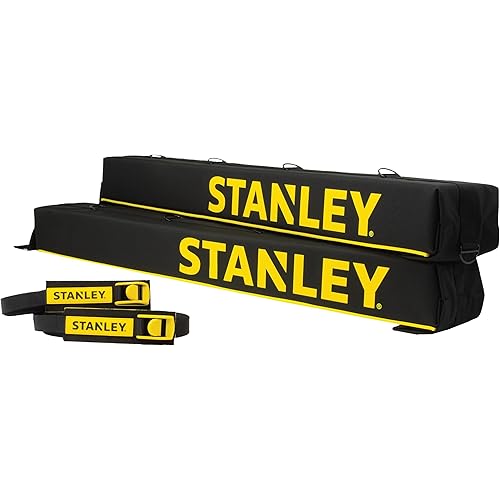
  • Package comes with 2 silver powder-coat finish cross bars, 4 endcaps and fitting hardware. Rubber underneath the endcap provides protection and buffering against the car roof.
  • Built to last aluminum alloy construction with wind tunnel tested teardrop shape design, quiet and exceptionally aerodynamic.
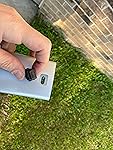
  • Super easy installation, The FRONT Crossbar is LONGER than the Rear. No drilling or cutting required. Installation instructions available.

Color: Silver


Brand: Snailfly


Is Foldable: No


Load Capacity: 165 Pounds


Mounting Type: Crossbar Mount,Rails,Roof Mount


Manufacturer: ‎Snailfly


Brand: ‎Snailfly


Item Weight: ‎9.58 pounds


Package Dimensions: ‎41.5 x 6.8 x 5.3 inches


Exterior: ‎Powder-coat


Manufacturer Part Number: ‎Snailfly 2020HLD0XU70CBS2


Date First Available: October 8, 2020


Frequently asked questions

If you place your order now, the estimated arrival date for this product is: Friday, May 17

Yes, absolutely! You may return this product for a full refund within 30 days of receiving it.

To initiate a return, please visit our Returns Center.

View our full returns policy here.

  • Klarna Financing
  • Affirm Pay in 4
  • Affirm Financing
  • PayTomorrow Financing
  • Apple Pay Later
Leasing options through Acima may also be available during checkout.

Learn more about financing & leasing here.

Top Amazon Reviews


  • Good quality, instructions suck .
I could easily give one star ⭐️ because of the unclear instructions but I am guys that likes to work and discover. I put as many pictures as I could to help you mount them .please be advised that the taller cross bar goes to the back not the front and each part go to a specific location ( RHF + LHF ) ( RHR + LHR) ... show more
Reviewed in the United States on November 5, 2023 by LAOUDJ Samir LAOUDJ Samir

  • Very sturdy, fits my Highlander Hybrid XLE perfectly
Despite other reviews to the contrary, this product fit my 2021 Highlander Hybrid XLE perfectly. The bars were the perfect length. I think those reviewers were trying to install the rear bar on the front, in which case it will definitely be too short. The bars are different lengths because the car gets narrower towards the rear. You have to put the shorter bar in the rear. I agree with other reviewers that the instructions are absolutely horrible. So, what I did was I took out all the pieces, laid them out, then worked out where each piece fits, like a puzzle. If you think about it in advance, it's not hard. But here are complete instructions in case you need them: 1. Remove the cover plates from the rails on the top of the car. 2. Remove the plastic covers from the four mount brackets that come with the product. 3. The mount brackets are identical, but two are mirror-images (for left and right side). Luckily, the mounting hole that the bolt goes into is off-center, so there's no way to put them on backwards. Start at the rear-left side of the car and install the first mount bracket. Use the BLACK bolt, and don't forget the washer! Tighten the bolt only half way for now. 4. Take the SHORTER of the two crossbars and slide it into the bracket you just installed. The crossbar is raised in the middle, don't put it on upside down! 5. Insert the black nut into the slot on the top of the crossbar, then thread the silver bolt into it from the end. Don't tighten all the way. 6. Find a right-side bracket and go to the back-right of the car and slide the other side of the crossbar into the end of the bracket. 7. Attach the bracket to the car with the black bolt and washer. 8. Insert the black nut into the slot on the top of the crossbar and thread the silver bolt into it. 9. Now you can tighten down the black bolts on both the left and right side so they are fully tight (don't overtighten). When tightening, ensure the brackets remain snug to the car and there are no gaps. 10. Fully tighten the silver bolts that hold the crossbars on the brackets. 11. Check everything is solid, tight and no wobbling. Check that there are no gaps between the brackets and the car (if so, you'll need to loosen everything and re-seat the bracket). 12. Install the plastic caps. FIRST, insert the yellow plastic retainer tie through the hole on the inside of the bracket (this keeps it from flying away if it gets loose). Next, starting at the end of the bracket where the crossbar attaches, slide the end of the plastic cap over the bottom of the bracket. Finally, push down firmly on the bottom part of the plastic cap close to the car. NOTE: if it seems loose or flimsy, you didn't push hard enough. You may also need to whack it with your palm. It should not be loose at all. Reviewers who said the caps seemed like they could fall off easily have not secured them fully. 13. Repeat for front bracket. ... show more
Reviewed in the United States on March 14, 2022 by Neal Gibson Neal Gibson

  • Crap instructions and unlabeled parts for very good rails
Let me start by saying that this appears to be a direct knockoff of the Toyota cross bars, either sold by or sourced from the original manufacturer. The instructions I got were crap, and the crossbars weren’t labeled, so I did a lot of reading to make sure I installed them correctly. Come to find out, the included 1-page instructions look like a grainy copy of the Toyota illustrations, with shorter instructions. The cross bars themselves are very solid, and well-made. I would buy them again, no problem! So, the good part is that they are very sturdy and well-made, and each support has the location molded into the metal base and rubber gasket (you’ll see LHR, which is left hand rear, RHF, which is right hand front, etc). The other good part is that the end of each cross piece has an internal support, and it will only go on one side. The bad news is, you have to get the black rubber cross bar inserts aligned with the top AND bottom holes (they should fit all the way flush against the cross bar, before you insert the torx screw through the support and tighten it). Also, you should leave these loose a few turns, so you can install the bases without having alignment issues with the main bolt. The biggest problem I had was that the cross bars weren’t labeled, so I wasn’t sure which one went in front. Let me save you some time and the risk of scratching your paint, trying to measure: the slightly shorter, flatter bar goes in back, while the slightly longer bar with more of a curve goes in front. In addition, the front supports slope up to the front bar, and the back supports slope away from the back bar. I suggest popping off the covers on the vehicle, pulling the covers off of all four supports (so you can read the labels), dropping in the rubber cross bar brackets, and assembling the four supports to the cross bars (leaving 2-3 turns of space, to move the supports for alignment. The rubber gaskets should protect the roof of your car, so line up the cross bar on one side and lower gently into place on the far side. Attach the four main bolts and lock washers, thread the yellow plastic tether through the hole in each cover, slide the cover from the bar out onto the support (making sure the cover lines up with the notches from and back), and pop the TWO extrusions into place in the notches in the supports. If you’re mechanically handy, this will take 15-ish minutes. If things don’t fit together correctly, make sure everything is lined up before proceeding. The only issues I had were the parts not lining up. If I could give partial stars, this would be a 4.25, because the rack is very solid, once assembled. The color isn’t a match for my silver hybrid Highlander, and the instructions are poor, and it’s worse when the parts aren’t labeled. I’m hoping these instructions help a few people, because these are good rack rails. ... show more
Reviewed in the United States on April 26, 2021 by Cypherpunk Cypherpunk

Can't find a product?

Find it on Amazon first, then paste the link below.