
Search  for anything...

RAD Sportz Bicycle Hoist 2-Pack Quality Garage Storage Bike Lift with 100 lb Capacity Even Works as Ladder Lift Premium Quality

  • Based on 14,041 reviews
Condition: New
Checking for the best price...
$27.21 Why this price?
Save $15.78 was $42.99

Buy Now, Pay Later


As low as $6 / mo
  • – 4-month term
  • – No impact on credit to apply
  • – Instant approval decision
  • – Secure and straightforward checkout

Ready to go? Add this product to your cart and select a plan during checkout.

Payment plans are offered through our trusted finance partners Klarna, Affirm, Afterpay, Zip, Apple Pay, and Google Pay. No-credit-needed leasing options through Acima may also be available at checkout.

Learn more about financing & leasing here.

Selected Option

Free shipping on this product

FREE 30-day refund/replacement

To qualify for a full refund, items must be returned in their original, unused condition. If an item is returned in a used, damaged, or materially different state, you may be granted a partial refund.

To initiate a return, please visit our Returns Center.

View our full returns policy here.


Availability: In Stock.
Fulfilled by Amazon

Arrives Wednesday, Oct 21
Order within 17 hours and 57 minutes
Available payment plans shown during checkout

Protection Plan Protect Your Purchase
Checking for protection plans...

Size: 2-Pack


Features

  • RUBBER COATED HOOKS - Hooks are designed with a protective rubber coating to protect your bike from scratches.
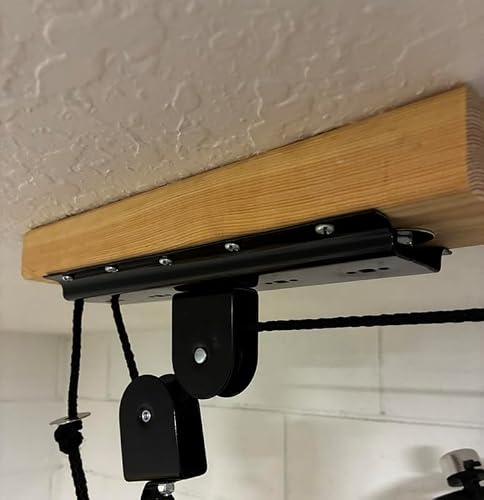
  • EASY TO INSTALL - Mount to your ceiling joist or rafter and so easy to use. With only the minimum of tools you can have your kayak hanging in your garage in no time.
  • ROBUST ENGINEERING - Allows you to lift heavy products, up to 100lb. Capacity. This is the bicycle hoist that all the other are trying to copy. We don't cut corners. This is the original RAD Bike hoist you've heard about.
  • INDOOR USE - For indoor ceilings up to 12 ft. high. Once the bike is out of the way you free up so much floor space you won't know what to do with it all.
  • SAFETY LOCKS - Safe locking mechanism prevents accidental release. No one wants to come home and find their bike has fallen to the floor.

Description

Easily store your bikes or even ladders overhead and out of the way with the Storage Hoists by Rad Cycle. Smooth pulleys and latches make lifting heavy items a snap, while the exclusive rope locking mechanism prevents unwanted release and can suspend up to 100-pounds. Please note, you can mount this item as pictured on a 2 X 4 and screw the 2 X 4 to the joist or mount it right to the joist itself. The ceiling storage hoists are ideal for creating storage in your garage or shed! SATISFACTION GUARANTEED: Rad Cycle is committed to providing the consumer with the absolute best price and value on our entire line of products, which we ensure by applying a rigorous quality control process. NOTE: This is an exclusive product of Rad Cycle and ONLY Lifting Hooks by Rad Cycle are GUARANTEED to be genuine IMPORTANT: Avoid buying counterfeit products and transacting with unauthorized sellers. Look for our logo on the packaging for every one of our products.

Material: Metallic-Fiber


Color: Black


Special Feature: Easy Lift and Secure Locking Mechanism


Shelf Type: Hanging Shelf


Number of Shelves: 2


Additional Features: Easy Lift and Secure Locking Mechanism


Shelf Type: Hanging Shelf


Number of Shelves: 2


Mounting Type: Ceiling Mount


Recommended Uses For Product: Bicycles, Ladders


Shelf Weight Capacity: 100 pounds


Indoor Outdoor Usage: Indoor


Material Type: Metallic-Fiber


Finish Types: Polished


Color: Black


Style Name: 2-pack


Item Weight: 1.82 kg


Included Components: Hoists


Brand Name: RAD Cycle Products


Manufacturer Warranty Description: 30 Day


UPC: 885333131429 885479572728 885425722108 885298275985 885337884369 885678239255 885839771716 885874929752 885274894926 885399539641 885181482650 885889988294 786372972083 885388250380 885909208241 885760804569 613103032023 885463625416 885265926780 885153980788 885196185935 885465508496


Global Trade Identification Number: 29


Number of Items: 2


Number of Packs: 2


Unit Count: 1 Count


Item Type Name: Bike Hoists – Overhead Pulley System with 100 lb Capacity for Bicycles or Ladders – Secure Garage Ceiling Storage by Rad Cycle (Set of 2)


Manufacturer: Trademark GLB


Model Number: 2004 RAD Bike Hoist 2 Pack


Manufacturer Part Number: 2004 RAD Bike Hoist 2 Pack


Frequently asked questions

If you place your order now, the estimated arrival date for this product is: Wednesday, Oct 21

Yes, absolutely! You may return this product for a full refund within 30 days of receiving it.

To initiate a return, please visit our Returns Center.

View our full returns policy here.

  • Klarna Financing
  • Affirm Pay in 4
  • Affirm Financing
  • Afterpay Financing
  • Zip Pay in 4
  • Financing through Apple Pay
  • Financing through Google Pay
Leasing options through Acima may also be available during checkout.

Learn more about financing & leasing here.

Top Amazon Reviews


  • Works great after some modifications
Size: 1-Pack
As some other reviews have noted, the install can be a bit tricky. I decided to mount the pulleys to a 2x4 sitting on top the rafters in my garage because I wanted to get the bike as far above the floor as possible. This also made the installation easier because I was able to get the pulleys positioned and screwed to the 2x4 while I was standing on the floor instead of trying to do it while up on a ladder. First I measured the bike to gauge the approximate distance the pulleys should be from one another. Then, I taped the pulleys to the board using strong gorilla tape. Next I suspended the board at about eye level between a ladder and a shelf in my garage, threaded the rope through the pulleys, and attached the hooks to my bike and gave it a try at ground level more or less. (Had the tape not held the pulley brackets in place for the test I would have used some small screws as temporary holders but the tape actually held it fine so I didn't need to do that.) Once I confirmed that the bracket placement was correct, I attached the pulley brackets to the 2x4's using the screws provided. Others have noted the screw quality it not very good. I think that's correct, but by drilling the proper size pilot hole I didn't have any trouble with them. Next, with the brackets attached to the 2x4, before I got up on the ladder and finagled the two before into place above the rafters. Once in the position I wanted, I drilled a 1-in hole through the rafter in between the brackets so that the line could pass through without any friction. See picture of this as well. During the first two initial tests my bike fell. My seat doesn't have a lip on the back of it and the hooks just slid off, allowing the bike to fall. I used a vice and a heavy mallet to bend the metal on the ends of the hooks so they would not be as likely to slip off the handlebars or the seat. I ultimately decided to use the hooks grabbing the seat rotated 180° from what is recommended so that they grab the seat from the front. See the picture I posted. With those modifications it works fine and doesn't seem likely to slip off. Some have noted that it lifts the bike unevenly. That is true. I lift the bike most of the way up, then pull down on the end of the bike that is higher, and then finish raising it the rest of the way. The total install took me about 2 hours, but it was worth it. Space is at a premium in my garage, and I don't have any wall space left to mount a bike, so this product was the perfect solution and I'm glad I bought it. I would highly recommend it just be aware you need to allow time to adapt it to your specific situation. ... show more
Reviewed in the United States on April 4, 2025 by J. M. K.

  • Great Bike Hoist — Easy to Install and Works Great
Size: 2-Pack
This RAD bike hoist is great. I was using a MaxxHaul wall-mount, which is a great bike rack, but my new bike wouldn’t fit on it, so I decided to lift it up. The kit arrives in a small but heavy box. Once you unpack everything and lay out the parts it all make sense. The installation was pretty straightforward and took me less than an hour. Don’t be intimidated. A couple of quick tips: First, take your time attaching the pulley systems to a 2x4. Pre-drill all the holes, and put the screws in and take them out at least once before mounting everything overhead. The provided hardware is fine, but if you happen to strip a screw it’s better on a workbench than while working over your head. Second, look at where your garage door is mounted to help locate the ceiling beams. I got lucky because the garage door was mounted with about the same spacing as where I wanted my bike to go. Using that as a guide, I attached both pulleys with three 3-inch lag screws into pre-drilled holes using a DeWalt 20V drill. Once the pulleys are mounted, that’s pretty much it. Just guide the rope through the system and everything is ready to go. I tied and extra knot with a washer at the end. The system works great. The bike lifts and lowers easily. Pull straight down and the bike is free to move up or down; let go, and it locks securely in place. I’m very pleased with this bike hoist and would highly recommend it to anyone looking for an easy way to get their bike up and out of the way. ... show more
Reviewed in the United States on August 9, 2026 by Jeff B.

  • Feels like it's missing hardware but does the job for ebikes!
Size: 2-Pack
Bought these and left them in box for over a year. I finally got fed up enough with the cluttered garage so I did an overhaul with paint and finally utilize the super high ceilings. Overall they were fairly straight forward to install. Finding the joists with a 2x4 was the hardest part. I did not trust the J hooks that are on the pulleys at all to hold up my ebikes. Luckily I found some cheap climbing carabiners and soft straps and used those instead to attach to the hoist. They also do not give you enough hardware to mount to the 2x4. They say you only need 4 bolts per mount but in my opinion I would add screws to fill all the holes in the 2x4. There is 6 screw locations total per mount and they only provide 10 screws for one hoist kit. There are 2 mounts so it's missing a few screws. I also used 5/16" and 3 inch lag screws from home depot and did 3 lags per bike mount on a 2x4 attached to the ceiling joist. Mounted all the hardware on the 2x4 on the ground after measuring the bars to seat distance. They are not included with the kit. The rope seems to do the job, but I would also suggest picking up a 3/8" rope from home depot while you are there for the lag screws. Overall it's pretty good value for the money but doing it on high ceilings you better get comfortable with a tall ladder. They saved me a ton of space and seem sturdy enough so I'm a happy camper. ... show more
Reviewed in the United States on February 17, 2026 by Blue Shark

  • Works great, almost identical to the more expensive version!
Size: 1-Pack
This bike lift is almost identical to the more expensive Racor list. We purchased a Racor first, then three of these. The only difference is slightly cheaper rope, and different pulleys. For the price, I'm happy that I went with this one. Review from my Racor purchase (applies to all of them): We purchased four lifts (three of this brand, one Racor) for our garage and are happy with them. We were able to position each bike about 16" apart and have no trouble getting any bike up or down. I have several hints from our installation, and one complaints, but on the whole am very satisfied: Positive: * Works smoothly * Clever, simple system * Locking mechanism for rope is nice * Installation is straightforward Negative: * Hooks need a safety strap, depending on where you attach them Hints: * I attached the hooks to a lower location on each bike to have the bike lifted all the way to the ceiling. This gives me enough room to stand beneath the bikes without bending my head. * I used some of the extra rope, after cutting to an appropriate length, for safety straps for the hooks. Depending on where the hooks attach, they may not have enough bite to fully trust -- easy way to prevent potential injury (see an earlier post on earthquakes!!) * I don't recommend using the supplied bracket for excess rope. I just coiled the rope and hung it from one of the quick-release levers on the bike. Works great, and keeps the ropes from getting tangled. On the whole, I'm happy with our purchase. Almost identical to the Racor lift here Racor Ceiling Mounted Bike Lift #PBH-1R and a significant savings that adds up if you're buying several. ================================ UPDATE: January 20, 2010 ================================ After living with these hoists for a while, I have mixed emotions: * Hooks do not have a deep/aggressive enough curve, resulting in a less than optimal hold depending on what part of the bike you're trying to hold. * Some sort of safety strap is necessary on each hook, partly due to the shape of the hook.. I dropped a bike several times due to the hook not holding reliably, a strap would have at least made this less painful. * While the hoist makes the bikes easier to raise and lower (minus the hook issues), it is not able to get the bikes as high as simple bike hooks mounted in the same location Given the lack of trust in the hold provided by the hooks plus the few inches of lost clearance that make a difference in our garage (though our mounting situation may be lower than yours) I've gone back to good old bike hooks to store our bikes. ... show more
Reviewed in the United States on May 8, 2007 by Porter Fam

  • It may not be perfect but it works well enough.
Size: 2-Pack
Overall it works well enough. As others have pointed out the hooks aren't the most secure and it is possible for the bike to slip and fall. The hooks seem to grab the handlebars well enough but the part going under the back of the seat isn't the most secure. I went ahead and ran a bungee strap between the hook and the seat post for additional security which seems to have fixed it. The other issue I had isn't with the pulleys or the hooks but with the cheap screws included in the kit. I predrilled pilot holes and still managed to strip 4 of them one right after the other. Yes I made sure everything was lined up and had a brand new bit in my driver, the problem is they're just made of cheap metal. Luckily I had a handful of quality 2" screws laying around which went right in. So, if you're purchasing this kit go ahead and add a pack of SPAX 2" #10 screws to your cart. Also, the pulleys are a bit too narrow for the brackets they go in leaving lots of spare space on either side which the rope likes to get bound up in. The only way to clear it up is to climb a ladder and pop the line back in the groove of the pulley. They should have installed wider pulleys or narrower brackets to avoid this problem. One thing I definitely liked about this kit, the line brake makes raising and lowering the bikes so much easier and works really well. In the end I'm happy with my purchase and will probably order it again to hang the rest of our bikes. ... show more
Reviewed in the United States on January 18, 2026 by Kyle A. Munz

  • Cheap, sturdy, easy to operate, excellent function
Size: 1-Pack
Well priced and it works. The hardest part of the install will probably be to locate and center up both mounts on the ceiling. I used a laser that projected a vertical line on the ceiling and this allowed me to line up both mounts. Every bike will be slightly different so measure the distance between where you want the front and rear hooks to pick up the bike. This will allow you to get a rough idea of how far apart the mounts should be. My garage ceiling is finished with drywall so my solution was to drill some holes where I wanted the mounts and the I climbed up into the attic above the garage to add some 2x4’s between the joists. The mounts are solidly in place. Finally, DO NOT CUT THE ROPE, until you have everything installed and then lower the bike to the floor. Once on the floor, determine how much rope you need in order to reach it easily. Then cut the rope to whatever maximum length you need. Otherwise, it’s a great product and has freed up a good amount of space in my garage. ... show more
Reviewed in the United States on January 23, 2026 by Par

  • Great product and a great price for a 2 Pack. Get it!
Size: 2-Pack
Directions were easy to follow. The other reviews here on amazon were helpful. Here are my tips/thoughts for you. 1. Use a 2x4 or a 2x6 to mount the pulleys to. (Get a 10 footer at a hardware store and most places will cut in half for you if you don't have a saw) 2. Throw the bags of screws they give you in the trash. They are terrible and you'll strip them before they are sunk into the wood. Get some deck screws while you are picking up your wood. Also get some lag bolts and washers to mount the 2x4 or 2x6 sections on to the joists. 3. Run the lines through the hooks and the pulleys before you mount it on the ceiling before you mount it. Tie the knot in the end of the front bracket before you mount it to the 2x4 or 2x6. I had to undo mine before I realized this would be easier if done before hand. 4. The nylon line included is super long. With the bike down give yourself a foot or two to use to pull the bike up and cut the rest off. Use a lighter to melt the end of the line where you cut it to prevent it from unraveling itself. 5. The hooks work fine and I did not need to bend mine at all. Just measure the distance between your handlebars and the back of your seat as the instructions indicate and you'll be fine. I can swing my bikes while they are mounted and they are not coming down. 6. The line brake works great but people are right I could see myself replacing the lines after a few years use. 7. The system is easy enough that my mother in law had no problems raising and lowering the bikes. ... show more
Reviewed in the United States on October 28, 2013 by rickyC

  • I'm a Believer Now
Size: 1-Pack
I've always been a little skeptical of the ease of use of these overhead bike hangar/hoist systems, but I decided to give one a chance: It works. My use case is a little different: I just had a whole house water softener installed and my garage is pretty full; I didn't realize how much floor space I would lose for the salt tank, so I decided the best way to make that up was to hang my table saw from the ceiling. I chose this particular hoist because (1) it was cheap, (2) it was rated for 100lbs (my table saw weighs around 50lbs) and (3) I like that the hooks have the extra "sideways" hinges in them, so they can open wider if needed. Installation overhead, in a garage, during the summer, in Tucson, is never a thrill, but it literally took me about: - 15 minutes to figure out exactly where I wanted the brackets/screw holes in my ceiling and joists - 20 minutes to install (including stripping a couple of screw heads) - 5 minutes to figure out I needed to flip it 180 degrees - 15 minutes to uninstall and reinstall it So, less than an hour, and faster if you do it right the first time. Installation notes: - The supplied "lag bolts" suck, this is why I gave the hoist 4 stars instead of 5. Some kind of really soft metal, I stripped out the first two heads trying to screw them into my joists (with pre-drilled holes). Save yourself the hassle and make sure you have some decent 2.5-3" wood screws or lag bolts available, and just throw the supplied screws away. - I thought threading the rope through the brackets and then installing them on the ceiling (as recommended in the instructions) would be more hassle than installing the brackets on the ceiling first, then threading the rope: I was wrong, when the bracket is already installed on the ceiling threading the rope through the brake is a real pain. My recommendation: (1) install the bracket without the brake on the ceiling first (without the rope), then (2) thread the rope through the installed bracket and through the uninstalled bracket with the brake, then (3) install the bracket with the brake on the ceiling. - Figure out where you want the rope hanging down before you install: for the brake to stay tight (nothing drops), the rope needs to hang down straight with essentially no tension on it; to unlock the brake (so you can drop your bike, table saw, whatever) you need to pull the rope down and "away" from the bracket. I initially installed the brake bracket "pointed" at a wall, then realized I wouldn't be able to pull the rope correctly to loosen the brake, and I had to take the brackets down and switch the positions of them and rotate them 180deg. Actual review: It just works. It's easy to pull the rope and lift up something that's kind of bulky and a little difficult to keep balanced, like a table saw, so I think lifting a bike is just going to be trivial. Lowering is also easy, just (1) hold the rope tight, (2) pull the rope down and away from the brackets to disengage the brake, and (3) now raise the rope to lower your item. This works so well that I'm thinking about buying another one, specifically for my bike. ... show more
Reviewed in the United States on July 18, 2023 by T. Towe

Can't find a product?

Find it on Amazon first, then paste the link below.
Checking for best price...