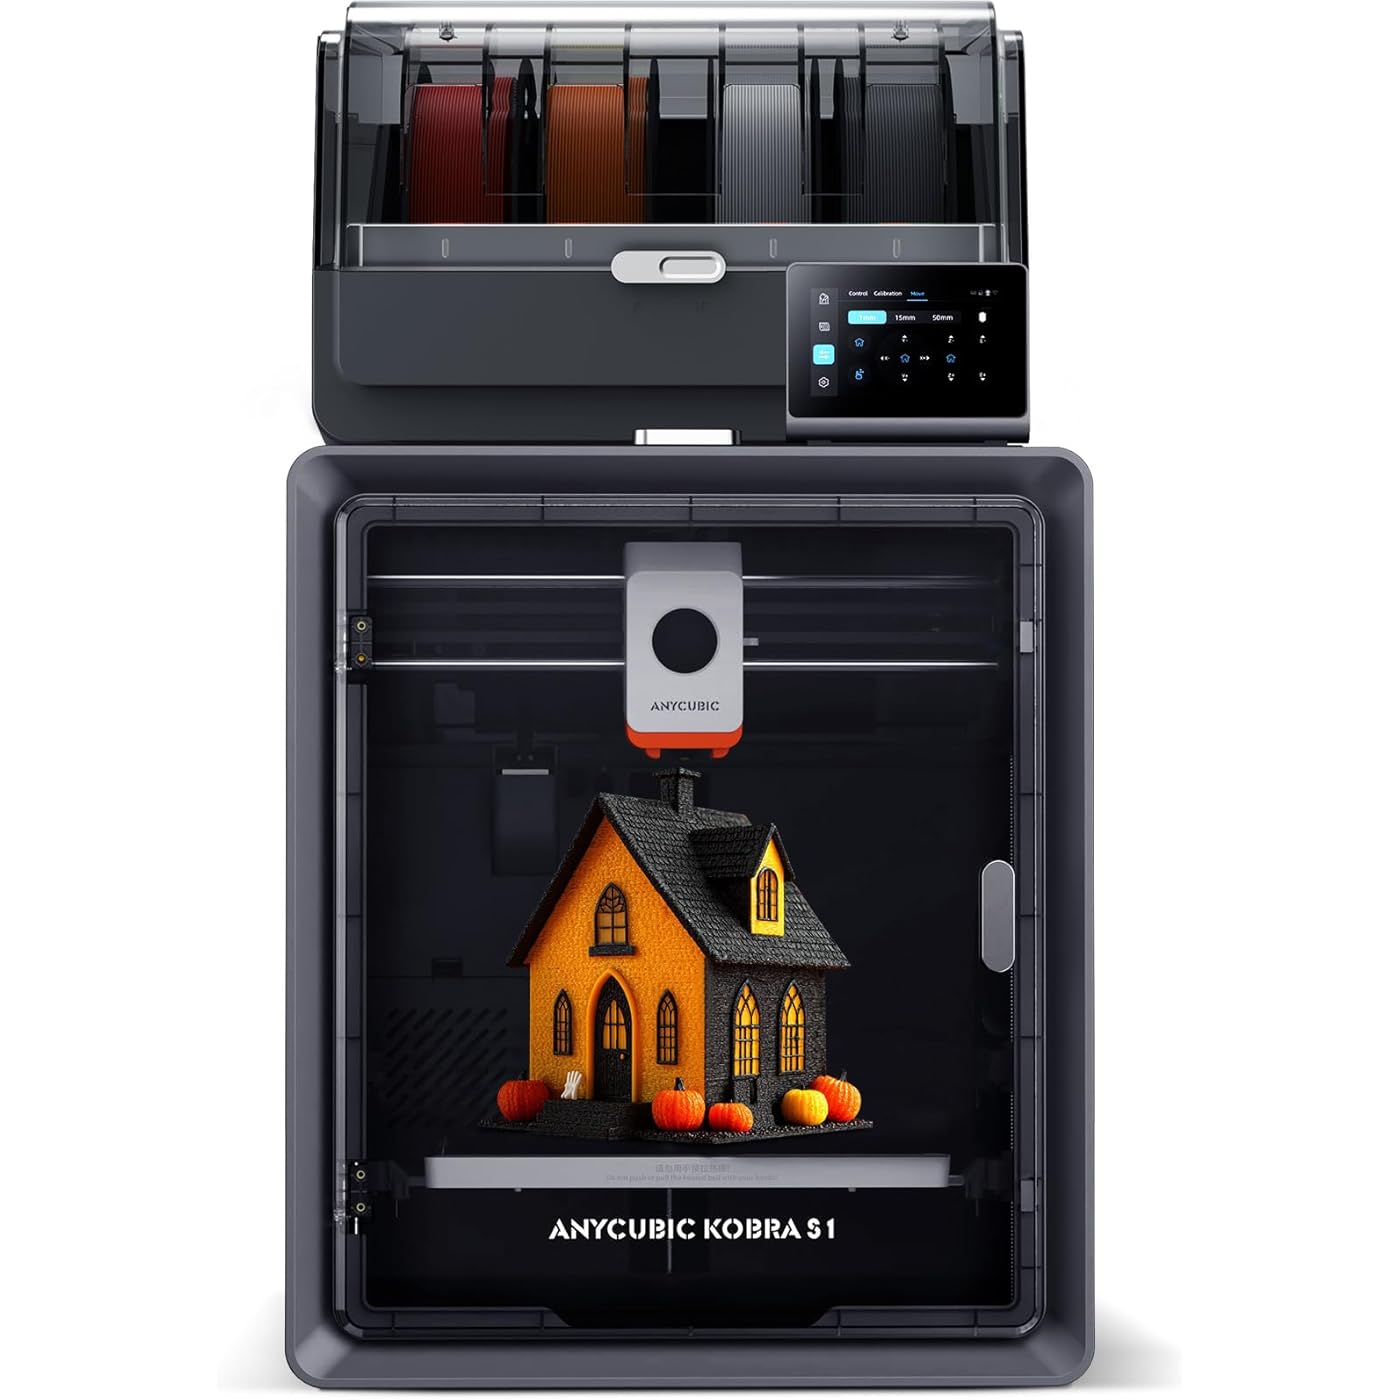
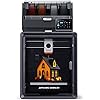
Search  for anything...

Anycubic 3D Printer Kobra S1 Combo, Multi-Color 3D Printer Max 600mm/s High Speed Printing High Precision, Works Right Out of Box Sealed Storage Intelligent Mult-Filament Drying 9.8"x9.8"x9.8"

  • Based on 678 reviews
Condition: New
Checking for the best price...
$599.99 Why this price?
Save $42.99 was $642.98

Buy Now, Pay Later


As low as / mo
  • – Up to 36-month term if approved
  • – No impact on credit
  • – Instant approval decision
  • – Secure and straightforward checkout

Ready to go? Add this product to your cart and select a plan during checkout.

Payment plans are offered through our trusted finance partners Klarna, PayTomorrow, Affirm, Afterpay, Apple Pay, and PayPal. No-credit-needed leasing options through Acima may also be available at checkout.

Learn more about financing & leasing here.

Selected Option

Free shipping on this product

30-day refund / replacement

To qualify for a full refund, items must be returned in their original, unused condition. If an item is returned in a used, damaged, or materially different state, you may be granted a partial refund.

To initiate a return, please visit our Returns Center.

View our full returns policy here.


Availability: Only 10 left in stock, order soon!
Fulfilled by Amazon

Arrives Aug 22 – Aug 23
Order within 5 hours and 58 minutes
Available payment plans shown during checkout

Model: Anycubic Kobra S1 Combo


Features

  • Vibrant Multi-Color PrintingWith 4-color printing, Anycubic ACE PRO delivers stunningly vibrant and vivid prints. When two Anycubic Ace Pros are combined, you can then unleash eight-color printing to bring you even more unimaginable possibilities
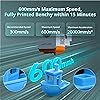
  • Unrivalled Printing SpeedPrinting at an astonishing Max 600mm/s and 20,000 mm/s2 acceleration, Anycubic Kobra S1 Combo 3D Printer effortlessly delivers superior accuracy and detail so you can print up to 12 times faster than regular FDM printers
  • Efficient Filament DryingDual PTC heating module + 360 hot air circulation drying technology ensures even heating of the filaments, keeping the them in optimal printing condition at all times to create the perfect model
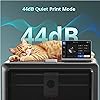
  • Superior Printing PrecisionAnycubic Kobra OS ensures consistently smooth and natural surfaces with flow compensation feature. With reduced virtual waste and minimized material overflow, precision is at its best
  • Convenient App Remote ControlStart your print process anytime, anywhere with just one click using your remote devices with the Anycubic App. Multi-plate document parsing is also supported for intricate designs

Brand: ANYCUBIC


Product Dimensions: 20"D x 20"W x 25"H


Compatible Devices: Personal Computer


Operating System: Linux


Printing Technology: FDM


Product Dimensions: 20 x 20 x 25 inches


Item Weight: 56.1 pounds


Item model number: Anycubic Kobra S1 Combo


Date First Available: December 17, 2024


Manufacturer: ANYCUBIC


Frequently asked questions

If you place your order now, the estimated arrival date for this product is: Aug 22 – Aug 23

Yes, absolutely! You may return this product for a full refund within 30 days of receiving it.

To initiate a return, please visit our Returns Center.

View our full returns policy here.

  • Klarna Financing
  • Affirm Pay in 4
  • Affirm Financing
  • Afterpay Financing
  • PayTomorrow Financing
  • Financing through Apple Pay
Leasing options through Acima may also be available during checkout.

Learn more about financing & leasing here.

Top Amazon Reviews


  • Awesome 3d Printer for new users. I listed a few helpful setup tips.
I received the Vyper 3d Printer within 2 days after I purchased it! Beforehand, I did a bit of reading and comparing. There are some real benefits to buying the Anycubic Vyper 3d (not to be confused with reviews on the Anycubic Kobra which is not as automated). The first print I tried worked out great and the owl (included on the SD card) looked pretty awesome! The total setup time was about an hour or so. There were a few things I had to redo on the setup but they were mostly my fault for not reading the guide better. There are only about a dozen (easy) steps total to the entire setup. I fully agree with the reviews I read about this being one of the best and easiest to use 3d printers. Once I was done, it all made sense. Here are a few tips to help with your setup: 1. You may want to order 1 or 2 (standard PLA) filaments with the 3d printer. Included is a small roll of filament that isn't on a spool. Trust me, you'll appreciate this when you get ready to do your first 3d print. I purchased a gold PLA standard filament which looks pretty nice once the object is printed. 2. There are a few tools included but personally I would get a better putty knife and a larger hand-sized zip tie cutter. You'll only use the zip tie cutters once but you'll use the putty knife after each print. The plastic putty knife included is nice but not ideal. I use a cheese cutting knife where I can use the big ball end to knock off the 3d object to break it loose from the magnetic top and the sharper blade end to get the residue off (being careful not to cut the magnetic top). The zip tie cutter is really (really) small and not ideal for some of the tougher zip ties you'll need to cut. There are about a 1/2 dozen or so zip ties to cut which are in obvious places. Don't forget about the large zip tie that is directly under the bed and securing it. It's almost impossible to cut this bigger zip tie with the small zip tie cutter included. I am grateful the Vyper shipped with tools even though I couldn't really use a couple of them (I guess I could use them in a pinch if I had nothing else.) I really like the slide out box for tools. 3. Unpacking is straight-forward and the quick setup instruction guide is good to look at (carefully). I did have to re-read a few sections and diagrams. The steps are easy and straight-forward as long as you actually read the guide. Again, there are only about a dozen steps in the whole setup!! Some of the arrows on the diagrams could be a little clearer on where the bolts need to screw in but it's difficult to mess this up when you only have 4 bolts (total) to worry about securing (nice)! They also include an L shaped hex type tool (whatever they are called.) You only need 2 of the 6 L shaped hex tools to tighten the 4 screws. I thought I was missing these tools until I opened the drawer in the front of the printer (below the LCD display on the right side). I found these tools secured in the drawer. Everything was neatly packaged and very secure to prevent any damage. 4. After mounting the LCD, I couldn't find the cable to connect to it until I pulled out the 2 big styro-foam blocks directly under the bed which were put there to keep the bed from moving while being shipped (you have to pull these out to clip the center zip tie under the bed.). Pull these out slowly as there are a few other cables taped under the styro-foam blocks. Besides the 4 cables to connect to the side motors, you will also see the LCD cable. It's difficult to mix up the connections since each one is a different size. There are about a 1/2 dozen cables total to connect (excluding the LCD cable). I was able to connect all the cables even though I had to re-route a few of them. Pay attention to the quick-startup guide and avoid routing them the same way as the diagram with the big red X. If you need to unplug them, you can slowly wiggle them out or there are 2 plastic things on the side of a couple of the connectors to push out which lets the cable unplug. 6. I powered everything up and inserted the filament into the guide. I then followed the instructions to push the "Filament In" button to get it to auto-route into the white tubing down to the tip. It was a little tricky but everything made sense following the guide and reviewing a few youtube videos to make sure. 7. The auto-leveling was painless and went without problems again, following the straight-forward guide. 8. Touching the tip of the heating end took a few touches with a metal object (anything metal I guess). I had to touch it a 3-4 times until I saw the LCD screen starting to execute the next step. 9. One important note is that you'll need a slicing program. Cura comes on the SD card but you may want to download and install it ahead of time from the web to make sure you have the latest version. Thingiverse is an awesome website to search for *.stl files to print. You open the *.stl file with Cura and then click the blue "Slice" button (bottom right) to make it into a *.gcode file. The *.gcode file then needs to be copied to the (root) of the sd card. The owl.gcode example file on the sd card needs to be copied from its folder to the root of the sd card before you can see it listed on the LCD screen. When you click to print the files on the LCD screen, you will then see all the *.gcode filenames in the root (ie. not in any folders) on the sd card. It's not a big deal but hopefully future versions of the LCD will allow you to navigate to sub-folders. My only complaint is that I had to copy the owl.gcode file to the root folder so the LCD would then see it. I then selected it and pushed the "Print" button to start printing. 10. Here's another important tip that I had to research on the web. The Vyper ships with the voltage defaulted to 115 (typo on the dial, it's really 110 and 220). After I clicked the Print button to print the owl, the screen turned black (and I panicked!) I waited, waited and waited. I then did some googling and I quickly found that this is caused by the incorrect voltage setting on the Vyper and you need to simply flip the red switch in the back of the unit until it says 225 (220) if you live in the U.S.A. or use 220, otherwise leave it. Once I did this and went to print, everything started immediately. The LCD unit will let you auto-level and do other steps but once you try to print, the screen will go black if the voltage setting isn't set correctly. Just turn off the machine and change the voltage setting to fix this. 11. The owl turned out perfect on the first try!! It was simply awesome to watch (it took about 1 1/2 hours.) 12. I downloaded more *.stl files (zipped) from Thingiverse (Yeggi and other sites also have *.stl files at a small cost of about $1-$2 each). I've been converting these to *.gcode files on the computer, copying them to the root on the sd card and then printing them. I had one small problem where I sliced an *.stl file of an object which didn't have a proper base (one side of it stuck out 4 inches at a 45 degree angle and there was nothing under to support it.) This caused the printer to try and print into thin air which then caused the filament to speghetti out. I paused and then eventually stopped the printer realizing that it just wasn't going to print properly without some kind of support on the one end (the object wasn't designed correctly). Another nice feature I noticed is that I can start the print and walk away. The head is designed to shave off the excess filament goob onto the side of the magnetic coating before it starts the actual print in the center. I just brush this goob of filament off the top of the coating when I check on things. I hope these tips help. One last thing to mention is the magnetic board will slide into place (after the printhead has heated up and shows 200/200 for the OE. You don't need to pre-position or worry about the board sliding forward. After the pointhead heats up for the next print, the magnetic board will slide back into place. Make sure to have fun with it. I've only had mine for 2 days and I'm having a blast printing out objects. There are soo many cool and useful gadgets you can print. Many kitchen and other useful gadgets that would cost me $20 or more can now be created for less than a few dollars of filament! ... show more
Reviewed in the United States on February 13, 2023 by Paul A. Kohn

  • UPDATED- Vendor making promises they are not keeping.
Model: Anycubic Kobra S1 Only
-UPDATE 7-28-25- I’ve been dealing with the vendor for over a month, now my return window closed on this order. The vendor has told me several times in the chat that they would refund me the money for the printer, even if I kept it. That was a complete fabrication. Customer Service for Amazon has also reviewed that promise and has asked me to ask them to make good on it. Well, after multiple emails back-and-forth, they instructed me to order another printer, and if I used it, and I liked it that they would refund me the money for that one. Well, I received the printer and it was damaged on the outside which I figured. No big deal. I’ll just use the pieces from the two printers to make one good one. When I asked the vendor if they were going to refund me the money like they stated, they told me that Amazon would refund me the money for the second printer. But I explained and reminded them, my return window closed for the original printer that is still not working 100% right. They asked me to ship the printer to them and that they would pay the shipping and then ship me a new one back. But I’m saying to myself I’ve just spent $1200 worth of printers and one is damaged upon arrival and the other one is not working properly. Why in the world, would I ship the original printer to someone who has blatantly told me untruths? I cannot recommend this printer unfortunately. When it works, it works great. The slicer software is glitchy as well, but I was starting to learn how to manipulate it. At the end of the day, the vendor will promise you things that they will not uphold. After a month and a few days of going back-and-forth, I’m throwing in the towel. As it stands right now, I do not trust the vendor. —————————- I picked this printer based on reviews and research. I've printed for 13 hours so far, not straight, on and off. The largest job was about 3 hours. All of a sudden, using the same spools of PLA provided by the manufacturer, I am getting lifting of everything I print. I tried dialing up the bed temp to 60 (from 55) and no help. I dialed up the nozzle temp to 225 (recommended on the filament spool to be between 200-250, and the printer keeps dialing it back to 170). For all of my prints thus far, which came out perfect, the bed has been at the default 55 and nozzle 170. No matter what I do, the base of the model lifts up on one part of the build (usually the second part if I am making a twisty figit tower which requires two towers to be printed at the same time. The back tower never adheres and I get melted glop and strings which eventually tries to interfere with the first tower. I am about to return this thing because it has literally failed the last 8 attempts to make a project. I've printed a few articulating dolphins, dinosaur, sharks, a statue, all came out stunningly perfect. Super crisp. I had such high hopes for this thing and now I don't. I am going to read up a little more on it, if I am wrong about something, I will change my rating. If I can't find a solution, it is going back. Then all of a sudden the app was not responding to letting me import things for 2 days. Out of the blue. I printed something the night before. Woke up, went to assign another job while I went off to work and the imports would get stuck on rendering, then say they were corrupt. Mind you, these were projects I had already printed. It seems to be back now but this printer is too much money to have this many failed prints. Wasting my filament, time and electricity. I will report back asap. Like I said, when this was working, the prints are phenomenal. :( ... show more
Reviewed in the United States on July 1, 2025 by Badcobra

Can't find a product?

Find it on Amazon first, then paste the link below.
Checking for best price...