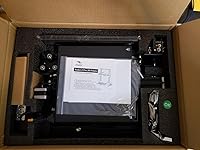
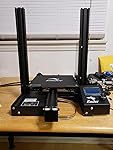
Creality Ender 3 Pro 3D Printer with Removable Build Surface Plate and Branded Power Supply, 3D Printers for DIY Home and School Printing Size 8.66x8.66x9.84 inch


Notify me when this product is back in stock
Buy Now, Pay Later
- – Up to 36-month term if approved
- – No impact on credit to apply
- – Instant approval decision
- – Secure and straightforward checkout
Payment plans are offered through our trusted finance partners Klarna, Affirm, Afterpay, Zip, Apple Pay, and Google Pay. No-credit-needed leasing options through Acima may also be available at checkout.
Learn more about financing & leasing here.
Selected Option
This item is eligible for return within 30 days of receipt
To qualify for a full refund, items must be returned in their original, unused condition. If an item is returned in a used, damaged, or materially different state, you may be granted a partial refund.
To initiate a return, please visit our Returns Center.
View our full returns policy here.


Set name: Ender 3 Pro
Features
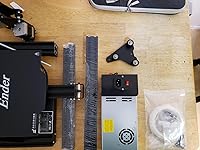
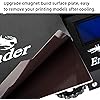
- REMOVABLE BUILD SURFACE PLATE: Provide all-round protection to your 3D printer build plate and ensure consistent temperature throughout the build surface. Easy to remove the printing models after cooling.
- SAFE POWER SUPPLY: Ender 3 Pro comes with a branded power supply, protecting your printer from unexpected power surges, that can heat the hot bed to 110C in just 5 minutes.
- RESUME PRINT FUNCTION: Ender 3 Pro can resume printing from the last recorded extruder position after suffering unexpected power outages.
- SEMI-ASSEMBLED KIT: This easy-to-setup kit comes partially assembled, allowing you to learn about the basic construction of 3D printers as you finish putting it together. A fun STEM educational experience in mechanical engineering and electronics.
- WHAT YOU GET: Ceality Ender 3 Pro 3D pinrter, lifetime technical assistance and 24 hours professional customer service.
Description
Creality Ender 3 Pro 3D Printer with Removable Build Surface Plate and Branded Power Supply, 3D Printers for DIY Home and School Printing Size 8.66x8.66x9.84 inch
Brand: Comgrow
Material: PLA glass
Color: Ender 3 Pro
Product Dimensions: 8.66"D x 8.66"W x 9.84"H
Item Weight: 8.86 Kilograms
Product Dimensions: 17.32 x 16.54 x 18.31 inches
Item Weight: 19.49 pounds
Item model number: Ender 3 Neo
Is Discontinued By Manufacturer: No
Date First Available: August 30, 2018
Manufacturer: Creality 3D
Frequently asked questions
To initiate a return, please visit our Returns Center.
View our full returns policy here.
- Klarna Financing
- Affirm Pay in 4
- Affirm Financing
- Afterpay Financing
- Zip Pay in 4
- Financing through Apple Pay
- Financing through Google Pay
Learn more about financing & leasing here.
Similar Products


Top Amazon Reviews