
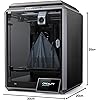
Creality K1 3D Printer - 600 mm/s High-Speed, Upgraded 0.1 mm Smooth Detail, Auto Leveling, Dual Fans Cooler, Straight Out of The Box for Beginners, Printing Size 8.66x8.66x9.84 inch


Notify me when this product is back in stock
Buy Now, Pay Later
- – Up to 36-month term if approved
- – No impact on credit to apply
- – Instant approval decision
- – Secure and straightforward checkout
Payment plans are offered through our trusted finance partners Klarna, Affirm, Afterpay, Apple Pay, and PayTomorrow. No-credit-needed leasing options through Acima may also be available at checkout.
Learn more about financing & leasing here.
Selected Option
Returnable until Jan 31, 2025
To qualify for a full refund, items must be returned in their original, unused condition. If an item is returned in a used, damaged, or materially different state, you may be granted a partial refund.
To initiate a return, please visit our Returns Center.
View our full returns policy here.
Recently Viewed


Model: K1
Features
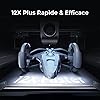
- Crazy 600mm/s Printing Speed: K1 3d printer is 12X faster than a regular 3D printer. K1 ramps up to 600mm/s in only 0.03s with 20000mm/s2 acceleration. The speed is bolstered by the powerful dual-core CPU and Combining a nimble Core XY structure
- Introducing Upgraded 2.0 Nozzle: Featuring a ceramic heater, the K1 Hotend reaches up to 300C and heats to 200C in just 40 seconds. Our new dual-gear direct drive extruder ensures stable printing, significantly reducing nozzle clogging issues
- All Around Cooling: Our dual-Fan technology ensures the model hardens before any stringing and warping could happen. It allows support-free bridges and overhangs
- Reliable Print Quality: mitigates the resonance frequencies of high-speed printing. No more ghosting or ringing on the print. 0.1mm Smooth detail. The aluminum alloy frame with unibody die-cast parts ensures steady printing at high speed
- Quick Start 3D Printer: Ready to print right out of the box, featuring an easy start-up guide. It includes a one key self-test, auto-leveling, and a flexible build plate for effortless print removal. Hassle-free operation at your fingertips
- Smart Remote Control: K1 Print can via flash drive or WiFi. After networking, you can use the Creative Cloud APP/ WEB side or Creality Print for remote printing or monitoring
Brand: Creality
Material: Aluminum
Color: Black
Product Dimensions: 16"D x 19"W x 18"H
Item Weight: 27.6 Pounds
Product Dimensions : 16 x 19 x 18 inches; 27.56 Pounds
Item model number : K1
Date First Available : April 13, 2023
Manufacturer : Creality
Best Sellers Rank: #109,008 in Industrial & Scientific (See Top 100 in Industrial & Scientific) #119 in 3D Printers
#119 in 3D Printers:
Customer Reviews: 3.1 3.1 out of 5 stars 166 ratings
Frequently asked questions
To initiate a return, please visit our Returns Center.
View our full returns policy here.
- Klarna Financing
- Affirm Pay in 4
- Affirm Financing
- Afterpay Financing
- PayTomorrow Financing
- Financing through Apple Pay
Learn more about financing & leasing here.
Similar Products


Top Amazon Reviews


