Search  for anything...

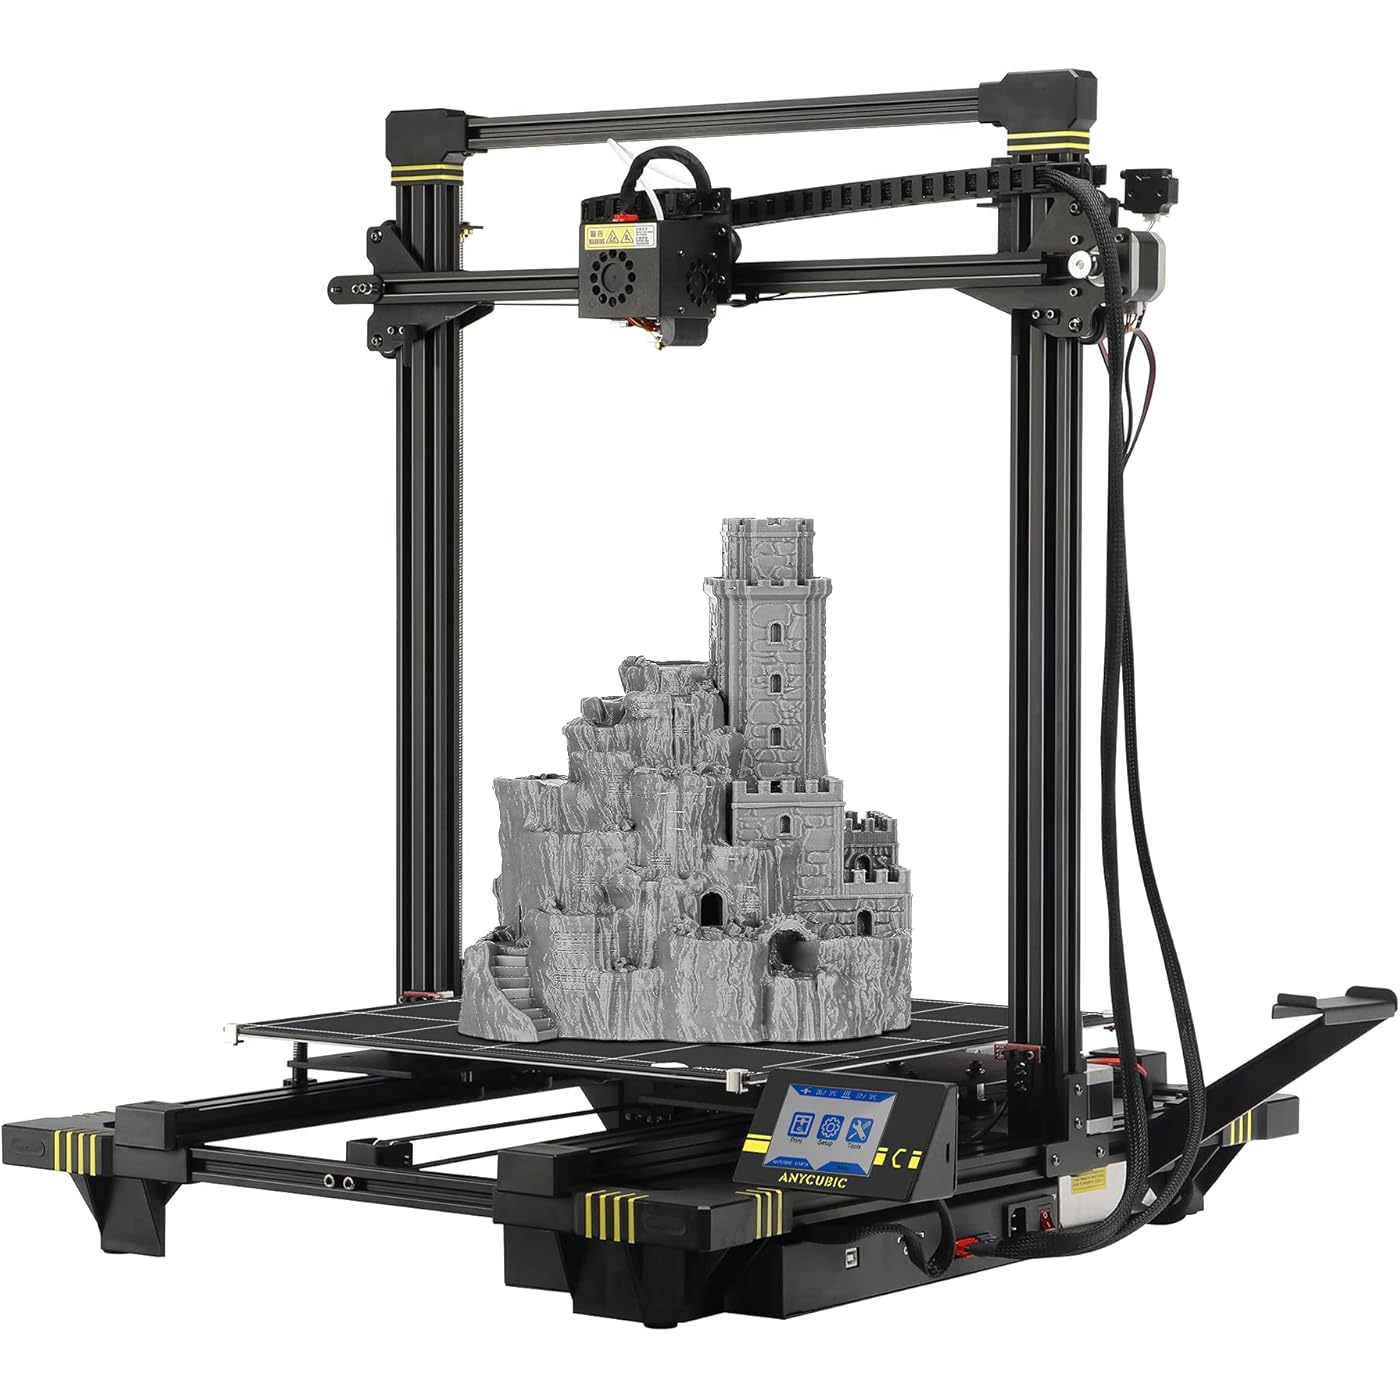
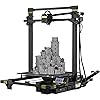
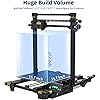
ANYCUBIC Chiron 3D Printer, Semi-auto Leveling Large FDM Printer with Ultrabase Heatbed, Suitable for 1.75 mm Filament, TPU, Hips, PLA, ABS etc. / 15.75 x 15.75 x 17.72 inch(400x400x450mm)

  • Based on 491 reviews
Condition: New
Checking for product changes

Notify me when this product is back in stock

$599.99 Why this price?

Buy Now, Pay Later


As low as / mo
  • – Up to 36-month term with PayTomorrow
  • – No impact on credit
  • – Instant approval decision
  • – Secure and straightforward checkout

Ready to go? Add this product to your cart and select a plan during checkout. Payment plans are offered through our trusted finance partners Klarna, PayTomorrow, Apple Pay, and PayPal. No-credit-needed leasing options through Acima may also be available at checkout.

Learn more about financing & leasing here.

Free shipping on this product

This item is eligible for return within 30 days of receipt

To qualify for a full refund, items must be returned in their original, unused condition. If an item is returned in a used, damaged, or materially different state, you may be granted a partial refund.

To initiate a return, please visit our Returns Center.

View our full returns policy here.


Availability: Unavailable
Fulfilled by Amazon
Available payment plans shown during checkout

Features

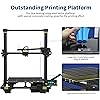
  • Large Build Volume, ANYCUBIC Chiron 3D Printer comes with one of the largest build volume of 15.75 x 15.75 x 17.72 inches, you can print models that 90% of other printers could not, The unique high precision nozzle of 0.4mm hot end with straight through design reduces the weight on the X axis which delivers better performance even on very tall prints, Your creativity will be maximized
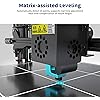
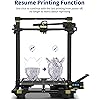
  • Semi Auto Leveling and Resume Print, Equipped with an auto leveling module which automatically detects 25 points, supports real time adjustment compensation of nozzle height, 3D Printer can resume printing after power outage or any other unexpected stoppage, One click to resume from the last recorded position when suffering power outages, And the sensor pauses prints and sets off an alarm when you run out of filament which greatly saves time and material
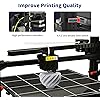
  • Easy to Assemble and Use, Full metal body, stable and durable, modular design and only take 5-10 minutes to assemble, TFT Touch Screen with brand new friendly UI to preview model and printing process on screen, offline printing, We use high grade Extruder, smooth feeding and not easy to plug, which can provide you a better printing experience of flexibility
  • Printing Precise and Safe, Equipped with Y Axis Dual Sideway and Z axis dual screw rod design, the height on both sides of the Z axis will be recalibrated before each printing which can reduce the probability of releveling before each printing and the print precision of our Chiron 3D Printer is greatly improved, 24V DC high power heated bed, heating up to 100C, Independent high-power mosfet drive, taking into account safety and heating effect
  • More Function, Ultrabase Pro, Coated with a special composite coating make the printed large model not easy to warp and easy to demold, All ANYCUBIC 3D printers backed with lifetime technical support and 24 hours professional customer service

Is Discontinued By Manufacturer ‏ : ‎ No


Product Dimensions ‏ : ‎ 15.75 x 15.75 x 17.72 inches; 20.5 Pounds


Item model number ‏ : ‎ Chiron01


Date First Available ‏ : ‎ July 17, 2018


Manufacturer ‏ : ‎ ANYCUBIC


Best Sellers Rank: #188,716 in Industrial & Scientific (See Top 100 in Industrial & Scientific) #384 in 3D Printers


#384 in 3D Printers:


Customer Reviews: 3.8 out of 5 stars 491 ratings


Frequently asked questions

This product is currently out of stock. Please check back later for shipping info.

Yes, absolutely! You may return this product for a full refund within 30 days of receiving it.

To initiate a return, please visit our Returns Center.

View our full returns policy here.

  • Klarna Financing
  • Klarna Pay in 4
  • PayTomorrow Financing
  • Apple Pay Later
Leasing options through Acima may also be available during checkout.

Learn more about financing & leasing here.

Top Amazon Reviews


  • First FDM printer and it's been a breeze!
When others recommended I buy something smaller or "easier", I completely ignored their advise and purchased the Anycubic Chiron. This is my first FDM printer. Initial Thoughts: - The shipping box is huge. Glad to see that it was packaged well. - It's not that it was over packaged, the printer itself is HUGE! Seriously huge...what have I done. - Awesome, just a couple of frame components to assemble, instructions, some sample filament colors and a 1kg spool of filament (Bubblegum Pink in my case), as well as a leveling probe. There's also extra guide wheels, nozzles and a complete hot end too! - ...now where do I put it. Assembly and Setup: It's pretty straight forward as there are just a few components to bolt together and the included instructions are clearly laid out. I took extra time to ensure all of the pre-assembled fasteners were actually tight; most were but a few needed snugging up. Adjust the eccentric nuts on the guide wheels during assembly is a good idea as you'll need to be moving the machine around quite a bit to get at all of them (unless you can walk around all sides of the machine) and I don't think you want to move it much once the bed is leveled. There are six wheels on each side of the bed, three on the print head carriage and three on both sides of the z-axis gantry. Once these were adjusted so I could -just- turn them with a finger, I went on to leveling the bed. Getting the bed leveled is probably the most important part of the initial setup and I took extra time to try and do it "right". Really, it's more than just making the bed level, it's making the bed level and properly setting the gap between the nozzle and the bed. The leveling instructions are OK and are presented to you in either a manual or semi-automatic fashion. To me, the manual method really gives you the opportunity to get the print bed level/parallel with the nozzle at the four corners and a check at the center by using the spring loaded adjustment knobs on the bottom of the bed. The real fine adjustment comes in when you use the semi-automatic leveling to probe the bed in 25 places and use the Advanced Settings to adjust all or each of the probe points to get a more consistent gap at each point (again, the bed is huge and thickness varies over it's span). The included Target/Bullseye test print is ok for adjusting the nozzle gap but I used a file on Thingiverse that is 25 dots that print in correspondence to the 25 probing points on the bed. This gave me the ability to see how each dot prints at each probe point, measure the rim thickness of the dots, compare the "good" dots to the "bad" dots and adjust individual points based on my findings. Once each probe point/dot is printing the same, then you can adjust all dots together if you need to fine tune the filaments squish on the build plate. It's time consuming and tedious but it's necessary and will make your prints better for doing it. Usage: After the initial setup, it's a breeze! Acquire an STL file, slice it with the included software (or download Cura directly from Ultimaker, Simplify3d, whatever) and print. Printed parts came out acceptable for my needs and removing them from the print bed (once cooled) is easy peasy as they basically just lift off. Since those initial prints, I've spent more time tinkering with the slicing software and reading forums to attempt to make my prints even better. The rabbit hole is deep. You could, and probably will eventually, spend hours tinkering, reading and tinkering some more in your quest for the perfect print. To me, this was half the fun of running the printer. Customer Service: Unfortunately I had to place a request with customer service. After quite a bit of usage, prints became more difficult to remove from the print bed and eventually print removal resulted in several pock-mark delamination instances in the glass. Due to the size of the bed I was able to continue using the unaffected areas but ultimately they began to fail too. Customer service responded to my initial request promptly, asked a few questions and began processing my request for a replacement bed. Replacement bed arrived from China in great condition. Customer service followed up with me several times to ensure my needs were being taken care of and it was an overall painless, pleasant experience. All companies should have customer service this good! Overall Impression: I'd not hesitate to buy this printer again, or buy another one if I needed it. Even considering the problem I had with the print bed, which was resolved quickly (nothing is perfect!). Again, it's huge. I have a 30" x 48" table dedicated to this machine and it takes up about 75% of it. That's the only downside. The build volume means I can probably print whatever I want and lots of stuff I don't need. It's not a fast printer. There's quite a bit of weight moving around with the bed and you don't want to go too fast unless you don't care about artifacts in your prints. Again, I didn't buy it for speed but for the volume. Hope you've found my rambling useful! :D ... show more
Reviewed in the United States 🇺🇸 on June 20, 2020 by Brian Weaver

  • Big Bed Monster
Pros: 1. The bed is huge. If you're looking for something to do full size props for wearables, you really cant beat this. I got it on sale during black friday for under $400. 2. The setup is simple and can be done in less than an hour with all the supplied tools. The gantry is very tall for those large prints, and only takes 4 screws to secure it in place. The only somewhat difficult screws were the ones that needed the anchor screws on the other end to fit into the railings, but its simple if you use the supplied tweezers to hold the anchor in place. Cons: 1. Bed leveling is not as simple as it claims. I actually tried writing a leveling guide here and it just starts getting complicated quick. There are support groups on facebook for these printers, look there for leveling guides. The supplied leveling circle isn't great. Use the 25 point one you can find in the groups or on Thingiverse. 2. The heated bed is awesome to keep things stuck on the bed, but there are a few things you need to watch for. For one, the cable can catch on the back corner of the bed and will rip the sheathe. Print one of the cable chains as the first thing you print as you can, the Y axis chains on Thingiverse works, or at least the other options for the Y axis bed cable. The second thing is you must wait for the bed to cool, about 15 minutes, before attempting to take a print off the bed or you'll run the risk of taking a chunk of the glass with the print. 15 minutes or so and prints will almost pop themselves off the bed for you. There is a bit of a texture to the bed which WILL show up on your prints, so keep it in mind if the bottom side of your print is important. Use a raft if you need that smooth. Third, the bed heating cables can bend and break inside the sheath. Anycubic should probably increase the wire density from 14 AWG Silicone to 12 AWG Silicone as others on the support page recommend. It does require unsoldering the bed side of the Red and Black larger wires and running new ones. Others seem to not have this problem, and it probably has to do with the bending issue and catching issue mentioned above. Just, watch it carefully. I actually had a entire print shift because that cable caught on the back end. Ending notes: This was my first printer, I learned some of the things the hard way with this printer but it was for doing large props and I did the Mando helmet in one solid piece. But this is easily a 3 or 4 star printer for beginners as long as you are willing to hit the ground running. Leveling is the only thing that really makes this printer a bit of a paranoid pain. Once its leveled, its fun, but as soon as it loses that leveling you'll feel like your next hour or two is going to be spent baby sitting this thing until its over. Anycubic's support is based in China, so you wont hear from them over the weekend or one of their many holidays, and chances are your emails from them will end up in spam, so be sure to check that folder every morning. Because of the Time Zone difference, you're going to end up only getting any response while you're already asleep. Thats not a fault on their part, just a fact of life. So it make take a few days of these one email a day back and forth's before you get anything taken care of. I had to have the main board replaced already to solve a fan problem. It took about 5 days of this, but they shipped me a new board via Amazon. All in all, be prepared to hit the deep end of fixing the electronic elements yourself with them sending you parts to swap. ... show more
Reviewed in the United States 🇺🇸 on August 24, 2020 by Justin Merryman Justin Merryman

Can't find a product?

Find it on Amazon first, then paste the link below.