Search  for anything...

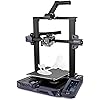
Official Creality Ender-3 S1 3D Printer with Direct Drive Extruder, CR Touch Auto Leveling, Dual Z-Axis, Silent Board, Flexible Filament Support, 220×220×270mm Print Size

  • Based on 2,955 reviews
Condition: New
Checking for the best price...
$194.99 Why this price?
Holiday Deal · 16% off was $231.00

Buy Now, Pay Later


As low as $32.50 / mo
  • – 6-month term
  • – No impact on credit
  • – Instant approval decision
  • – Secure and straightforward checkout

Ready to go? Add this product to your cart and select a plan during checkout.

Payment plans are offered through our trusted finance partners Klarna, Affirm, Afterpay, Apple Pay, and PayTomorrow. No-credit-needed leasing options through Acima may also be available at checkout.

Learn more about financing & leasing here.

Selected Option

Free shipping on this product
This item's return window has been extended for the holiday season: FREE refund/replacement until Jan 31, 2026

To qualify for a full refund, items must be returned in their original, unused condition. If an item is returned in a used, damaged, or materially different state, you may be granted a partial refund.

To initiate a return, please visit our Returns Center.

View our full returns policy here.


Availability: Only 1 left in stock, order soon!
Fulfilled by Amazon

Arrives Monday, Dec 22
Order within 12 hours and 34 minutes
Available payment plans shown during checkout

Protection Plan Protect Your Purchase
Checking for protection plans...

Model: Ender 3 S1X


Features

  • Faster & Smoother PrintingEquipped with up to 200mm/s printing speed, Ender-3 S1 delivers models faster than standard printers. Supports PLA, TPU, PETG, ABS, ideal for daily or flexible prints.
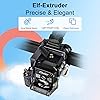
  • Reliable Direct Drive ExtruderUpgraded Sprite dual-gear direct extruder with 80N pushing force ensures smooth filament feeding and precise extrusion, especially effective for soft filaments like TPU.
  • Auto Bed Leveling Made EasyCR Touch 16-point automatic leveling system eliminates manual calibration. Compensates for uneven bed surfaces to deliver a perfect first layer every time.
  • Enhanced Print SurfaceFeatures a removable PC-coated spring steel print sheet with magnetic base. Ensures strong adhesion while allowing easy model removal by simply flexing the platform.
  • Stable Dual Z-Axis & Power RecoveryDual Z-axis screws and motors improve motion accuracy and surface quality. Power-loss resume and filament sensor avoid print failures and material waste.

Brand: Creality


Material: Polycarbonate


Color: Black


Product Dimensions: 10"D x 10"W x 10"H


Item Weight: 9.1 Kilograms


Product Dimensions: 10 x 10 x 10 inches


Item Weight: 20 pounds


Item model number: Ender 3 S1X


Date First Available: May 21, 2025


Manufacturer: Creality 3D


Frequently asked questions

If you place your order now, the estimated arrival date for this product is: Monday, Dec 22

Yes, absolutely! You may return this product for a full refund within 30 days of receiving it.

To initiate a return, please visit our Returns Center.

View our full returns policy here.

  • Klarna Financing
  • Affirm Pay in 4
  • Affirm Financing
  • Afterpay Financing
  • PayTomorrow Financing
  • Financing through Apple Pay
Leasing options through Acima may also be available during checkout.

Learn more about financing & leasing here.

Top Amazon Reviews


  • Amazing value 3d printer
Model: Ender-3
Super amazing value and super easy operation (I recommend Ultimaker Cura slicer it's way better than their own slicer) print quality is great and I love how upgradeable it is. I used an ender 3 for 4 years (using it pretty consistently for my 3d printing business I run selling 3d artwork and pushed it pretty hard at times and it made the whole cost of the printer back) before I ended up replacing it with an ender 3 s1 pro because I love the ender series so much and wanted an upgrade plus it had some parts needing replacement (I could have replaced the parts for cheep but it was an excuse to upgrade) If you're looking for a basic 3d printer to get started this one is perfect for you ... show more
Reviewed in the United States on November 30, 2025 by Brock Davis

  • Very nice!
Model: Ender 3 V3 KE
I had (better still have) a CR-10 V2 for quite a few years and really like it ... but I wanted a 'direct drive' feeder and a higher temperature hotend ... refitting my old printer seemed too tedious, so I ordered this one (Ender-3 V3 KE) ... WOW! what an upgrade ... yes the built is smaller but the speed is phenomenal and it processes TPU with ease ... I am very satisfied !! ... show more
Reviewed in the United States on November 13, 2025 by Ulrich S

  • Learn how to adjust it and it's fantastic... but noisy.
Model: Ender-3
I'm writing this review after a long first day of printing. I'm pretty happy with it, honestly. This is great value. After having built a larger but remarkably similar printer from scratch, I'm also not convinced they're losing money on it. So at least this isn't a case of Chinese dumping. It's simply a good product at a fair price, for once. My first two prints came out looking fantastic. The provided white PLA wasn't enough to complete the dog model, but my somewhat old and probably wet yellow PETG printed just fine as well. Adhesion was quite good on the provided print surface. Obviously, your results may vary. I don't know how good their quality assurance is, but most Chinese manufacturers seem to struggle with it. It could be that I got one of the good ones. The rails aren't bent, the belts are intact, the steppers all work just fine. The electronics are noisy, though. Given the price, this isn't surprising, but it is something most people will probably want to upgrade. Going with something with TMC2208 or better stepper drivers will almost certainly solve the problem. Overall, I'd say it's a good printer for beginners, but not if you're a buffoon or just not mechanically inclined. Learn how to tune this in, and it'll serve you very well. Ultimately, I gave this four stars instead of 5 because of the noise issue and because the manual doesn't mention the single most important detail for making this printer really shine: adjusting the delrin wheels. Since the manual doesn't mention it at all, I'll give a quick explanation here: the delrin wheels that form the linear bearings for this printer need to be properly tensioned. Do _not_ expect the factory setup to be anywhere near correct. Even if they got it perfect, the shipping process can knock them out of alignment again. The printer comes with little wrenches just for this purpose, so use them! On each set of wheels on the X and Z axes, there is one wheel that is mounted on an eccentric spacer. You can identify it because it has a hex shaft instead of a round one. The larger wrench in the kit should fit this hex. If you turn it, the wheel is pushed slightly inward or outward because it's mounted a little off-center from the bolt hole. This is how you adjust the wheel spacing to make the bearing tighter or looser. You should make it tight enough that you can't feel any play when you try to twist the bearing set, but not so tight that it's difficult to make it roll along the rail. You shouldn't be able to turn the wheels against the rail without the whole thing moving along the rail too. If you still have trouble, take your printer apart again and make sure the ends of the rails weren't damaged in shipping, causing them to not mate up squarely. Since the rails are aluminum, it's relatively easy for the sharp corners to be deformed from minor bumps. If the corners are deformed from impact damage, you should file/sand the deformity off so that the face of the end of the rail can mate flatly against the side of the rails you're bolting them to. If your rails are bent, you'll have to take that up with Creality. There's a warranty for a reason, and that definitely counts. If you aren't sure if your rails are bent, take two of them and place them together lengthwise. Rotate one of them 90 degrees a few times, checking if you can see light coming through between them. If you can, at least one of them is bent. Get a replacement. You spent money on the damn thing, make sure you get what you pay for! ... show more
Reviewed in the United States on September 17, 2020 by Kyle Kyle

  • Watch YouTube On-line Beginner Videos BEFORE Building - Assembly Sheet Is VERY Confusing
Model: Ender-3
Watch the third-party free YouTube on-line beginner videos BEFORE building. The included assembly sheet is VERY confusing … and I’m an engineer! The videos make good points about how extremely important it is to make sure the printer’s frame is absolutely square in all three dimensions. Just gradually tightening the bolts in a rotation (like when tightening the bolts/nuts on a vehicle wheel) isn’t good enough. The Z limit switch mounting bracket has a nub on the left front corner (looking from the front of the printer). Some videos say to clip it off (e.g., with diagonal wire cutters or heavy-duty shears), which is the only way that I could get to perform the bed “leveling” process. The process actually positions the bed parallel to the X-Y plane of the printer’s frame (left-to-right, and front-to-back). Some people mistakenly try to use a carpenter’s level to “level” the bed, but if the printer isn’t sitting on a perfectly level table/bench surface, and the bottom of the printer frame isn’t exactly parallel to the supporting table/bench surface (not likely), a carpenter’s level won’t be of any use. Threading the printing filament past the gripping feed rollers and into the white feed tube to the print head is very tricky. Some videos show that it helps to unscrew the brass fitting attached to the feed tube and get the filament to protrude out of the right side of the feed mechanism about an inch (25 mm), then screw the brass fitting back into the mechanism after pushing the fitting over the protruding filament. That makes it possible to get the filament into the feed tube - I couldn’t have accomplished that step without that hint. Getting the end of the filament into the hole beyond the gripping feed rollers was extremely frustrating, as the hole is impossible to see, even with bright lighting, as the hole passes through a black plastic housing behind the very close rollers. The menu items are somewhat different on my printer from any of the manual versions (included on the USB thumb drive, on the Creality.com site, elsewhere on-line, or what’s shown in the videos. I was able to guess that the Motion menu item was what had to be selected from the main menu in order to get to the Auto Home and Disable Steppers menu items, needed to perform the “leveling” steps. Once I had stumbled through the assembly sheet, then discovered the YouTube videos and done things right, printing was pretty straightforward using the built-in micro-SD card reader. I haven’t been able to scale a model down in the included Creality subset of the free, open-source Cura “slicing” software. The provided gcode files print just fine, but not the .stl files after scaling and saving as gcode files. The printer only displays and prints from gcode files that the slicing software generates from .stl (3D Object) files. I’m trying to resolve this issue via on-line searches and forums. ... show more
Reviewed in the United States on August 19, 2022 by Jim M.

Can't find a product?

Find it on Amazon first, then paste the link below.
Checking for best price...