
Genie Series II Garage Door Opener Wall Console - Sure-Lock/Vacation Lock for Extra Security - Light Control Button - Compatible with All Genie Series II Garage Door Openers - Model GBWCSL2-BX


Buy Now, Pay Later
- – 4-month term
- – No impact on credit to apply
- – Instant approval decision
- – Secure and straightforward checkout
Ready to go? Add this product to your cart and select a plan during checkout.
Payment plans are offered through our trusted finance partners Klarna, Affirm, Afterpay, Apple Pay, and PayTomorrow. No-credit-needed leasing options through Acima may also be available at checkout.
Learn more about financing & leasing here.
FREE 30-day refund/replacement
To qualify for a full refund, items must be returned in their original, unused condition. If an item is returned in a used, damaged, or materially different state, you may be granted a partial refund.
To initiate a return, please visit our Returns Center.
View our full returns policy here.
Recently Viewed


Features
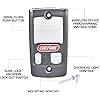
- The Genie Series II Wall Console control panel, has a back light, making it easy to locate in the dark
- This Genie Series II Wall Console control panel is equipped with a sure-lock slide lock that locks out remotes or keypads when you are on vacation for added safety
- This wall console, control panel, is very easy to install, with only 2 mounting screws, and two wires that attach to the back of the console
- The Genie Series II wall console is compatible with all Genie series II garage door openers made since 1995. Will not work with wall consoles that have a black button. Replacement for these models: BWC2, GPWC, GWC-2, GPWC
- This multi-function Genie Wall Console, allows you to turn the garage door opener lights on, independently from opening/closing the garage door
Description
The Genies Multi-function Series II wired garage door opener wall console Featuring Sure Lock Mode with new Slide Lock Design replaces an Genie Series II wall console manufactured since 1995. This wall control panel will not work on Genie Series III wall consoles. Installation of the multi-function wall control panel/console, is easy installs with just 2 screws. You have the ability to lockout remotes when you are on vacation, control your garage door openers lights, and open and close your garage door.
Brand: Genie
Special Feature: Alcohol-Free
Lock Type: Keypad
Item dimensions L x W x H: 4 x 0.75 x 2 inches
Material: Plastic
Brand Name: Genie
Recommended Uses For Product: Garage
Included Components: Includes the Genie Series II Wall Console, two mounting screws, and detailed installation instructions
Model Number: GBWCSL2
UPC: 765042454159 749860047335 780320029539 190283079692 050049020576 640213242493 696735525002 077349966861 642008672515 696582437978
Global Trade Identification Number: 76, 35
Manufacturer: Genie
Item Type Name: Garage Door opener wall console
Unit Count: 1.0 Count
Manufacturer Warranty Description: Limited 1 year
Additional Features: Alcohol-Free
Lock Type: Keypad
Control Method: Touch
Connectivity Protocol: Wired
Style Name: Wired
Color: Gray
Material Type: Plastic
Item Dimensions: 4 x 0.75 x 2 inches
Item Weight: 2.4 ounces
Frequently asked questions
To initiate a return, please visit our Returns Center.
View our full returns policy here.
- Klarna Financing
- Affirm Pay in 4
- Affirm Financing
- Afterpay Financing
- PayTomorrow Financing
- Financing through Apple Pay
Learn more about financing & leasing here.
Similar Products


Top Amazon Reviews
