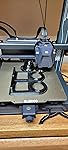
ELEGOO Neptune 4 Pro 3D Printer, 500mm/s High Speed Printer with Klipper Firmware, Auto Leveling and Direct Drive Extruder, Easy Assembly, 8.85x8.85x10.43 Inch Printing Size


Notify me when this product is back in stock
Buy Now, Pay Later
- – 6-month term
- – No impact on credit to apply
- – Instant approval decision
- – Secure and straightforward checkout
Payment plans are offered through our trusted finance partners Klarna, Affirm, Afterpay, Apple Pay, and PayTomorrow. No-credit-needed leasing options through Acima may also be available at checkout.
Learn more about financing & leasing here.
Selected Option
FREE 30-day refund/replacement
To qualify for a full refund, items must be returned in their original, unused condition. If an item is returned in a used, damaged, or materially different state, you may be granted a partial refund.
To initiate a return, please visit our Returns Center.
View our full returns policy here.
Recently Viewed


Size: Neptune 4 Pro
Features
- 500MM/S LIGHTNING-FAST SPEED: Equipped With Klipper firmware and powerful processor, ELEGOO Neptune 4 pro can print at 500mm/s amazing speed, allowing you to produce your creation faster
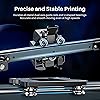
- UPGRADE FOR MORE PRECISION: Both the X and Y axes of Neptune 4 Pro are upgraded to robust all-metal guide rails with U-shaped steel wheels, to ensure less drag and more precision. 8.85x8.85x10.43 inch/225x225x265mm build volume
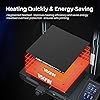
- SEGMENTED HEATED ZONES: The 3d printer has 2 independent heating areas . Slicing software automatically identifies the model size and activates peripheral heating zone if it exceeds the central heating zone. Significantly reduce power consumption and speed up heating
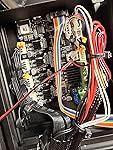
- DIRECT DRIVE EXTRUDER: Self-developed dual-gear direct drive extruder has a 5.2:1 reduction ratio, providing powerful extrusion and smoother filament feeding. Paired with metal throat pipe and unique air duct design to reduce nozzle clogging risk
- 300C HIGH-TEMP NOZZLE: With a 300C high-temp nozzle and an extended hot end, Neptune 4 Pro ensures faster melting and extrusion, can handle various filament materials, including PLA, PETG, ABS, TPU and nylon
- AUTO LEVELING & EFFICIENT COOLING: Newly design 121 (11x11) points auto bed leveling ensures quick and accurate leveling. Powerful double-sided cooling fans and model cooling blower fans prevent warping and enhance print quality
Brand: ELEGOO
Material: Aluminum
Color: black
Product Dimensions: 17.5"D x 18.7"W x 20.3"H
Item Weight: 8890 Grams
Product Dimensions: 18.7 x 17.91 x 20.27 inches
Item Weight: 19.6 pounds
Item model number: US-EL-3D-N4P
Date First Available: June 1, 2023
Manufacturer: ELEGOO
Frequently asked questions
To initiate a return, please visit our Returns Center.
View our full returns policy here.
- Klarna Financing
- Affirm Pay in 4
- Affirm Financing
- Afterpay Financing
- PayTomorrow Financing
- Financing through Apple Pay
Learn more about financing & leasing here.
Similar Products


Top Amazon Reviews