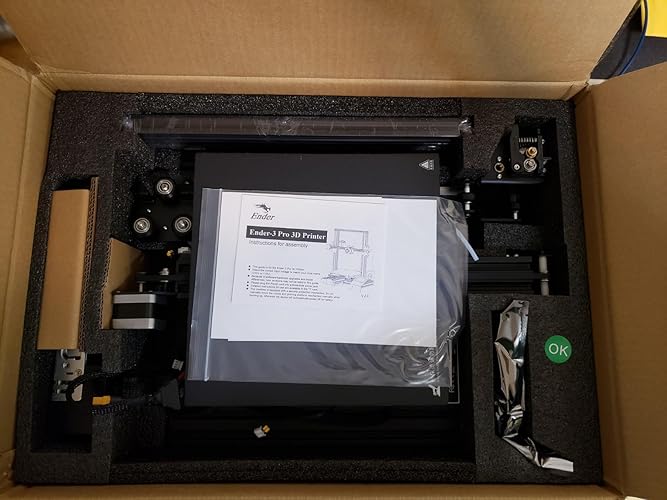
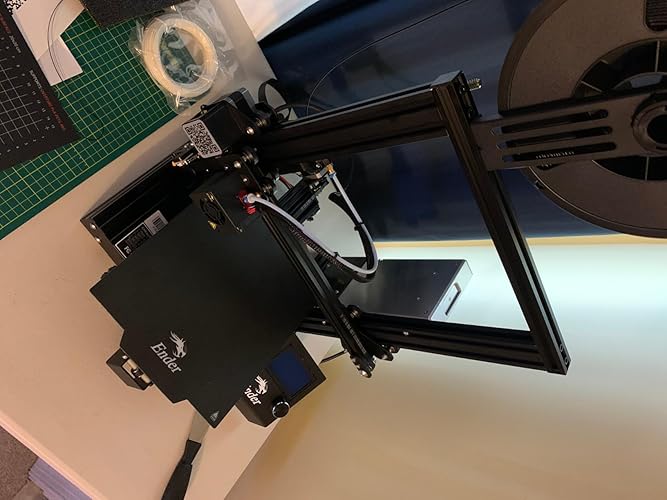
Search  for anything...

Creality Ender 5 Max 3D Printer, Build Volume 15.75x15.75x15.75 inch, 700mm/s Max Printing Speed Large 3D Printer, Auto Leveling 300℃ High Temp Precise Linear Rail Dual Z Axis

  • Based on 10,049 reviews
Condition: New
Checking for the best price...
$749.00 Why this price?
Labor Day Deal · 19% off was $929.00

Buy Now, Pay Later


As low as / mo
  • – Up to 36-month term if approved
  • – No impact on credit
  • – Instant approval decision
  • – Secure and straightforward checkout

Ready to go? Add this product to your cart and select a plan during checkout.

Payment plans are offered through our trusted finance partners Klarna, PayTomorrow, Affirm, Afterpay, Apple Pay, and PayPal. No-credit-needed leasing options through Acima may also be available at checkout.

Learn more about financing & leasing here.

Selected Option

Free shipping on this product

30-day refund / replacement

To qualify for a full refund, items must be returned in their original, unused condition. If an item is returned in a used, damaged, or materially different state, you may be granted a partial refund.

To initiate a return, please visit our Returns Center.

View our full returns policy here.


Availability: Only 10 left in stock, order soon!
Fulfilled by Amazon

Arrives Saturday, Sep 6
Order within 15 hours and 9 minutes
Available payment plans shown during checkout

Model: Ender 5 Max


Features

  • Large Printing Size: A larger bulid volume means more possibilities and more applications. Ender 5 Max offers a build volume of 400 mm x 400 mm x 400 mm, perfect for creating large items or printing small parts. You can print storage boxes, garbage cans and other household items that printers can't achieve
  • Up to 700 mm/s Maximum Printing Speed: Ender 5 Max equips 42-76 stepper motors drive the X/Y axis movement with power. Up to 700 mm/s print speed and 20000 mm/s3 acceleration for time-saving 3D printing
  • Automatic Bed Leveling and Excellent First Layer: Creality Ender 5 Max, large 3d printer, 36-point leveling for quick calibration, no longer cumbersome, easy to build a solid first layer. Hot bed tilt calibration, to prevent platforms from becoming uneven
  • High Temperature 300 C High Temperature Extruder: Hardened extruder gears of Creality Ender 5 Max, able to withstand 500 hours continuous extrusion. Reliable for 24/7 production without pause for inspection or maintenance
  • Improved design: Ender 5 Max has improved design, for example, 1.3-color status indicator light: visible from a distance of up to 10 meters, it will inform you of the exact status of the machine. 2. Robust frame and precise linear rail: super reinforced structure with enlarged die-casting aluminum alloy frame parts. The X-axis has a precise linear rail. 3. More strength from dual Z-axis motors: two independently motorized Z-axes comprising two pairs of feed screws, and each Z-axis is assisted by 2 linear rods for higher accuracy

Brand: Comgrow


Material: Aluminum


Product Dimensions: 25"D x 15"W x 22"H


Item Weight: 57.1 Pounds


Compatible Devices: Laptop, Personal Computer, Tablet


Product Dimensions: 25 x 15 x 22 inches


Item Weight: 57.1 pounds


Item model number: Ender 5 Max


Date First Available: March 17, 2025


Manufacturer: Creality 3D


Frequently asked questions

If you place your order now, the estimated arrival date for this product is: Saturday, Sep 6

Yes, absolutely! You may return this product for a full refund within 30 days of receiving it.

To initiate a return, please visit our Returns Center.

View our full returns policy here.

  • Klarna Financing
  • Affirm Pay in 4
  • Affirm Financing
  • Afterpay Financing
  • PayTomorrow Financing
  • Financing through Apple Pay
Leasing options through Acima may also be available during checkout.

Learn more about financing & leasing here.

Top Amazon Reviews


  • Ender 3 Pro is both Professional with a few upgrades and Beginner as is NICE
Model: Ender 3 Pro
I was really surprised at what this printer can do. I have 5 of them now and use them for production parts in my valve and machine. I even print sprockets using a chain drive and PC carbon fiber PETG carbon fiber. I have upgraded all of them a bit. All have direct drive extruder and the all metal hot ends, as I print at 248C and the Teflon tube cannot take that temperature very long and will cause a blockage in the hot end. The hottest I have had to print so far is 255 and it works great. You can buy a cheap “heat break” that makes the Creality hot end “all metal”. Three have the dual Z axis kit on them, and the other two still single and print fine. But the single Z's need leveling more often. I put all aluminum extruders on and have no issues with feed. I have never had to adjust the E steps, nor have I upgraded the firmware, as they all work and print parts within .02 mm. The only issue I had was three of them had .4 mm nozzles were not .4 mm, from the factory, and that caused some funny prints with the walls separating. I used a digital caliper and measure the filament coming out of the nozzles at under .3 mm. Now with every nozzle install I run some filament out and see if it, shows 0.4 exactly on all the replacements. All the walls print strong now. I think that Creality got some .3 mm nozzles with .4 marking. To get perfect prints requires some testing and working on the printers. I print almost exclusively PETG and many different brands depending on he price. I noticed that some I bought direct from China were “wet” and so I bought dryers. All the PETG I dry before using and get no “blistering” where the moisture expands under heat. I just don't have time to keep reprinting because of moisture. I also print some TPU and at on time printed over 500 of these “rubber” grommets that our supplier stopped making during the COVID shortages. The main thing is to assemble it correctly so that the X bar is level and the wheels (with the pom tires) can actually spin with some friction. You can measure with a metric tape or rule and get it within .5 mm. I actually drilled a 5 mm hole in the vertical to be able to get the X axis perfect. The hole allows the Allen wrench to loosen the X cross member so you can level it without having to keep removing and adjusting the whole X axis bar. The verticals need to be square to the base and they are very close. On two I put the triangle rods to get it perfect. I used a machinist square to get it perfect. Smooth is the keyword. You don't want any "jump" from the Z axis (rising axis). Parallel and 90 deg to the bottom frames. After about 6 months I installed the dual Z axis and that was simple enough. This one change made it so I can print the same part over and over up to 100 times without having to tram the bed. Also called leveling. `After some time I learned that he Z limit switch will get out of calibration and that spraying it with canned air removes the dirt or whatever is changing the stop point. I think an LED version would be better. On the beds, every one of them has had loose axles on the wheels. The 5 mm screws with 8 mm nuts needed to be tightened. To do this you need to loosen the offset wheels so you can get them vertically stable. There should be absolutely NO wobble in the bed. If you feel any, stop and tighten the rollers. I have had to replace three rollers where the bearings were bad and the wheels wiggled on the shafts. Always adjust the cam 10mm so the wheels can move with slight friction. Over tight causes problems and too loose is also bad. Just so they spin with friction. No wobble side to side or when you lift the corners of the bed. Every screw on the printer needs to be checked for tightness. EVERY screw. Loose screws are a nightmare. Even on my $1000 big printers, all of them needed to have the screws tightened, even the screws under the bed. No wobble and you will have “happy printing”. I have not put the auto bed leveling on as it actually takes longer to print with it (on my other printers). I use only glass on the beds (I scrapped off the magnetic sheet and cleaned with alcohol) and still use the doubled standard printer paper to set the level. I just got “good” at it. Then when the print starts sometimes, but rarely, I will tweak the adjustments. I usually print a skirt with three lines so I can “feel” the thickness of the first layer. I did put the stronger bed springs on also, this gives more stability. I use the Ultimaker Cura (updated)and it has more adjustments than most beginners can use. But as you learn you can make slight adjustments and try them out and see things improve. One of the good things is this printer is so popular you can find lots of YouTube videos to help you. And parts can be found on Aliexpress for the same parts way less. The all come from China, anyway. I have five of these Ender 3 Pro's now, bought two from Comgrow Amazon, came with the glass bed plates. I print almost exclusively PETG at 248c Nozzle and 85C bed temp, (this makes for very good layer welding) and bought the Creality glass plates and the Bed Weld, water based adhesive so the PETG will let go. The higher temp is to insure both a good layer weld and that the cooling will cause the parts to just come of very easy. Once printed they just come off very easy. If I dry the filament I get almost NO stringing. I can't stress how important dry filament is for nice prints. The metal flex plates and the ones that come with the printers magnetic plastic do not work with PETG at all. They are ruined after two prints. Glass is the best with the Layerneer Bed Weld and I have no problems with adhesion and removal. Just have to wait for cooling. The prints come off as if nothing was holding them when it cools. The parts in the photo are actually functional parts that we can't get from a supplier.. So, naturally I made a CAD drawing and made them. The trick with functional parts is to make the plastic about 1/3 thicker than on injection molded, because of the tiny gaps caused by the space between the "lines" of print. It is not 100% solid even if it looks like it is. And most of my prints use 100% infill because hey are parts getting some heavy use. Overall, it is a good choice and a workhorse printer. For the money it still can't be beaten, That is why the 5 stars. But for those who are “technically challenged”, you may get frustrated with the learning curve. After a few hundred prints you will be a pro. Watch the videos as there are tons of them. There may be equally good or better printers for the price, but the availability of parts, upgrade parts and help resources for these printers is amazing. ... show more
Reviewed in the United States on September 1, 2021 by James Arjuna Sr James Arjuna Sr

  • Fantastic first-time machine
Model: Ender 3 Pro
I am very impressed by my first 3D printer - I got it for prototyping cast metal parts, and I knew it would be a rabbit hole of learning a whole new technology. But this printer has made it fun rather than difficult. Assembly took less than an hour, and within 24 hours, I had my first finished prototype, using bronze PLA. It's been running almost constantly in the 2 months I've had it. After reading reviews, I had painter's tape and hairspray at the ready, but I haven't needed them once. The magnetic bed is great, although it is getting chewed up, they're only $10 to replace. I have to relevel it using a test file once in a while, but usually I just watch the brim print when I start a file, and make any tiny adjustments to the leveling screws while it's running. I will note that the bed on mine has a slight flex upward in the middle - enough that the first layer is fully solid at the edges and nonexistant in the middle. This isn't a problem for me, as I use .6-1mm bottoms on prints, and I don't care how the bottom looks. But when I have to stop a file early on, scraping this area clean is a pain. Often a half-layer remains and is pulled off with the next successful print. Quality has met my expectations, though I've never tried printing below .1mm resolution. I just replaced the nozzle for the first time, and it had definitely degraded (pushing bronze PLA through a brass nozzle, I expected it would wear out fast). But it's back to normal now, and replacing the nozzle was simple, following instructions in a YouTube video. I did print a filament guide arm as my test file, and it seems to help as I've never had a tangle or stuck filament. I'm very impressed that my test print is now a permanent part of the printer - honestly I did not expect my first attempt hitting "print" would actually work. I'm planning a few upgrades - a Raspberry Pi with Octoprint and a webcam to enable a network interface, an auto-bed leveler. I'll probably try to get an acrylic case for it and print ABS before long - I've been working in PLA so far. This price point is incredible and allowed me to rapidly build a product line as I started my business - for the cost of Sketchup and this printer, I was able to produce perfect CAD files to send to production - prototypes that I had held in my hands and played with that cost about $1 each in PLA. That blows me away and reduced my startup time by months and thousands of dollars. My one gripe is that if I leave it on for a long time, including just having it's computer powered by USB, it'll start "hanging" when printing. It starts to print but will just stop running midway through, and instead starts this weird behavior of making a hex pattern of burnt plastic drips. So far I can't identify a cause - my STL files are clean - but I've noticed it goes away if I power it totally off for 20 minutes before starting a new print. I'm guessing there's a memory problem going on, but I haven't had time to troubleshoot it with the mfgr yet. Overall it's a major win - with the added bonus that it prints neat little toys, and replacement parts for household objects. I have a technologically-minded nephew who's 11, and he'll probably be getting one of these for Christmas. I would say that if a kid is smart enough to know what "this part is very hot" means, they could use one of these with very little support/supervision - but you might want to assist with things like assembly and replacing the nozzle, which involve small screws and a bit of experience. ... show more
Reviewed in the United States on June 26, 2019 by Paul W.

Can't find a product?

Find it on Amazon first, then paste the link below.
Checking for best price...