Search  for anything...

Official Creality Ender-3 S1 Pro 3D Printer Ender-3 S1 Upgrade with 300°C High-Temperature Nozzles PEI Spring Steel Plate LED Light Sprite Direct Dual-Gear Extruder CR Touch Automatic Bed Leveling

  • Based on 504 reviews
Condition: Used - Like New
Checking for product changes

Notify me when this product is back in stock

$385.33 Why this price?
Save $13.67 was $399.00

Buy Now, Pay Later


As low as / mo
  • – Up to 36-month term with PayTomorrow
  • – No impact on credit
  • – Instant approval decision
  • – Secure and straightforward checkout

Ready to go? Add this product to your cart and select a plan during checkout. Payment plans are offered through our trusted finance partners Klarna, PayTomorrow, Apple Pay, and PayPal. No-credit-needed leasing options through Acima may also be available at checkout.

Learn more about financing & leasing here.

Selected Option

Free shipping on this product

This item is eligible for return within 30 days of receipt

To qualify for a full refund, items must be returned in their original, unused condition. If an item is returned in a used, damaged, or materially different state, you may be granted a partial refund.

To initiate a return, please visit our Returns Center.

View our full returns policy here.


Availability: Unavailable
Fulfilled by Amazon
Available payment plans shown during checkout

Size: Ender 3 s1 pro


Features

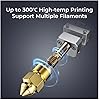
  • 300C High-temp Nozzle:The brand new nozzle made of brass can stand up to 300C printing temperature, and it is compatible with multiple filaments, such as PLA, ABS, PVA, Wood, TPU, PETG, and PA, providing more possibilities for creation.
  • Spring Steel PEI Magnetic Build Plate:Ender-3 S1 Pro has used the spring steel PEI magnetic build plate, which has good adhesion to the printed model and enables fast heating up of the heat bed. The build plates is not only durable but also flexible. Once the printing completes, users can remove the printed mdel effortlessly with just a slight bend.
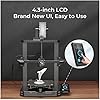
  • 4.3-Inch Touch Screen & LED Light:The 4.3-inch touch screen, supporting 9 languages, offers efficient UI interaction and is easy to use. It will dim out automatically for energy-saving if there is no action for 3 minutes. The equipped LED light enables comprehensive light fill, with which users can observe the printing details even in a dark environment.
  • "Sprite" Full-metal Dual-gear Direct Extruder:The "Sprite" full-metal dual-gear direct extruder with an extrusion force of 80N ensures smooth feeding when printing with different filaments, especially the flexible TPU.
  • CR Touch Automatic Leveling:Equipped qith CR Touch, the 16-point automatic leveling can complete quickly with compensation for points' printing height on the heat bed. Good effeciency saves much time.

Brand: Creality


Material: Aluminum


Color: Black


Product Dimensions: 20"D x 12"W x 20"H


Item Weight: 8.6 Kilograms


Product Dimensions: 8.66 x 8.66 x 10.63 inches


Item Weight: 18.92 pounds


Item model number: Ender 3 S1 Pro + P Cloth


Date First Available: February 26, 2022


Manufacturer: Creality 3D Printer


Frequently asked questions

This product is currently out of stock. Please check back later for shipping info.

Yes, absolutely! You may return this product for a full refund within 30 days of receiving it.

To initiate a return, please visit our Returns Center.

View our full returns policy here.

  • Klarna Financing
  • Klarna Pay in 4
  • PayTomorrow Financing
  • Apple Pay Later
Leasing options through Acima may also be available during checkout.

Learn more about financing & leasing here.

Top Amazon Reviews


  • A bit light on instructions, but an amazing printer
Size: Ender-3 s1 pro
I upgraded to this printer from a Wanhao D6 clone, wanting something a bit more up-to-date. The printer arrived on time and was well-secured inside its box. The instructions for putting it together were mostly clear (albeit terse), but were occasionally baffling. For example, the printer ships with a "Z-axis limit kit" which is clearly marked in the installation guide inventory, but there is no other reference to it in the installation guide. This was somewhat alarming, but after much searching online, I determined that it was just a spare part for something already installed. Another mystery: there are turnable knobs on both the front of the bed slider and the right of the gantry slider, and I *still* haven't figured out what those are for. Other than that, putting it together was reasonably easy, though I strongly recommend (a) putting it together on a large table with a blanket placed on the table (b) getting the help of a second person to stabilize it while putting it together and (c) using a long, thin magnetic screwdriver with changeable bits for screwing things in because the supplied drivers are not very useful for reaching into hard-to-reach screw sockets. Another key problem was the initial auto-leveling, which hit an error about halfway through with an extremely unhelpful error message despite my worktable being absolutely level. There is no "troubleshooting guide" in the installation guide, and I was in a bit of despair. Again, searching online, it appears that auto-leveling will fail if there is more than a 3mm difference in level between the starting point and another other point, so the fix is to manually level the bed using the knobs under the bed while a small construction level is placed on it -- then autoleveling will work and you can follow the rest of the instructions for it normally. The bed wobbles slightly from left to right, and this is apparently by design. I'm used to a printer where the bed moves up and down, not forward and back, so this was slightly startling to me. I'm also used to a printer where there is a specific command to insert material, but on this printer and I got stuck trying to find a similar command on the S1 Pro, but in fact you just pull back the feeder clip and push it in without any command. This is way more efficient, but the manual assumes that you know how to insert material already and doesn't tell you how to do it. (Related to that, I really like the high degree-of-freedom material guide on the gantry, as it helps keep the filament from getting into trouble without impeding the nozzle feed as the head moves around.) Another installation omission, though this one's mostly my fault -- the guide tells you to install the wire clip, but forgets to tell you to feed the ribbon cable through it. If you are rushing things, you might forget to do it on your own. Failing to do this can cause the ribbon cable to interfere with the filament near where it enters the heater, though I actually managed two perfectly fine prints before I realized what was happening. OK, that's it for the weird and annoying stuff. The good news is that, once you have it set up and leveled, it's amazingly good. The touch screen is almost perfect (you have to hunt around a bit for the manual controls to heat the nozzle if you want to melt out some older filament, but that's my only complaint). Auto-leveling after the first time is so easy and fast that I always do it before every print, even when I'm printing objects one after the other. I first built the included "money cat" STL using the included PLA, and it was absolutely perfect on the first try. I use Simplify 3D for slicing, so I searched around online for an S1-specific FFF format file for it to generate my own gcodes. I could only find a format file for PLA, but happily this worked and, using Overture PLA+, I printed a half-dozen successful builds with no failures at all -- no stringing, no warping. Adhesion was perfect during the build, and the builds just popped off of the plate once it had cooled -- literally, I could just pick them up with my hand as if they were just sitting there unattached. I only needed minimal support for bridging, and I was able to print at pretty extreme angles without needed support. I tried Overture PETG the next week, researching the heat and speed values, and got it right the first time. Again, no problems with the prints at all. Today, I tried Overture ABS, again making guesses at the values based on some (often conflicting) online information. This would be the trickiest print, since ABS is notoriously bad at adhering and generally you also need an enclosure for it to work well. However, once again, everything went perfectly. I didn't have to coat the build plate with anything, I didn't get any curling at the edges, and the part just popped off once the build plate had cooled. Overall, I've done over a dozen prints in the last couple of weeks using three different kinds of plastic (a couple of them being quite complex), and every single one has turned out to be a high-quality piece. I can't say enough good things about this printer -- it's a great buy for the money. I almost went for the much more expensive Prusa, but I'm happy that I saved myself a bunch of cash and went with the Creality instead. ... show more
Reviewed in the United States on October 13, 2022 by Matthew Gertz

  • An incredible device!
I put off getting a 3D printer for a very long time, hoping things would settle out and they would "just work out of the box" like most tech things do. I finally pulled the pin and got this one. It is amazing! I can't believe all the things I can make with this. I am a do-it-myself or it doesn't get done and am constantly tinkering with fixing something. I have built many items that I would normally have had to make out of wood or metal by hand and the precision of the prints is so great, that I rarely have to redo anything. A little sanding is usually all it takes to finish off even the most demanding items since I can start so close to what I want. The setup is very simple, since they have it almost all assembled in the box. After putting the few items together, just double-check all the adjustments and you are off and running. I didn't have any problems with any of the adjustments on mine, but others have reported issues with loose tolerances. The bed leveling is very much worth the extra time to get correct. I watched many videos and read a lot before I dove into this and still took a bit to get things reliable on my end. I kept changing things and adjusting to see what difference the changes would make until I am pretty comfortable jumping into a new print with only a few seconds of setup. The CR auto bed leveling system seems to help but don't forget to adjust the Z-level to get the extruder just right on the bed. I am finding that the correct settings here really cut down on other problems that may not even seem to be connected to a non-level bed. The filament-out sensor is vey useful also, not only when a spool actually runs out, but I have used it to pause prints to change colors and it works very well. I have printed a camera mount to run on my Octoprint box to monitor long prints and a tool holder since the drawer is a little difficult to get in and out of with the printer in an enclosure. The enclosure has also helped a lot since the environment can be much more consistent with temps and humidity with everything insulated. It also keeps dust off the machine since we run a wood stove and live in a dusty area. I am very happy with my purchase, and am telling everyone that the time has come to jump on this technology - things have matured to the point of being pretty turn-key at this point. I know the Ender 3 is an entry-level machine, but the S1 Pro has the options I would have eventually bought to make it a decent machine. ... show more
Reviewed in the United States on April 28, 2023 by A. Paradis

  • High Hopes
I had high hopes for the ender 5 s1. But my ender 3 s1 prints better. All I get with the ender 5 s1 are gaps in the print, stringing and the prints look terrible. I'm using the same filament as with the ender 3 s1 I've even lowered the print speed down to the ender 3 s1. But to no avail. The screen on the ender 3 s1 scrolls through a file name so you can see what whole file you are looking at, the ender 5 s1 only show the first couple words no scrolling nothing. Maybe after the ender 5 s1 has been out for a while they will get the bugs out but for now at least for me the ENDER 3 S1 is a better choice. I'm going to try different setting to see if I can get a better print if not I will be sending it back. Shame to I had high hopes for the ender 5 s1. This is an update on the ender 5 s1 i tried to print a Torture Toaster with it. After the print nothing would move. I've tried to print things that my 3s1 print fine but the 5s1 stops half way through the print. I've wasted half a spool of filament trying to get something to print right. The only thing that printed right was the rabbit on the card. nothing else has printed right, no matter the settings I use. it's going back I will stick with my ender 3 s1 it works. Another thing I've noticed was on the rails on top there is a lot of rubber from the rollers, which to me means they will wear out fast. I really wanted this ender 5 s1 to work as promised but to no avail. I really do wish it worked, but i got a new ender 3 s1 plus. Seems to be working well. Larger print bed. ... show more
Reviewed in the United States on January 2, 2023 by just me

Can't find a product?

Find it on Amazon first, then paste the link below.