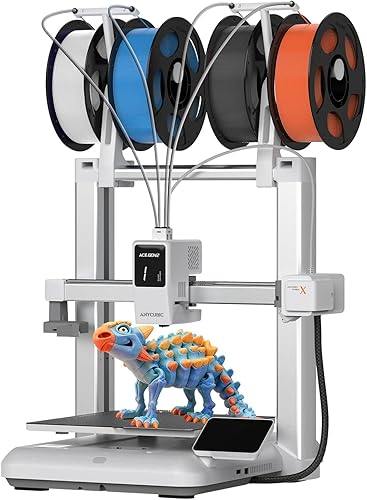
Anycubic Kobra X Multicolor 3D Printer, Easy Setup with Native 4-Color Printing Up 19 Color, 600mm/s Fast 3D Printing, AI Camera, Quiet 45dB, 260mm³, FDM for Kids Beginners Family Makers Professional


Buy Now, Pay Later
- – 6-month term
- – No impact on credit to apply
- – Instant approval decision
- – Secure and straightforward checkout
Ready to go? Add this product to your cart and select a plan during checkout.
Payment plans are offered through our trusted finance partners Klarna, Affirm, Afterpay, Zip, Apple Pay, and Google Pay. No-credit-needed leasing options through Acima may also be available at checkout.
Learn more about financing & leasing here.
FREE 30-day refund/replacement
To qualify for a full refund, items must be returned in their original, unused condition. If an item is returned in a used, damaged, or materially different state, you may be granted a partial refund.
To initiate a return, please visit our Returns Center.
View our full returns policy here.
Recently Viewed


Features
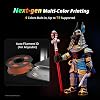
- Newest Level - 19-Color with 4 ACE 2 ProWhy settle for one color when you can have multicolor? The Kobra X comes born with 4 colors built-in. It is innovative 3D printer, easily expand palette up to 19 breathtaking colors with 4 units ACE 2 Pro. Turn every ideas into reality. (Tips: Both ACE 2 Pro and ACE Pro are incompatible.)
- Savings 2X TimeStop wasting hours and filament on purging! Kobra X impresora 3D reduces the filament and machine travel path by 81.25%, so 2X the Speed, and cutting material costs in half.
- Hardened Precision & High Speed Equipped with a high-durability hardened steel nozzle and vibration compensation, the Kobra X ensures every layer remains smooth. Accelerate workflow with a max speed of 600mm/s. Complete Benchy in 14mins.
- Flawless First Layer with LeviQ 3.0The LeviQ 3.0 and auto bed leveling system uses a 49-point calibration and advanced leveling algorithm to ensure 100% bed flatness. Make every leveling process more efficient and precise. Ready to print 15 mins after pickup.
- Smart AI Monitoring & Large Model LibraryAPP remote control, features Spaghetti detection and foreign object detection. The innovative top-mount spool holder releases more desktop space.A vast library of 10.0000 models to choose from. Perfect for home use, schools, and makerspaces. Features a large print size of 260mm x 260mm x 260mm.
- Multi-Material Compatibility Supports mixed printing of rigid and flexible filaments including PLA, PETG, TPU, PVA, and ASA with nozzle temperature of 300C for versatile printing applications
- Advanced Connectivity Options Features dual-band Wi-Fi with stable 2.4G/5G and LAN connectivity, allowing remote control and live status monitoring through the Anycubic App and Slicer for convenient operation
Description
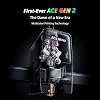
ACE GEN 2 has an adaptive extrusion force compensater. It constantly and automatically adjusts the extrusion force based on the filament's hardness, enabling seamless transitions between different materials. Anycubic is a famous consumer-grade 3D printing manufacturer specializing in delivering quality 3D printing products. Featuring a professional R&D team and high-end innovation technologies, we could make 3D printing more accessible to meet the demand from 3D professionals and amateurs alike. We are passionate about providing effective 3D printing solutions to unleash your creativity and help you push the limits of what's possible. Visit the Store Visit the Store Visit the Store Visit the Store Visit the Store Visit the Store Visit the Store Visit the Store Visit the Store Visit the Store Visit the Store Visit the Store Visit the Store Visit the Store A more comprehensive range of high-quality products at competitive prices To meet our users' various needs, we provided multiple options. So You can always find your suitable 3D printers in our stores whether you are a 3D printing beginner or a professional. We believe there's an innovator in everyone. We are passionate about helping you transform your ideas and creativity into reality and making you enjoy the freedom to create with 3D printing technology.
Brand: ANYCUBIC
Material: Metal
Color: Grey
Product Dimensions: 23"D x 13"W x 22"H
Item Weight: 9.5 Kilograms
Product Dimensions: 23 x 13 x 22 inches
Item Weight: 20.9 pounds
Date First Available: February 27, 2026
Manufacturer: ANYCUBIC
Frequently asked questions
To initiate a return, please visit our Returns Center.
View our full returns policy here.
- Klarna Financing
- Affirm Pay in 4
- Affirm Financing
- Afterpay Financing
- Zip Pay in 4
- Financing through Apple Pay
- Financing through Google Pay
Learn more about financing & leasing here.
Similar Products


Top Amazon Reviews