
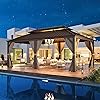
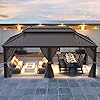
EROMMY 12'x 20' Gazebo Galvanized Steel Outdoor Hardtop Canopy Double Vented Roof Pergolas Aluminum Frame with Netting and Curtains for Garden,Patio,Lawns,Parties


Buy Now, Pay Later
- – Up to 36-month term if approved
- – No impact on credit
- – Instant approval decision
- – Secure and straightforward checkout
Ready to go? Add this product to your cart and select a plan during checkout.
Payment plans are offered through our trusted finance partners Klarna, Affirm, Afterpay, Apple Pay, and PayTomorrow. No-credit-needed leasing options through Acima may also be available at checkout.
Learn more about financing & leasing here.
Selected Option
30-day refund/replacement
To qualify for a full refund, items must be returned in their original, unused condition. If an item is returned in a used, damaged, or materially different state, you may be granted a partial refund.
To initiate a return, please visit our Returns Center.
View our full returns policy here.
Recently Viewed


Material Type: Galvanized Steel Roof Aluminum Frame
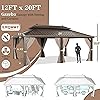
Size: 12'x20'
Features
- GALVANIZED STEEL ROOF:Size: 12'X 20' Permanent Gazebo. Beautiful hard metal top instead of normal fabric or polycarbonate material.Compare to a traditional soft top,Galvanized steel metal top can withstand heavy snow, which provide you a privacy, safe and cool room
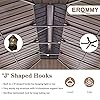
- VENTED DOUBLE HARDTOP:Compared with one layer design, this double gazebo canopy allows sunlight to filter though and provides excellent airflow and the sloped roof allows rainwater to slide right off. Hardtop gazebos for patios can tolerate high summer temperatures and withstand UV rays,provides you plenty of cool shade to enjoyment.Finally, the interior hooks on the ceiling can be used for hanging the lamp or heater
- REINFORCED ALUMINUM FRAME:Powder-coated gazebo aluminum frame, which is sturdy, anti-corrosion and all weather resistant for years of use. Stable structure can withstand heavy snow and wind.It is built with 4.7"x4.7" triangular aluminum stand pole, much bigger and stronger than standard models.All materials are built to last,never becoming rusty or deformed.Plus, the sturdy expansion screws and ground stakes provided for extra stability
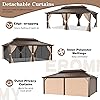
- NETTING & CURTAINS:The gazebo curtains are made of 180G M2 polyester fabric and PU, which is CPAI-84 certified, flame resistant.Detachable curtains and netting can be adjusted through dual-track seperatly, offer a fully sheltered privacy space, while having sufficient airflow and visibility.Fully enclosed zippered double layer sidewall protect you from UV rays while adding more privacy
- VERSATILE USAGE:EROMMY patio gazebo provides 240 rectangle feet of coverage without feeling crowded.This heavy-duty gazebo provides you ample space to hold outdoor activities, such as picnics, BBQs, cook-outs, and get-togethers. Furthermore, the space allows you to enjoy time with your friends and family, creating memories for years to come
Brand: EROMMY
Material: Galvanized Steel Roof Aluminum Frame
Style: Modern
Product Dimensions: 240"L x 144"W x 123.6"H
Item Weight: 555 Pounds
Frame Material: Coated aluminum
Water Resistance Level: Water Resistant
Shape: Rectangular
Ultraviolet Light Protection: 99%
Assembly Required: Yes
Brand: EROMMY
Material: Galvanized Steel Roof Aluminum Frame
Style: Modern
Product Dimensions: 240"L x 144"W x 123.6"H
Item Weight: 555 Pounds
Frame Material: Coated aluminum
Water Resistance Level: Water Resistant
Shape: Rectangular
Ultraviolet Light Protection: 99%
Assembly Required: Yes
Occupancy: 4-6 people
Color: Vertical Double Roof, Dark Bronze
Manufacturer: EROMMY
Item Weight: 555 pounds
Frequently asked questions
To initiate a return, please visit our Returns Center.
View our full returns policy here.
- Klarna Financing
- Affirm Pay in 4
- Affirm Financing
- Afterpay Financing
- PayTomorrow Financing
- Financing through Apple Pay
Learn more about financing & leasing here.
Similar Products


Top Amazon Reviews
