Search  for anything...

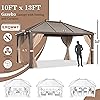
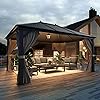
EROMMY 10'x13' Hardtop Gazebo, Galvanized Steel Outdoor Aluminum Canopy with Netting and Shaded Curtains, Single Roof Pergolas, Permanent Metal Pavilion for Patio, Backyard, Deck and Lawns, Brown

  • Based on 549 reviews
Condition: New
Checking for product changes
$1,299.99 Why this price?
Save $1,650.00 was $2,949.99

Buy Now, Pay Later


As low as / mo
  • – Up to 36-month term with PayTomorrow
  • – No impact on credit
  • – Instant approval decision
  • – Secure and straightforward checkout

Ready to go? Add this product to your cart and select a plan during checkout. Payment plans are offered through our trusted finance partners Klarna, PayTomorrow, Affirm, Apple Pay, and PayPal. No-credit-needed leasing options through Acima may also be available at checkout.

Learn more about financing & leasing here.

Selected Option

Free shipping on this product

This item is eligible for return within 30 days of receipt

To qualify for a full refund, items must be returned in their original, unused condition. If an item is returned in a used, damaged, or materially different state, you may be granted a partial refund.

To initiate a return, please visit our Returns Center.

View our full returns policy here.


Availability: In Stock.
Fulfilled by Erommy

Arrives May 25 – May 28
Order within 16 hours and 52 minutes
Available payment plans shown during checkout

Size: 10x13FT, Single Roof


Features

  • -HARDTOP GALVANIZED STEEL ROOF:Our Galvanized Steel double roof features three-layer protection that reduces the heat while blocking 99% of harmful UV rays and preventing water from leaking. The gazebo is sturdy enough to withhold heavy snow and wind. The sleek overhang roof design also prevents rainwater from gathering.
  • -RUSTPROOF ALUMINUM FRAME:The strong powder-coated aluminum frame of the garden gazebo is weather-resistant and prevents fade, rust, and corrosion. The ground stakes with pre-drilled holes for easy mounting and fixing ensure the overall stability on different surfaces.
  • -NETTING & CURTAINS:This 10'x13' patio gazebo has a double-track system that allows for double-layered sidewall and sliding each layer with ease. Two side zippered privacy curtains and mosquito netting protect you from the insects, sun, and rain while still having full airflow and visibility.
  • -MULTIPLE APPLICATIONS:This outdoor weather-resistant gazebo is perfect for a variety of events, such as family gatherings, BBQs, parties, etc. Equipped with hooks on the top roof, it can be used to hang up the lights and fans to enrich this aluminum hardtop gazebo. A patio set and table will fit perfectly under the rectangle roof, so you can always be outside no matter the weather.
  • -EASY ASSEMBLY:The 10'x13' large size allows your family and friends to enjoy the great outdoors in your patio, backyard, deck, etc. EROMMY hardtop garden tent will come with 2 boxes, the installation will take approx. 5 hours for 2-3 people. If you have any questions, please feel free to contact us.

Product Dimensions: 156 x 120 x 0.01 inches


Manufacturer: EROMMY


Frequently asked questions

If you place your order now, the estimated arrival date for this product is: May 25 – May 28

Yes, absolutely! You may return this product for a full refund within 30 days of receiving it.

To initiate a return, please visit our Returns Center.

View our full returns policy here.

  • Klarna Financing
  • Affirm Pay in 4
  • Affirm Financing
  • PayTomorrow Financing
  • Apple Pay Later
Leasing options through Acima may also be available during checkout.

Learn more about financing & leasing here.

Top Amazon Reviews


  • Good purchase for the money, recommended
Size: 10x13FT, Horizontally
edit a couple weeks and a few heavy storms later: The 10x13 is waterproof, however...when it rains hard like it has here lately it hits the metal roof and bounces into the top roof's bug netting and we end up with quite a bit of wetness right along the middle of our gazebo cover. No real way to prevent it if you want the vent at the top, but just wanted to mention it in regards to whether it is waterproof or not. I have stood out under it in heavy rain with a flashlight looking up underneath and I have seen no leakage through any of the covered areas. This review is for the 10x13 size. Summary, built it over the last two days, frame on the first day, roof on the second. I had my two kids assist with holding the legs for 10 minutes while I secured the horizontal beams, but I did the rest of the build by myself. I would recommend this purchase to friends as I like the final built product. First, FedEx ground delivery, ugh. This size has four boxes. All four boxes info were received by FedEx on Friday for pickup from the CA warehouse with a proposed Thursday delivery. The first three boxes behaved normally, though two were shipped Friday and one waited until Monday, they were delivered to Ohio on Thursday and Friday. The fourth box was picked up Friday and sat at the FedEx origin site until Wednesday! Then it shipped and had no updates until it showed up again saying it was in Ohio on Friday and was delayed to Saturday. Then it was delayed to Sunday and made it here Sunday afternoon. Not sure why that box was treated so weirdly. So the four boxes arrived over four days, a little beaten up but not so much as to damaged the contents. I unpacked everything and only found a few almost unnoticeable dings and none of the severe bent pieces others discovered. I put together the frame on the first day. I recruited my two kids to hold up two of the legs while I bolted the frame together. Then I marked the leg locations and installed concrete anchors that I bought from the local hardware. I opted for slightly bigger than what was included. Other than help propping the legs so none of the horizontal arms would bend at all, I built the rest of the gazebo by myself. I only had one screw hole problem. Several times I had to loosen adjoining bolts a little more to make slight adjustments so holes lined up but that is to be expected. All other holes lined up fine. The one i had a problem with is the corner cover cap, the big corner cover that takes two screws on top and two on the bottom. I got to the last corner, three screws in fine and the fourth would not find the hole. It was getting dark so I could not see that good. After some frustration I took the other three screws back out and removed the bracket and sure enough, there just was no fourth hole. They missed drilling that hole. Like I said though, that was the only misalignment or missing hole i encountered. The next day the roof went on. It was a bit windy of course, so the roof panels acted like sails and were harder to manage than they could have been. The small upper panels were not bad at all. I did two at a time, sliding them both in and then attaching the bottom channel. I put temporary bolts into the ones shared by the next panels. Did that all the way around. I did the the four panels on the two short sides next. The first one was a disaster as I tried to manhandle it in and it just kept popping out on me, and the wind did not help. So the way I found was to through the panel up over the two cross bars, then while holding the panel up I turned on the ladder so I was under the panel facing outwards. I found it much easier this way. I would guide it into the straight side was high as it would go and brace it. Then I would work in the diagonal side. Once in, while holding the panel steady, I would turn back around to secure the panel with the bottom channel piece. Then do the next panel, get the bolt into the open hole, remove the bolt from the shared hole and reinstalling it with the bolt hole cover piece. The first panel probably took me about 25 minutes to figure out the way that worked for me. Each panel after that took probably 5 minutes at the most. The middle side pieces with the two straight sides were easy, just remember to put the small R piece on first, then overlap it on the larger panel and push both up at same time. Went easy. Hint for the rest, I did everything else from under the roof, no need to be above the roof. I have seen comments about the little plastic clips and the R1/2 pieces. I put the clips on after installing the panels first. I just used both thumbs and popped it under the join where the R and Q pieces met. This was not that easy, my thumbs were very sore by the time I was done. For the R1/2 pieces, get a tall ladder to where your head is basically touching the ceiling off the gazebo. Then turn the pieces and stick them through the opening. I found it very easy to put in the diagonal side first, slide it over tight and the straight side had enough room to slide right under, then slide it up and log it in position with the clips. Finally, those wedge pieces (Y I think?), you can do those the same way, by reaching through the vent openings at the top and popping those in, then reaching through with a power drill. There are screw holes for these already. I could not see out the opening and handle the drill at the same time so I blindly located the screw holes and drilled them in. Seemed kind of stupid, yeah, but it was easy enough. By the way, I am 6 feet tall with proportionately long arms. I believe that panels R1/2 would be harder for a shorter person, but at the same time the wedges and screw might be easier. I saw some questions on the curtain/screen hook and how the velcro works. Curtain on the outside hangers, screen on the inside. Put the screen velcro hook through the grommet hole in the curtain and hook into the hole in the leg. There are three velcro strips, a long and short on one side of the screen and a short on the other side. The two on one side are used to secure both the screen and the curtain, just wrap them in opposite directions around the outside of the leg post and secure them. If you want to use the netting and just secure the curtain, then you use the long one and the short one from the other side of the screen and wrap in opposite directions around the leg post. If done right, this should secure just the curtain and leave the net free. You can see in one of my pics where it is all tied back. You never use all three pieces of velcro at once. I also included a pic showing what the inside ceiling looks right with the bug screen they included. I did have one corner where the hook was not staying as well so I little bend in the hook and it did not pop anymore. All in all, an intermediate difficulty build for a single person. I could have done the legs alone, but having help just made it easier. I have always enjoyed building things like this and have the patience to step back and ask myself "what the heck?!?!" and reason it out before continuing. I quickly ditched the included tool and used a screwdriver with the appropriate bit. I hate hex keys! I only used a drill for those screws on the roof where they said to do so. I find it too easy to strip holes in these kinds of things with power tools. I also found it helpful to use my step stool in addition to the full ladder. Made it easier to quickly move around the bottom edge. I did use them both for the big panels as it made it easier to pivot between positions. You can see a couple stages of the build and the final result in my pics. We put ours up on those small stone pillars. This makes the bug netting less effective because it opens the bottom up, but we are putting a hot tub under ours, so the bottom screening (hopefully) is not as necessary and we wanted the extra height. Mosquitoes do fly close to the ground, so if it becomes a problem we will find a way to add some netting to reach the ground. We plan to add some led lighting around the ceiling. We had a cheaper gazebo some years ago at our previous house whose legs "folded" in the wind and it collapsed. I would expect the larger legs and sturdier bracing of this one to stand up stronger. My only contact with Erommy was to let them know that Amazon said it was delivered, but that was only the first two boxes and the fourth box was currently "lost". They answered a few hours later that FedEx showed a new delivery date of Saturday. I checked and sure enough, FedEx had updated during those few hours between emails. So they were prompt and accurate with their reply. ... show more
Reviewed in the United States on October 18, 2021 by S. Davis S. Davis

  • High Quality Gazebo
Size: 10x13FT, Horizontally
This gazebo was actually my second choice. The one I originally ordered was out of stock and unavailable for 6 weeks. This was close in size and price so I went with it. Glad I did. This is a very nice gazebo. A few things to note. This gazebo comes in four (4) boxes. I got three on the day I was promised. I was unaware that there was a forth box until I laid out all the parts and discovered I was missing the roof panels. I contacted Customer Service and they replied immediately that the fourth box was actually close by and would be delivered the next day. It was. I didn't know how many boxes were in the shipment. If you're not going to assemble this right away, you may not know you are missing a box until much later. NOTE TO SELF: FOUR (4) BOXES) The first thing I did was pull out the assembly instructions and was horrified to learn that there was no writing . Just pictures. They looked complicated and I feared the worst. In reality, the instructions were easy to follow, well illustrated and I didn't have to deal with writing that was done by someone in China who took a semester of English in the 8th grade. I read a lot of reviews that said this requires 2 or 3 people to assemble. I assembled the entire gazebo with the exception of the roof panels by myself (I'm 67). Things you need to know: This gazebo needs to be on a base of either concrete pad or a wood deck. I built a ground level deck for mine . I made the deck a foot longer and a foot wider than the gazebo. If you are working alone, Assemble the four legs and rectangular frame upside down. When all four legs are on the frame, tip it over and do the rest standing up. As with most things I do, I assembled mine during a heat wave. Although I live in Maine, it was in the mid nineties on the days I built this. My yard has no shade whatsoever. If you are assembling this in the direct sun, put up a canopy of have a garden hose handy. The parts get incredibly hot. If you don't cool the parts or keep them shaded, handling will be a problem. I misted the parts with the hose. Worked great. I've read review that said some holes don't line up. They do. If you are having a hard time lining up holes, check the instructions again. You are likely doing something wrong. Most of the screws go into threaded brass inserts. Make sure your screw is threaded properly before driving it home. If you cross thread or if you over tighten, the brass insert will spin in the hole and you won't be able to tighten it or remove it. Take your time. I read reviews that said the roof leaks. Within three days of completing mine, a tropical storm came barreling through. I feared the worst. Wind speed got to 50mph and the rain was torrential and driving. I actually went out to check on the gazebo. It held strong and not a drop of rain entered through the roof. Take your time, follow the instructions. If the roof is assembled properly it is water tight. I'll be interested to see how it does with a snow load this winter. **You will need a second person, and a second step ladder to put the roof panels up** The gazebo comes with 12 wedge anchors. These are great for concrete but if you are securing to a wood deck they wont work. I used 2 1/2" galvanized deck screws. In hindsight, had I know about this, I would have added blocks under the deck where each leg lands. Since my deck was built before I got the gazebo it was too late. I did buy some galvanized twisted cable and some eyebolts. I drove the lag eyebolts into the deck frame, ran the cable around each leg and secured with a galvanized wire rope clip. Not real pretty by if I get a big storm it will keep it from ending up in the trees across the street. The only issue I had with the instructions was about the curtains. They come with a Velcro tie to secure them to each post. I still don't know how those work but I've got them to hold back the curtains. Be aware that each curtain covers 1/2 side. It's a little confusing at first but you can close in any part or all of the gazebo with the curtain and / or net. In summary, we have tried all kinds of things to shade our yard. Canopies, Huge 12' umbrellas etc. None really did the job. I was hesitant to part with $1400 for an experiment but it turned out great. This gazebo provides shade wherever and whenever you need it. The roof is well ventilated and it' very comfortable to sit out under it. It is my wife's "go to place". It was a good buy. If you're looking for some shade, you won't go wrong with this gazebo. ... show more
Reviewed in the United States on August 26, 2020 by Bob Gervais Bob Gervais

  • Happy with the product
Size: 12x20FT, Vertically
I am very happy with the product but it is a bear to put together. there were 2 of us and it took us a full day to assemble once we laid out all pieces in order and made some guesses for the lack of instructions in certain parts of the instructions
Reviewed in the United States on March 1, 2023 by Andre L. Sconiers

  • VERY NICE LOOKING YARD ADDITION,,,, BUT MAJOR PROBLEMS READ ON
Size: 12x16FT, Vertically
READ BEFORE YOU BUY ,,,, I like this a great yard piece now that its up ''BUT" LOL, it was a bad day when we opened all the boxes like it said to do and NO INSTRUCTIONS just a very poor set of very bad pictures.. Never had so many problems putting things together only to take apart over and over trying to tell what parts were what from the poor pics they gave INSANE. Something this big with so many parts and no Instructions really sucked.. I am a car builder , home builder, can build anything but this was a joke, for 3 of us lost tempers alot of bad words it was not fun.. Some reviews said 1 person could put together Well they lied no way can 1 person do this alone,, Mission Impossible. Now that its together we have not been able to use it the day we got it done 3 of us sat under it to laugh about our ordeal and have a beer,, it was 90 out that day but the heat radiating from the roof was way to hot we couldnt sit under it for long. Now its 110 out and that dark roof gets so hot you cant touch it OR SIT UNDER IT something I never thought of but you cannot use this to get in the shade and cool off which is what its for. We have 120 in July and August this will be not good, I have a carport with a white metal roof that you can touch sit under to cool off anytime.. THIS IS REALLY A WASTE OF MONEY TO GET FOR SHADE AND COOLING OFF So this has not been used yet thinking of putting a white roof on it.. painting it white, or insulating the inside so we can use it, PRETTY UPSETING SO FAR ... show more
Reviewed in the United States on June 30, 2022 by Bob

Can't find a product?

Find it on Amazon first, then paste the link below.