Search  for anything...

Epson Perfection V600 Color Photo, Image, Film, Negative & Document Scanner

  • Based on 6,524 reviews
Condition: New
Checking for product changes
$299.99 Why this price?
Save $99.01 was $399.00

Buy Now, Pay Later


As low as $50.00 / mo
  • – 6-month term
  • – No impact on credit
  • – Instant approval decision
  • – Secure and straightforward checkout

Ready to go? Add this product to your cart and select a plan during checkout. Payment plans are offered through our trusted finance partners Klarna, PayTomorrow, Apple Pay, and PayPal. No-credit-needed leasing options through Acima may also be available at checkout.

Learn more about financing & leasing here.

Selected Option

Free shipping on this product

This item is eligible for return within 30 days of receipt

To qualify for a full refund, items must be returned in their original, unused condition. If an item is returned in a used, damaged, or materially different state, you may be granted a partial refund.

To initiate a return, please visit our Returns Center.

View our full returns policy here.


Availability: Only 2 left in stock, order soon!
Fulfilled by Office Depot LLC

Arrives May 3 – May 7
Order within 2 hours and 41 minutes
Available payment plans shown during checkout

Style: V600 - New


Features

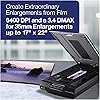
  • Create extraordinary enlargements from film: 6400 x 9600 dpi for enlargements up to 17 Inches x 22 Inches. Maximum Scan Area 8.5 x 11.7 inches. TPU 2.7 x 9.5 inches
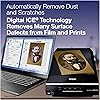
  • Remove the appearance of dust and scratches from film: Digital ICE for Film
  • Remove the appearance of tears and creases from photos: Digital ICE for prints
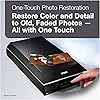
  • Restore faded color photos with one touch: Epson easy photo fix included
  • Scan slides, negatives and medium format panoramic film: Built in transparency unit
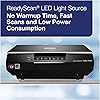
  • Achieve greater productivity: Energy efficient Ready Scan LED light source means no warm up time, faster scans and lower power consumption
  • Convert scanned documents into editable text: ABBYY FineReader Sprint Plus OCR
  • Take your photos further: ArcSoft PhotoStudio included, to help edit and enhance your digital images
  • Quickly complete any task: Instantly scan, copy, scan to email and create PDFs with four customizable buttons With Epson ReadyScan LED Technology, scanning starts instantly with no warm-up time required. In addition, the technology is environmentally friendly as it is mercury free, low in heat dissipation and power consumption.
  • The V600 Photo comes with four customisable buttons that let users instantly scan, copy, scan-to-email and create PDFs at a single touch. It also features fully automatic scanning along with three additional modes for better control. The included OCR software ABBYY FineReader Sprint enables users to convert scanned documents into editable text. Results based on Epson internal testing conducted using US-equivalent 120V models.

Description

The Epson Perfection V600 Photo delivers outstanding quality scans from photos, film, slides and everyday documents. With 6400 x 9600 dpi resolution, this high performance scanner ensures precision film scanning for sharp, vivid reproductions up to 17" x 22". Featuring Digital ICE for both film and prints, one touch color restoration and ArcSoft PhotoStudio, this scanner provides a complete photo restoration solution. Use the built in Transparency Unit to scan slides, negatives and medium format panoramic film up to 6 x 22 cm. The V600 Photo scans everything from invoices and receipts to photos and 3D objects. And, with the included Optical Character Recognition (OCR) software, you can easily convert scanned documents into editable text. Use the scanner’s four customizable buttons to instantly scan, copy, scan to email and create PDFs. The V600 Photo also features Epson’s exclusive ReadyScan LED technology for increased productivity and energy efficiency. Minimum System Requirements: Windows 8, 8.1, Windows 7, Windows Vista, Windows XP, Windows XP Professional x64 Edition, Mac OS X 10.6.x, 10.7.x, 10.8.x, 10.10.x.


Media Type: Negatives, Receipt, Slide, Photo


Scanner Type: Receipt


Brand: Epson


Connectivity Technology: USB


Item Dimensions LxWxH: 19 x 11 x 4.6 inches


Resolution: 9600


Item Weight: 9 Pounds


Wattage: 16.5 watts


Standard Sheet Capacity: 10


Light Source Type: LED


Product Dimensions: 19 x 11 x 4.6 inches


Item Weight: 9 pounds


Item model number: B11B198011


Is Discontinued By Manufacturer: No


Date First Available: September 18, 2009


Manufacturer: Epson


Frequently asked questions

If you place your order now, the estimated arrival date for this product is: May 3 – May 7

Yes, absolutely! You may return this product for a full refund within 30 days of receiving it.

To initiate a return, please visit our Returns Center.

View our full returns policy here.

  • Klarna Financing
  • Klarna Pay in 4
  • PayTomorrow Financing
  • Apple Pay Later
Leasing options through Acima may also be available during checkout.

Learn more about financing & leasing here.

Top Amazon Reviews


  • SLIDE SCANNING SETTINGS EASY USE TIPS
Style: V600 - New
11th Day Update: all 5400 slide transparencies (35mm mounted slides) have been scanned (at 2400dpi) and burned to DVDs. That was with only selective use of Color Restoration, which doesn't add anytime to the scan. We would look at each set of 4 preview images and click and highlight the ones we wanted to color restore (click on the slide, do NOT click on the checkbox...leave the checkbox on each preview CHECKED ON...that's what lets the scanner know you want to scan all 4 slides that you just previewed). Super huge 5,400 slide project DONE for $199 + blank DVDs and a blank usb thumbdrive for backup. We also sprang for an external hard drive and docking station for a super backup. Not bad and we still have a great scanner. Much cheaper than paying a service to do it. Less than 2 weeks worth of work! Background: BFA in Art with concentration in Darkroom Photography; Own my own darkroom for 25 years; Decade as an Imaging Specialist/Scanner Operator (you can skip the next few paragraphs and get to the settings which worked well for us while scanning a bunch of old slides). I was a digital imaging specialist for 10 years at Thomson Learning/Gale Research. Every day for a decade, 8 hours a day I used PhotoShop 3.0+, flatbed scanners, image setters and even a Nikon Coolscan slide scanner with an automatic slide-feeder. As I recall the slide feeder could hold about 40 mounted slides and took about 8 minutes per slide to scan. It would jam once or twice per day. I would use the digitized images in textbooks, dictionaries and online resources/databases we published and charged universities and public libraries for. Meaning: I was in a professional publishing environment. One of my degrees is in Fine Arts with a concentration in dark room photography. I still have (but don't use anymore) an actual photographic darkroom. I've personally hand-developed thousands of rolls of transparency (slide) film. CLEANING OLD FILM/SLIDES So first to correct some erroneous information in a previous review: You CAN wash old film and slides in water. How do you think we washed all the developer/stop bath/fixer off the film once we were done developing it? We used WATER!!! And not fancy distilled water, just regular tap water. Then we hung the film strips from clips in the ceiling until they drip-dried, once dried we would take scissors and cut the entire roll down to manageable strips (or we cut the transparency film down to each frame and popped them into slide holders). Rubbing alcohol will leave streaks and dry spots. A wetting agent could be added to the final rinse water (two drops of rinse agent to a gallon of tap water). That would TOTALLY eliminate dry spots. Of course distilled water could be used NOW since you probably don't have a photo-store near you to buy wetting solution. Distilled water is 99 cents a gallon at the store by me. Guess what the final rinse was when we developed paper prints (color and black and white)...you guessed it! Plain old tap water!!! If you have a paper photography that was made in the 1950s or later you can POSSIBLY remove the stains by soaking it in water! Basically, as long as it's not some glass negative tin-type silver salt thing from the Civil War Era water won't hurt anything! Water makes film and paper VERY SOFT and EASILY SCRATCHED until it dries again. However, as long is your film is in reasonable shape the best bet is to just use an air duster can to blow off the dust. Also blow off the dust from this scanner every once in a while too. RATIONALE FOR PURCHASING THE EPSON V600 While I still have a Umax Powerlook III which was probably around $1700 new, it only does one scan at a time. I wanted to set up a new, easy scan station for my father to scan his old slides: 54 slide projector carousels (round thingies) filled with a maximum 100 slides each. Using this scanner at 2400dpi and saving as JPG at 1 compression (no/least compression) at 48-bit color results in files that are a little over 4MB each closed and abou 10MB open. This scanner can go up to a whopping 128,000dpi but that's overkill for our current purposes: see our old photos and occasionally sending one off to an online printing service for 16x20" print. SETTINGS FOR SLIDE SCANNING I installed the CD software, then plugged in the machine, and finally I turned it on with the ON/OFF button HIDDEN on the right side of the machine. The online manual and the manual on the CD say to use the box with a diagonal arrow to turn it on but that's WRONG, WRONG, WRONG! Contrary to what the instructions say there IS an on/off button. The quick start guide included is correct in this respect. So, for decent slide scans here is a nice setting list: Mode = Professional Document type = Positive film Image Type = 48-bit Resolution = 2400 dpi CHECK the unsharp mask box to turn it on, set level to LOW CHECK the Color Restoration box to turn it on. Nothing else checked. Click preview, select and flip any upside-down slides with the options Click Scan and sit back and wait while all 4 slides are scanned (a little under 4 minutes to scan and auto-name and auto-save). ACTUAL PROJECT: Each slide takes 1 minute to scan, auto-name and auto-save. 54 boxes of slides x 100 slides each = 5400 slides. That's 5400 minutes, which equals 90 hours. That's about two-and-a-half-weeks worth of work at my old jo, working 8 hour days. Totally doable!!!! Each scan closed on disc is less than 5MB, so we'll round up to 5MB. 5,400 x 5MB = 27,000MB, which is 27GB. WOW! 27GB will totally fit on a cheap 64GB thumb drive! It will also fit on about 7 DVD-R discs. A spindle of 100 DVD-Rs is like $20, lol! So: get this; get a can of spray duster; some distilled water if your originals are too gross; a 64GB thumb drive and some DVD-R + blank discs. WHY THIS? Some other "scanners" are cheaper and claim to scan in a single second. They are cheap webcams stuck in a cheap plastic box that take a crappy photograph of you slide. You would get better results taping your slides/negatives to a window and snapping a picture of them with your cellphone!!!! Seriously awful quality. Plus, this Epson also scans paper photographic prints because it's a flatbed. Yes, at about 1 minute per slide it's a little slower (at 2400dpi) but you can save a little time and scan at 1200dpi, or even go down to 100dpi, lol. Depends what you're using them for. Online/facebook then 100-300dpi is fine. Using your photograph to print a HUGE poster: select 128,000dpi and knock their socks off. Plus everything in between. Basically it's $50-$100 for something that's almost guaranteed to disappoint; or $200 for this thing which is awesome. A minute per slide is a lot slower than 1 second per slide. I'd rather spend two weeks getting 5,400 great scans then spend 5 hours getting crappy scans that look terrible and I'll end up deleting. CONS This thing is huge (because it can scan actual sheets of paper too). It's heavy (really heavy and good quality). It has a weird spring on the top: it tries to slam upward when opening and slam downward when closing: BE CAREFUL! On/Off button is not mentioned in two of three manuals. It's on the right side, near bottom, lol. WHAT DIDN'T WORK WELL (FOR US) AND WHAT DID First off, use the professional mode for slides. The automatic easy mode has drawbacks: it only allows 1200dpi scans at the highest setting; even though it's only 1200dpi it seems to take longer than the professional mode at 2400dpi; even though in the manual it says you can skip the preview...it actually does one preview at a time and shows that to you while it scans, which means the preview portion takes FOUR times as long. Also, when you select the color restoration option: the little preview is color restored, but the scan isn't! It's a weird flaw in the software. So: it takes 2x-4x as long and doesn't actually apply color restoration to the scan that is autosaved to your computer. Another problem is that the unsharp mask is NOT an option in the automatic mode! Thus: if you want to scan, color restore and sharpen you have to use the professional mode (and re-check the color restoration box after selection "all" 4 previews with the blue frame highlighting them AFTER EVERY PREVIEW!!!!). Use the professional mode. 48-bit color is noticeably better than 24-bit. Not just nit-picking, it's easily noticed. 24-bit results in flat blocks of color like 1990s over-compressed JPGS, lol. Make sure to use the 48-bit option. On principle I NEVER enable ICE/dust correction because it does a couple things: slows down the scanning/saving process; and it also can do weird things to some photos. I've found it will do well on a bunch of photos, but then do weird things to the glint in peoples' eyes in portraits and makes then look crazy. We're happier with the sprayduster can. I fiddled a little with the grain removal setting, but it just kind of blurred my test slides. Yep: if you blur a photo it's hard to see the grain. I leave the grain removal OFF. You can always blur your scans later if you wanted to. Red EYE reduction: I suppose if you have like 500 slides of people with red eye (reflection of on-camera flash unit's light) then MAYBE you could use this, but I leave it off because I have no idea what it might randomly decide to do to normal portraits or even photos with no people in them. Why chance it? Unsharp mask: you can always sharpen later; but if something is oversharpened it's harder to fix. Sharpening bumps up the color value between two areas of abutting colors (heavier outlines). The sharpening feature IS really nice, so I set it to the "LOW" setting. A good safe bet. Color restoration: WOW! Professionally I would never use this in the past, but this just works great with our Kodak EktaChrome and KodaChrome slides from the 1970s-1990s. I mean the benefit of having this checkbox CHECKED ON is amazing! Something that might take me 10 minutes to get in PhotoShop is just instant. It does wonders even on slides I thought were totally fine. USE IT! There are other settings were you want to: UNcheck the write over files with the same name (why would you want to overwrite your previous scans? An accident waiting to happen). I think it defaults to name by sequential number (1, 2, 3...). I changed the default name from "Img" to "Slide" So they come out "Slide001" "Slide002" and on and on. File type: I selected JPG with no compression (1 out of 100). You could also select TIFF. Honestly, the JPG is nice. When I was a professional (paid) scanner I would save as TIFF. It was lossless (doesn't throw out color information). JPEG has come a long way, and if you set it at no/low compression you won't have problems. TIFFs are still a tad bigger, but if you're scanning once and then throwing away your slides then scan huge and save as TIFF for that once in a lifetime chance of archiving. Honestly, the JPEG is totally fine: at a 1 setting you don't see any jpeg blocky digital artifacts-even when zoomed in. JPEGS also (still) seem to play better when most stuff online/social/tv set/BluRay player/etc. It really doesn't matter too much TIFF vs JPG (as long as you set the JPG to 1 No compression). UNFORTUNATELY it defaults to some default compression setting closer to 100 which WILL LOOK AWFUL, lol. Set it to 1 and then forget it. You're pics will look great. Still worried? Then set it to save as TIFF files and you'll just have to burn a few more DVDs on a large project--no biggie, DVDs are cheap these days. Back in my publishing days it was always: TIFF = Files sent to book printers and files sent to archive CDs ; JPGS for online databases and educational CD-ROMS. It used to REALLY matter which you chose when, but now not so much because you can basically turn off the JPG's compression. Then it basically acts like a TIFF, but still works easily online/TV set viewing/etc. In fact, setting the bit-rate on this scanner down to only 24-bit results in blocks of flat color-just like over-compressed jpgs looked like in the 1990s! That's why I said to use 48-bit. Somewhere in the advanced settings option when you first open Epson Scan you can also uncheck the "include color profiles" box. Unless you're sending your files to a professional printing press that needs specific color profiles THIS JUST BLOATS THE SIZE OF EACH OF YOUR SCANS! I don't care about LAB COLOR vs CMYK vs Srgb ICC profiles and when I was a professional our printers (and by printers I mean the humans who ran huge color printing presses that are about 40' long) would set their prepress to strip out/ignore any color profiles accidentally left attached to image files we sent them...because THEY wanted to control the color, not some random file that nobody on our end looked at or modified or fixed or cared about. UNLESS YOU'RE A PROFESSIONAL PHOTOGRAPHER SENDING SCANS TO A COLOR PRINT PUBLICATION THAT REQUIRES YOU TO SEND ALONG COLOR PROFILES uncheck the box and save space on your computer. Even if you sent a scan to go on the cover of National Geographic I have a feeling they'd override your profile settings when they went to print the magazine. For slides use a light table to flop them down on and arrange them. Also a lamp is good for helping to see which is the shiny side and which is the dull emulsion side with raised lines on it. Emulsion side goes facing the ceiling. If you don't have a lightbox just stick a fluorescent lamp bulb under a clear tuppeware container or something to make one. I take four slides out, have my thumb and index finger hold them by the edges with space in between and that allows me to dustspray between all four at the same time. Fast and easy! Take time to arrange your desk and work area and you can shave DAYS off your project completion time. WORKFLOW Each box of 100 slides gets a new folder on the desktop. It is named with whatever is on the spine of the box of old slides. Turn on compute and scanner. Click on Epson Scan Select "Professional" and "Current Settings" 2400dpi Check color restoration box on Check unsharp max on / Medium Dust spray and put in 4 slides. Click Preview Click on any of the 4 previews (NOT the little checkboxes) and they will be highlighted with a blue frame. Use the "E" rotate button to rotate any highlighted previews. ****VERY IMPORTANT STEP RIGHT HERE: Click the "ALL" button the highlight all four previews with blue frames and then click "RESTORE COLOR CHECKBOX TO ON"/ (The color restoration feature shuts itself off after every preview, and if you turn it back on it only applies to the previews with blue frames around them!). This is for "pros" who only color restore 1 out of every 4 slides or whatever. Click "Scan". Change 4 slides. Repeat a 193 times...once you get 4GB worth then save to DVDs, drag and copy to thumbdrive and drag and copy to external hd. Delete scans off computer. Repeat 7 more times. Pop the cork on some champagne...you're done! Actually, you'll probably want to be drinking throughout the entire project because scanning is a dull, dull process. That's why I became a librarian. Yes, being a librarian is way more exciting than being a scanner operator. LOL! Save to DVDs. Save to USB Thumb drive. Save to an external hard drive (1 Terabyte for $49) using an external hard drive plug-n-play docking station ($20). Store the slides in a cool, dark place. Put a couple thumb drives in different spots. Put DVD copies in different places. Have yet another thumbdrive to plug into our TV to view the slides! Many BluRay players also accept USB thumb drives (or just pop the DVDs you burned into it and view photos). 3 Different archive media (USB Thumbdrive, DVD-R +, External Hard Drive)...plus the copies on the desktop computer this scanner is plugged into. SHINY SIDE GOES UP for slides (dull emulsion side down). For a little more money, and a bit more time you'll have USEABLE FANTASTIC scans. My father and I both researched this slide project. He is a film/darkroom photographer how was an automotive engineer and I was a digital imaging specialist from 1997 -2007 and am now a librarian. It took him a couple days and he favored the Epson v850 for around $1000. I researched for 15 minutes and actually ordered this V600 (for around $200). LOL. It just makes sense. Go look at the photos people post as examples in the reviews for the Wolverine and Jumble units: I can't even tell what some of the pictures are of! Let alone gauge their quality of digitization. If you've got the time and money for this machine you won't be disappointed with the results. Computer (we have a 2/3 year old Dell with i5 core processor and Windows 10, regular non-solid state hard drive) This Scanner Dust-off Sprayer USB Thumbdrive (archive 1) Blank DVDs (archive 2 or more if you burn multiple copies to send to various relatives) External HD (archive 3) Time: 1 minute per slide This thing is heavier than my 25 year old Umax PowerLook III scanner which was used in by my at my job in a multi-million dollar publishing empire. They of course laid-off everyone and sent the work to China/India. They DID sell me my computer and the Umax cheap though! I don't know who got to take home the Nikon CoolScan slide scanner (w/auto-feeder), LOL! If you want a simple solution with GREAT quality and TONS of user changeable settings (but also simple settings too) then GET THIS!!!! Do you have only a month to scan 50,000 slides? Well, then contract a vendor to do them for 60 cents per slide and then sell you an external hard drive with your scans on it...plus shipping...plus expedited service...plus insurance which will give you a few dollars if the shipper looses all your slides so instead of your photos you'll have like $300 and the horror of loosing priceless, irreplaceable pictures. By the way: for my 5,400 slides it would cost at least $3,240 to have them scanned (plus shipping, plus hard drive they return the scans on, etc.). For that much money I could: buy this Epson v600 and pay friend, young relative, random weirdo off CraigsList,college student, neighbor $3000 to do the actual scanning for me! If anything I gave you: a template to plan your project/setup/costs & some easy start-up settings to get great slide scans. I hope this helps. By the way, this thing comes in a HUGE box. Everyone thought I bought a new TV. UPDATE: It's the second day of ownership, and even with our time spent testing settings, setting up a light box, unpacking and dusting off 54 boxes of 100-slide carousel wheels we managed to scan 2 entire boxes out of the 54! Not bad at all! It's going to snow tomorrow, so that'll mean we'll probably get another 2 boxes done. So, casually in about a month our huge archive will be completely scanned. We already popped some of the scans onto a USB and plugged it into a BluRay player: SO COOL SEEING OUR OLD PHOTOS!!! Don't waste anymore time shopping for the cheaper scanners: THIS IS THE ONE YOU WANT! The ONLY THING THAT SUCKS ABOUT IT IS: after every 4 slide batch is previewed the "Color Restoration" box UNchecks itself. So you have to select all four previews and ONLY THEN click to check the color restoration box, and then scan. However that takes about 2 seconds and is a LOT faster than going into PhotoShop and trying to color correct them. I can spend 5-15 minutes trying to color correct an RGB color image, and even longer for a CMYK image for print (textbook, magazine, book cover, etc.). After you do a few dozen you won't even have to think: your hand will just click ALL and Color Correct and SCAN. Muscle memory. The other thing that sucked was the "hidden" power button that was misidentified in two of the three manuals (online, on CD, printed startup guide). Good luck, have fun, spend a day or two scanning and rescanning a few documents to get the perfect settings and physical workflow that works for you! -Mike from Detroit ... show more
Reviewed in the United States on March 12, 2017 by M1K3 FR0M D3TR01T

  • It does a good job. But it has very flimsy film holders which break easy. (Updated)
Style: V600 - New
Update April 22, 2018, and I lied before. This will instead be my final update on this scanner. I figured that I would throw in a some more technical information. A 35 mm color negative scanned at 2400 DPI (Yes, it uses DPI) at 24 bit depth will yield just over a 4 MB size JPG image. Scanned at the same 2400 DPI at a 48 bit depth will yield over a 40 MB size TIF file. The scanner does not support PNG image files. (Mistake! Some of my jpg files from scans are around 100 MB. And some of my TIF files are around 200 MB. I never went past 3200 dpi when scanning. And some of my files reflect the sizes above, and everything in between.) Scanning a typical 120 6x7 negative with the ICE technology turned on requires an averaged of 30 minutes to scan each negative. At least I did while using my old Win 7 computer. Naturally, the smaller size 35 mm and smaller negatives and slides took less time. And there is a big difference in the time it takes to scan an image between when the ICE technology is turned on, and when it is turned off. Turning the ICE technology off allows a scan to be completed in a fraction of the time needed to scan the same image with the ICE technology turned on. While the ICE Technology is not 100% effective, it seriously reduces the amount of post-processing. Use the software in Pro Mode for your best results. While the software allows for both automatic and manual color correction, you will find that you often have to do color corrections in post-production. On the occasional times when the automatic preview does not see the entire image, You can designate the image area manually. If you are using a Linux computer, your have to manually designate the image area 100% of the time. This scanner can scan up to 12,800 DPI at a 48 bit depth on color images, and 16 bit depth for grey scale images. (I don't even want to consider the file size at 12,800 DPI.) Ok. I think I am done with my thoughts on this scanner here. I think that this V600 is the best film and slide scanner for the money when scanning 120 film or smaller. If you are scanning prints, then this is also a very good print scanner. But there are many good print scanners out there. It's major benefit concerns scanning film and slides. ************************ Update April 15, 2018 I think that this will be my final update for this scanner. I have scanned thousands of my old images, including images from my parents, since I received this scanner. I had this thing running day and night for a long time. For the price, it is unbeatable. But if price were not an object, then I would have gone for the V850. Over the winter I have scanned film from 4x5 to 110, including 620, 126, 127, 35 slide and negative, 120/220 film (Various formats), and 4x5 positive and negative film. And there was also a bunch of prints. Some of the film that I scanned this past winter dated back over 100 years. This scanner scans images up to 12,800 DPI in 8 and 16 bit depth for Grey-scale, and 24 and 48 bit mode for color. A down side is that you are limited on the type of files that you can save. My favorite file format is PNG, and I could NOT save it in this format. The 120 film and 35 mm scanning anything was the easiest type of film to scan. I ordered in holders for 126, 127, and 110 film. These holders had been 3D printed by 3rd parties. There holders fit inside the 120 mm holder. the software will automatically select the film images. (On using 120 film, you must select the correct image format before scanning for the images to be automatically selected. And on scanning film smaller than 35 mm, you must select the image manually.) It's a good idea to order in an extra set of film holder. For 4x5 film, I simply lined it up on the scanning plate and laid it there to be scanned. However, I could have made a template from an old mounting board which would have worked better. The V600 will scan a little more than 75%, or maybe 80 % of a 4x5 film image. Had I used a template to line up the film, then I could have matched up the images and combined them using various post-processing software. (Note: A template has to leave a notch at one end of the scanning plate. The scanner has an eye there.) Point, you can cut our a template from an old mount board to scan any film size. But you will need to select the scanning area in the software manually. My chief complaint was that it is slow! This maybe because I was using an older computer with only 8 GB of memory. Also, the ICE technology really slows the scan down. And using ICE is a serious slow-down.... The ICE technology takes out a lot of the dust and defaults in the film. But there will still be places that need to be corrected. The ICE technology simply makes it easier. One correction from what I posted earlier. This scanner will work with Linux operating systems. On Linux, it will not make use of the ICE technology. And you also have to select every image manually. This scanner will only work on a Linux operating system when using Xsane scanning software. The Epson Linux print software has to also be installed. Obviously, you need to keep the scanning plate clean. I used soft nylon gloves, and kept a can of compressed air next to the scanner. I also had one of those film and camera equipment bulb blowers next to the scanner. This scanner really is the best scanner for the money.... But you will question that if you using Windows and do not have a lot of memory, and you are using the ICE technology on every image.... Just uploaded a flower that I photographed in the early 1970's with 35 mm film. (And I just deleted the image of the mother and baby.) Update February 14, 2018 The scanner does a reasonably good job. It has an excellent resolution and can reproduce detail from a weak slide or negative where that detail would have been lost in a photographic print from the negative. (I used to print thousands of film prints.) I've discovered that 4x5 film can also be scanned up to 80 or 90% on the 4 inch side, and full length on the 6 inch side. This is done by simply laying the film on the scanner bed and lining it up in the center. Among it's failings are that the color and contrast is seldom exact. Epson provides the tools to correct this in it's software, but those tools are difficult to use at best. It's better to scan your image and make the corrections with some other photographic software after it's been scanned. Just make sure that you are not clipping the parts of the image that you want. (It is easy to end up with an image where highlights or shadows were clipped from the image.) Lowering the contrast is a good way to reduce this problem. A serious fault is the weak slide/negative holders which come with the scanner. They are very flimsy plastic holders. You should order an extra set of these. If you do a lot of scans, then you will probably break 1 or 2 of these film holders very quickly. (I just ordered my 3rd 120 film holder in the past 6 months.) Additionally, I am adding a photo that I scanned with this scanner of a person with a crossbow in a competition. Below is my previous thoughts on this scanner. Update: Sept. 20, 2017 6x7 120 film. There is an issue not mentioned in the scanner manual where I could find it. The default size in the software for 120 film is 6x4.5. To correct this, you need to go into the Epson scanner configuration. Select film and then select 6x7 film size. I am uploading an scan from a 6x7 negative. Also, Software thumbnails tend to me darker then the final scan. Scans will not have the same depth as the original flat art. But they will look better than the originals in some cases. (Note: The baby in this photo that I scanned and uploaded here would be approaching 40 years old now. It was simply a 120 negative that I ran across.) ************************************** Original review below. I just got this in yesterday, and scanned roughly 300 slides and negatives. It does a good job of scanning old 35 mm slides and negatives. There is a single holder for the 35 mm slides and negatives. It scans up to 12 negatives or positive film images in strips at a time in the film holder. It scans up to four 35 mm slides at a time. Most of the results were better than the originals. I haven't gotten to the 120/220/620 film holder yet. Dust and fingerprints are an issue on the scanning plate. Use lint-free gloves or cloth when touching it. The software does not seem to work on a Linux system under Wine. That being the case, I did not connect it to my Linux computers. It is attached to a Windows 7-64 computer which already had the Epson printer software installed. The software for the scanner seemed to be just an ad-in to the other Epson printer software. I would have liked to see a 4x5 holder, but they saved that for the more expensive scanners. It's reported that some people are scanning 1/2 of a 4x5 image, and stitching it together. I haven't tried this yet. The film holders are cheap, and easy to replace. ... show more
Reviewed in the United States on September 17, 2017 by Greta Greta

Can't find a product?

Find it on Amazon first, then paste the link below.