Backyard Discovery Skyfort II Cedar Wood Swing Set with Wave Slide, Raised Clubhouse, Crow's Nest, Monkey Bars, Balcony, Belt Swings, Trapeze, Rock Wall, Picnic Table, Sandbox, Ladder, Outdoor Playset


Buy Now, Pay Later
- – Up to 36-month term if approved
- – No impact on credit to apply
- – Instant approval decision
- – Secure and straightforward checkout
Ready to go? Add this product to your cart and select a plan during checkout.
Payment plans are offered through our trusted finance partners Klarna, Affirm, Afterpay, Apple Pay, and PayTomorrow. No-credit-needed leasing options through Acima may also be available at checkout.
Learn more about financing & leasing here.
30-day refund / replacement
To qualify for a full refund, items must be returned in their original, unused condition. If an item is returned in a used, damaged, or materially different state, you may be granted a partial refund.
To initiate a return, please visit our Returns Center.
View our full returns policy here.
Recently Viewed


Features
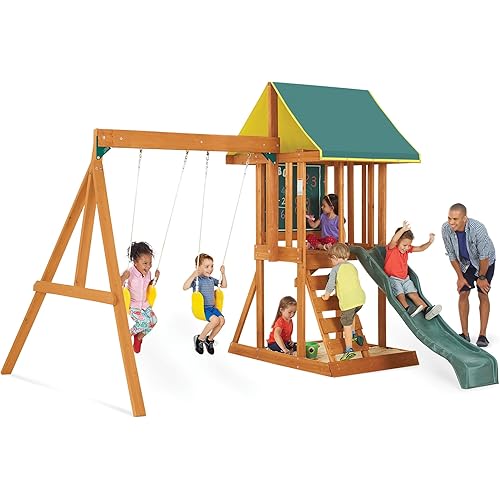
- Elevated Adventure: Spacious raised clubhouse with a wooden roof, balcony, covered entryway, and bay windows is perfect for outdoor play, complemented by a wide step ladder for easy access
- Lower Play Space: Includes a shaded lower deck with a sandbox area to inspire creative sensory play, plus a picnic table and bench seating for snack breaks or arts and crafts (sand not included)
- Industry-Leading Warranty: 5-year warranty for added peace of mind
- Crows Nest: Elevated lookout with a toy telescope inspires imaginative exploration and adventurous quests
- Monkey Bar Fun: Creates a playful challenge that promotes strength as children swing and climb
- Versatile Swings and Wave Slide: 2 classic belt swings and 1 trapeze allow multiple kids to swing at once, while the 10-foot wave slide offers swift, safe descents for endless fun every time
- Rock Climbing Wall: Adventurous rock wall with 12 holds encourages playful climbing challenges and skill-building
- 100% Cedar Wood: Made from durable cedar wood for exceptional strength and natural resistance to decay, with a rustic burnt sienna stain; Stain saturation and color may vary
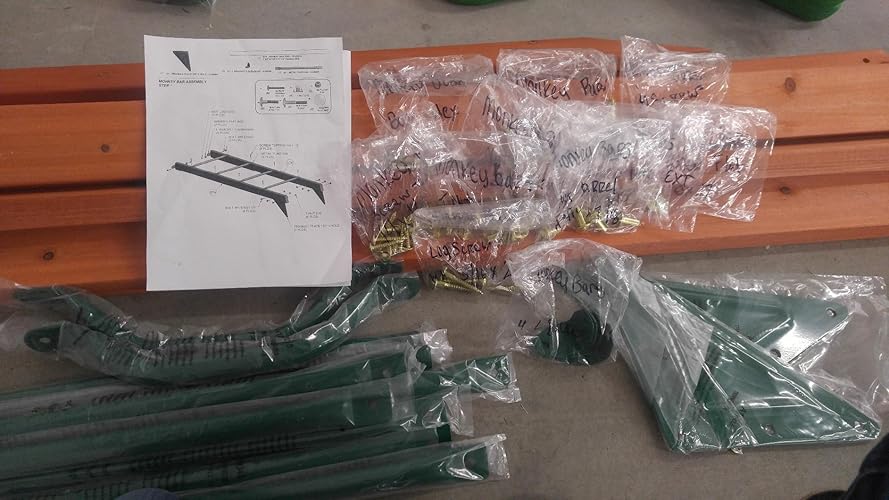
- Ready to Assemble: Pre-cut, pre-drilled, and pre-stained pieces, paired with guided instructions in the interactive BILT app, offer easy installation
- Safe Play: Designed with multiple play areas for up to 15 kids, Backyard Discovery swing sets are engineered to meet or exceed ASTM standards (code F1148-22); For residential use only
Description
This outdoor playset will be the kids' favorite, with its raised clubhouse play fort, wooden roof, gabled entry way and balcony. From the crow's nest, they’ll cast a keen eye to the horizon, then race to the monkey bars and swing set on its three-position swing beam. A solid rock wall and standard ladder will give them healthy climbing fun while a 10' wave slide will zoom them down to start all over again!
Specs & Other Info
| Specification | Details |
|---|---|
| Manufacturer | Backyard Discovery |
| Color | Earthy Brown |
| Dimensions | 201.12"D x 263.16"W x 148"H |
| Construction Material | Natural Wood |
| Finish | Natural Wood Finish |
| Assembly | Required |
| Weight | 710 lbs |
| Origin | Manufactured in China |
| Model Number | 6113D |
| Recommended Age Range | 3 - 10 years |
| Continued Availability | Currently Available |
| Market Introduction | January 28, 2020 |
Frequently asked questions
Similar Products


KidKraft Appleton Wooden Swing Set, (Amazon Exclusive)


XDP RECREATION All Star Outdoor Kids Swing Set, Multicolor


Top Amazon Reviews
🚀 Abunda's Overview
This is our summary and key points to consider based on customer reviews.
The reviews paint a picture of a robust, feature-rich swing set that seems well worth the effort of its challenging assembly process. Both reviewers commended the set's durability, variety of activities, and the joy it brings to children. They highlighted the importance of organization and preparation for assembly, recommending specific tools and strategies to streamline the process. With meticulous pre-assembly organization, the actual build can be a rewarding, if time-consuming, project that ends with a sturdy and beloved addition to any yard.
Pros
- 🌟 Well-designed with a variety of features to engage children
- 🛠 Pre-assembled panels and clear labeling simplify the assembly process
- 🌦 Durable through various weather conditions with proper maintenance
- 👫 Suitable for children of different ages and supports adult supervision
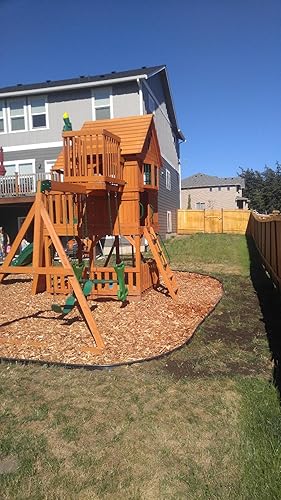
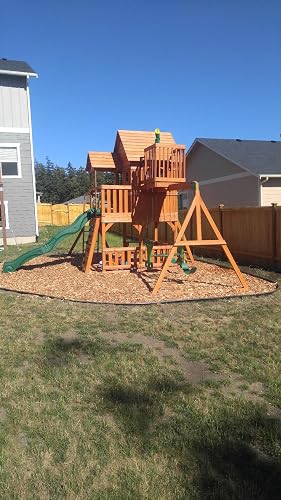
- 🏡 Aesthetically pleasing and sturdy construction adds value to the yard
Cons
- ⏳ Time-consuming assembly requires significant preparation and manpower
- 🔧 Needs various tools and careful organization of parts for assembly
- 📦 Large delivery in multiple boxes can be challenging to manage
- 🛠 Some pieces may arrive warped, demanding extra attention during assembly
Should I Buy It?
If you're willing to invest time and effort into the assembly, this swing set offers excellent long-term value with its durable build and wide range of features. Ideal for families looking for a substantial, versatile outdoor play structure that will grow with their children and withstand the elements with proper care.