Search  for anything...

Lifetime 71566 50 Inch Shatter Proof Portable Basketball Hoop Clear

  • Based on 179 reviews
Condition: New
Checking for product changes
$389.99 Why this price?

Buy Now, Pay Later


As low as / mo
  • – Up to 36-month term if approved
  • – No impact on credit
  • – Instant approval decision
  • – Secure and straightforward checkout

Ready to go? Add this product to your cart and select a plan during checkout.

Payment plans are offered through our trusted finance partners Klarna, PayTomorrow, Affirm, Afterpay, Apple Pay, and PayPal. No-credit-needed leasing options through Acima may also be available at checkout.

Learn more about financing & leasing here.

Free shipping on this product

30-day refund/replacement

To qualify for a full refund, items must be returned in their original, unused condition. If an item is returned in a used, damaged, or materially different state, you may be granted a partial refund.

To initiate a return, please visit our Returns Center.

View our full returns policy here.


Availability: Only 4 left in stock, order soon!
Fulfilled by Amazon

Arrives Jun 20 – Jun 21
Order within 4 hours and 14 minutes
Available payment plans shown during checkout

Features

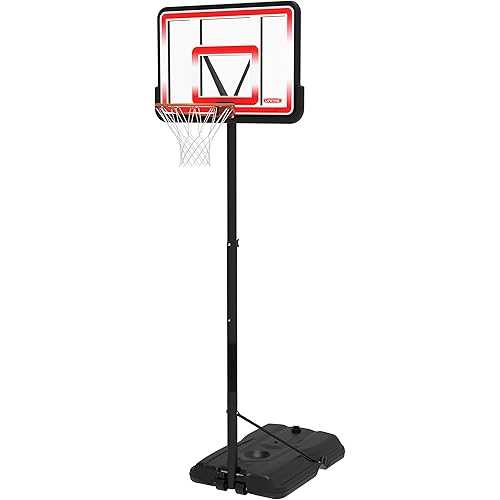
  • 50" Shatterproof Makralon polycarbonate backboard gives you the look and feel of professional glass!
  • All-weather resistant, designed to withstand the harshest elements
  • Action Grip height adjustment mechanism easily adjusts from 7.5 to 10 feet with one hand
  • Solid-steel Slam-It Rim with double-compression springs and welded net hooks is built to take a slam
  • Portable base can be filled with water or sand; Backed by a 5-year limited manufacturer warranty

Description

Lifetime Adjustable Portable Basketball Hoop (50-Inch Polycarbonate)

Brand: Lifetime


Material: Polycarbonate (PC)


Color: Clear


Product Dimensions: 94.6"D x 148"W x 50"H


Item Weight: 105 Pounds


Indoor/Outdoor Usage: Outdoor


Special Feature: Portable, Adjustable Height, Shatterproof, Fade Resistant, Rust Resistant


Mounting Type: Freestanding


Target Audience: Parents


Room Type: Outdoor


Brand: ‎Lifetime


Material: ‎Polycarbonate (PC)


Color: ‎Clear


Product Dimensions: ‎94.6"D x 148"W x 50"H


Item Weight: ‎105 Pounds


Indoor/Outdoor Usage: ‎Outdoor


Special Feature: ‎Portable, Adjustable Height, Shatterproof, Fade Resistant, Rust Resistant


Mounting Type: ‎Freestanding


Target Audience: ‎Parents


Room Type: ‎Outdoor


Model Name: ‎Lifetime 71566 50 Inch Shatter Proof Portable Basketball Hoop


Team Name: ‎Lifetime


League: ‎NBA


Included Components: ‎Basketball Hoop


Frame Material: ‎Polycarbonate


Minimum Height: ‎7.5 Feet


Style: ‎Portable


Assembly Required: ‎Yes


Maximum Height Recommendation: ‎10 Feet


Global Trade Identification Number: ‎88


UPC: ‎081483000688


Rim Size: ‎18 Inches


Manufacturer: ‎Lifetime


Item Package Dimensions L x W x H: ‎50.3 x 34 x 9.4 inches


Package Weight: ‎126 Pounds


Item Dimensions LxWxH: ‎1 x 50 x 1 inches


Brand Name: ‎Lifetime


Warranty Description: ‎5-Year Limited Manufacturer Warranty.


Suggested Users: ‎unisex-adult


Number of Items: ‎1


Part Number: ‎71566


Size: ‎50 Inch


Sport Type: ‎Basketball


Date First Available: January 24, 2008


Frequently asked questions

If you place your order now, the estimated arrival date for this product is: Jun 20 – Jun 21

Yes, absolutely! You may return this product for a full refund within 30 days of receiving it.

To initiate a return, please visit our Returns Center.

View our full returns policy here.

  • Klarna Financing
  • Affirm Pay in 4
  • Affirm Financing
  • Afterpay Financing
  • PayTomorrow Financing
  • Financing through Apple Pay
Leasing options through Acima may also be available during checkout.

Learn more about financing & leasing here.

Top Amazon Reviews


  • Solid, simple design. Nice value.
Ordered our hoop with FREE SuperSaver shipping, and it arrived in good condition 6 days later. That's great service for a 100+ lb package traveling 2300 miles. Well done, UPS and Lifetime! I assembled the hoop entirely by myself, at a careful pace, in a little over 5 hours. The instructions say 2 adults are required, but you can manage by yourself if you have a couple sawhorses for the backboard assembly, and can find a way to stabilize the base/pole while you attach the backboard. I leaned the pole on a sawhorse and wedged the base against a wall with chock-blocks. Worked fine. I found the instruction booklet (dated 3/31/2012) to be very good, with well-defined steps and plenty of accurate illustrations. I'd rate it 4-1/2 stars out of 5. Doesn't get 5 because: First, the use of arbitrary 3-letter sequences as part identifiers makes it unnecessarily tedious to read the diagrams. Label the top pole section TPS if you want, but not ALH(?), come on! Second, it would be nice if the many bags of small parts were labeled. They were mostly grouped by step, which was helpful, but were unmarked. I strongly advise assemblers to leave the parts in their bags until the relevant step, as many parts look similar but are, in fact, different. I read the instructions carefully and checked my work against the diagrams at the end of each step. Assembly itself was pretty easy, with the parts fitting together well--no misaligned holes, ragged edges, missing pieces, etc. The only hiccup was with the self-tapping screws. The larger ones are supposed to fit in the chuck of your electric drill, but they were too big (barely) for my Craftsman 3/8" chuck. (First time the 3/8" has ever been too small for a household drilling need.) I had to drill pilot holes and drive them with a socket wrench instead, which added 10 minutes of grunt work. I suggest drilling pilots for the smaller screws too, though the instructions don't specifically say that. Anyway, I got everything properly attached. Overall, it was a fun project, with lots of oddly shaped pieces fitting together in interesting ways. Our hoop will get mostly light-duty use from my 7-year old daughter and myself, in a spot protected from the wind. I decided to try water in the base, and it seems plenty stable, yet is not so heavy that I can't move the hoop by myself, if necessary. If I had teenage boys doing dunks, I would use sand for the extra stability, and get help when it needed moving. As with any portable hoop, there is some rattle and wobble, but it's closer to my best hopes than my worst fears. I'm pleased that there's very little oscillation or sway. Typical bankshots work fine on the 50" backboard, and in general, good shots are rewarded, which is what counts. Another minor portable hoop issue is that, at full height, the pole is only a couple feet behind the backboard. If I was playing competitively on it, I'd invest in padding for the pole. Adjusting the height is quick and easy, requiring little strength. A 12-year old could do it, but younger kids may have trouble reaching the adjustment handle. The supports and rim mechanism are all strong metal. Sturdy plastic is used in the base, the adjustment handle, and some spacers. I don't see anything that looks likely to break. The family loves it. Overall, I'm very pleased, and am sure we'll get $300 worth of enjoyment from it. Recommended. ... show more
Reviewed in the United States on July 1, 2012 by Steve Cobb

  • Set-up is no joke. But once set-up its a joy to play with and a marvel to look at!
Like many others have stated in their reviews, this thing is a BEAST to put together. That's why I'm giving this only 4 stars. There are some reviewers that state if you take your time and follow the instructions carefully and to-the-letter then set-up is not difficult. That may be so if you're skilled with power tools, have experience with woodworking or other shop work. But if you're the typical guy with no power tools in his garage and have little if any experience in this line of work, then you WILL have problems with set up. Those who claim this set up is simple is like tech support telling you over the phone "this is so easy! Anyone can do this!". Or a brain surgeon saying "Doing a craniotomy to remove a tumor in your brain is so simple! Anyone can do it!" Also, I firmly believe that there are many steps in the set-up that could have been done already by the manufacturer while not adding to the size of the shipping box. Here's my take on this: 1] YOU CAN NOT DO THIS WITHOUT AN ELECTRIC DRILL. Do whatever you have to do (buy/rent/borrow/steal) to get your hands on an electric drill. Within 30 minutes of set-up you'll find yourself faced with a big metal pole and a screw you must drill through.....but there's no pre-existing hole in the pole for this screw. I don't care if your arms are twice the size of a sumo wrestler. You need an electric drill! So, I bought an electric drill for about $100. Sadly, I used this drill for a total of 5 minutes out of the seven hours it took me for the whole process. The tool I used the most is the ratchet. A ratchet is not a must-have like the electric drill. But having a ratchet sure makes the job easier. I also thought the rubber mallet (picked one up at HD for $4) came in handy. 2] I DID THIS MYSELF AND IT TOOK 7 HOURS! The instructions say this is a two-person job. I would have to agree with this. One-person is do-able but with a lot of frustration and sweat involved. In hindsight, I wish I had another person helping me. I think it would have reduced the time in half. I wish the parts were labeled or at least have labels on the plastic bags that the parts came in. 3] A FEW TIMES DURING SET-UP I CAME ACROSS HOLES THAT DIDN'T MATCH-UP.....BUT IN THE END I BELIEVE IT WAS INTENTIONALLY DESIGNED THIS WAY. I'm sure you've read other reviews that state this. But I believe these seemingly misaligned holes are purposely made. For example, when the directions state to place the metal axel (steel bar) through the plastic tires, through the heavy vertical pole and through the base of the basketball system I paused and wondered "if I go through the big ordeal of raising the big/heavy metal pole risking my life in the process and then try to slide the axel through....then would the axel fit through all the holes?" So without the big metal pole I decided to slide the metal axel into the base and see if it fit into all the existing holes in the base. Alas, the axel did not match the holes! Off by a full inch. At this point I felt like calling customer service to complain or just return the whole thing. I did not want to cut a new hole into the base to allow the axel to fit since that would compromise the structural integrity. I sat there in my garage feeling sorry for myself for wasting 3 hours of my life putting together a bad system. Then it hit me! The weight of the massive vertical pole would likely make the axel bow or bend slightly thereby making the axel fit into the final hole. So I took a leap of faith, raised the really heavy metal pole vertically and slid the axel through all the holes......it fit perfectly! My faith restored in the Lifetime engineers. 4] THE RIM/HOOP SCREWS DID NOT SEEM TO TIGHTEN STRONG ENOUGH TO MAKE THE RIM STURDY.....BUT IN THE END THE HOOP TURNED OUT VERY FIRM AND STURDY. After putting the rim onto the backboard I found that the bottom two nut/bolts would not permit me to tighten them to the point that the rim would stay firm when faced with a basketball. I spent a couple hours trying to solve this problem (therefore it took me a total of 7 hours). After a couple hours of futile tightening, taking things apart and then putting back together...etc I came to the realization that this was done intentionally. Its too difficult to put into words. After staring at the rim and the seemingly loose nuts/bolts I had another epiphany! Its supposed to be this way. You will see when you put this together that the rim-to-backboard interface is the most complicated step. The way this system is designed does not permit you to tighten this rim-to-backboard very tight. Even still, I couldn't help second-guessing myself. I grabbed the rim with my hand and gave it a good shake. It seemed to rattle...more than I felt comfortable with. Nevertheless, I had faith in the engineers (although a little less than at the beginning of my ordeal) and charged on. In the end, the rim was very sturdy and did not rattle very much compared to other portable basketball systems I've used. 5] THE HOLE IN THE BASE TO FILL UP WITH WATER/SAND IS TOO SMALL!! After finishing the set-up, the time finally came to fill up the base with sand! I was so excited. I figured this would be the easiest step. Nope! First, the hole is located on the side of the base so you have to do this with the basketball system is lying on the ground....okay, fine. When I discovered that trying to fill it up with MOIST sand (didn't know this when I bought the sand from the garden store) through the 3-inch opening is like trying to fit a Mack truck through your front door, I just gave up and decided to go with water. After filling up with water I discovered the water was leaking around the cap. I tried multiple times re-fitting the cap (yes, I installed the washer inside the cap just as the instructions stated) only to find water leaking around the cap again. Then I used silicone tape (used by plumbers) to line the cap and the leak stopped. All of the problems of filling the base with sand or leaking of water issue could have been solved or averted if they just built the mouth on top of the base (instead of the side) and make the mouth bigger.... a lot bigger ... show more
Reviewed in the United States on January 27, 2014 by Jonathan K. Park

Can't find a product?

Find it on Amazon first, then paste the link below.