Search  for anything...

EMBRACO Refrigeration Compressor FFI10HBX1 R-134A 1/3 HP

  • Based on 73 reviews
Condition: New
Checking for the best price...
$204.95 Why this price?

Buy Now, Pay Later


As low as $34.16 / mo
  • – 6-month term
  • – No impact on credit
  • – Instant approval decision
  • – Secure and straightforward checkout

Ready to go? Add this product to your cart and select a plan during checkout.

Payment plans are offered through our trusted finance partners Klarna, Affirm, Afterpay, Apple Pay, and PayTomorrow. No-credit-needed leasing options through Acima may also be available at checkout.

Learn more about financing & leasing here.

Free shipping on this product

FREE 30-day refund/replacement

To qualify for a full refund, items must be returned in their original, unused condition. If an item is returned in a used, damaged, or materially different state, you may be granted a partial refund.

To initiate a return, please visit our Returns Center.

View our full returns policy here.


Availability: In Stock.
Fulfilled by Amazon

Arrives Tuesday, Nov 18
Order within 2 hours and 55 minutes
Available payment plans shown during checkout

Description

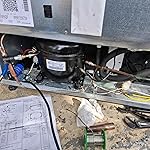
This EMBRACO refrigeration compressor is a direct replacement compressor for many Whirlpool, GE, and Electrolux appliances. Suitable for use in most food service equipment, bottle coolers, and ice machines. Also for use in other refrigeration equipment applications. Compressor includes electrical and mounting accessories to ease installation. Item: Refrigeration Compressor BtuH: 4400 Voltage: 115 Phase: 1 Line Connection Suction I.D.: 5/16" Line Connection Discharge I.D.: 1/4" Refrigerant Type: R-134a Nominal HP: 1/3 Hz: 60 Amps: 35 Base Mount Length: 4" Base Mount Width: 6-1/2" Length: 8" Width: 6-13/16" Height: 8" Potential Relay: 513506009 Start Cap. MFD/Volts: 270 to 324/180 Type of Compressor Oil: POE Application: Vending Machine, Light Commercial Refrigeration Manufacturers Warranty Length: 1 yr. Standards: ASHRAE Includes: Electricals and Mounting Accessories

Brand: Embraco


Voltage: 1.1E+2 Volts (AC)


Recommended Uses For Product: Air Brushing, Drilling, Nailing, Spraying


Power Source: Corded Electric


Noise Level: 54 Decibels


Product Dimensions ‏ : ‎ 8 x 6.81 x 8 inches; 24.8 Pounds


Item model number ‏ : ‎ FFI10HBX1


Date First Available ‏ : ‎ September 24, 2018


Manufacturer ‏ : ‎ CAI - EMBRACO


Customer Reviews: 4.1 4.1 out of 5 stars 73 ratings


Brand: ‎Embraco


Voltage: ‎1.1E+2 Volts (AC)


Recommended Uses For Product: ‎Air Brushing, Drilling, Nailing, Spraying


Power Source: ‎Corded Electric


Noise Level: ‎54 Decibels


Special Feature: ‎Portable


Included Components: ‎Electrical and mounting accessories


Maximum Power: ‎0.33 Horsepower


Color: ‎Black


Material: ‎Cast Iron


Product Dimensions: ‎8"L x 6.81"W x 8"H


Style: ‎Portable


AC Adapter Current: ‎35 Amps


Motor Horsepower: ‎0.33 horsepower


Compatible Hose Diameter: ‎0.31 Inches


Model Name: ‎FFI10HBX1


Manufacturer: ‎CAI - EMBRACO


UPC: ‎707129287083 727079907633


Item Weight: ‎24.7 pounds


Item model number: ‎FFI10HBX1


Date First Available: ‎September 24, 2018


Frequently asked questions

If you place your order now, the estimated arrival date for this product is: Tuesday, Nov 18

Yes, absolutely! You may return this product for a full refund within 30 days of receiving it.

To initiate a return, please visit our Returns Center.

View our full returns policy here.

  • Klarna Financing
  • Affirm Pay in 4
  • Affirm Financing
  • Afterpay Financing
  • PayTomorrow Financing
  • Financing through Apple Pay
Leasing options through Acima may also be available during checkout.

Learn more about financing & leasing here.

Top Amazon Reviews


  • Great compressor - Used on an All Freezer (Electrolux)
The media could not be loaded. First off I'm a 30 plus year appliance technician in Hot Springs Arkansas. I am HVAC schooled and licensed. Also, I have my EPA license for handling all freons. These are the minimum requirements for professionally installing these compressors. This compressor I am personally using as a replacement for an undersized compressor installed at the factory. The product is an all freezer all refrigerator wall set. The all freezer which is Electrolux around 19 cubic foot is the one that I'm replacing. These are extremely expensive and Electrolux which is also Frigidaire makes them slightly different each year so replacing it with an exact same size and look is impossible. Here's where I save the day. I inform the customer that I will need to take the unit to the shop and have it for a minimum of 3 days. I've done over a thousand compressor replacements in the past successfully. The original compressor was a quarter horsepower and this one is a third of a horsepower. All the small details line up closely enough that I can upgrade to a slightly more powerful compressor and get a much better result. The first step is crucial you must evacuate vacuum all of the freon from the dead system. All Freon must be canistered in the labeled by a EPA license technician for the government. There's a $13,000 fine if anyone is caught venting Freon into our atmosphere. Basically the way the law reads is the government wants to know where the freon went that you took out of the old system. So it must be canistered and labeled with the unit and customer information. This way if a government employee from the EPA comes and visits my shop. That's the proper thing they want to see on each repair like this. So all that aside I have removed all the freon from the previous system. It's tagged, labeled and canistered. Next in the process Is to claim the system completely out. The compressor died and your number eight for a reason. Now there's only a few reasons why these die early if they're designed correctly. Somebody may have laid it down at one point which is a major red flag. (never do this) Never lay anything down that has a refrigeration system. That compressor is half full of oil and when it is turned more than 45°, that oil will leave the compressor and run up the condenser lines as well as the low pressure line. Some stores will tell this same old lie. Just after you get it there stand it back up for several hours and it'll be fine. Let me tell you something as an expert in refrigeration that is the biggest lie you will ever hear in your life. Refrigeration systems are not designed to where everything free Falls easily back into the compressor. It simply not like that. The oil that comes out and goes up the lines becomes trapped. Especially in that tiny condenser line. If you lay one down and you get it to the house and plug it in. First if it works you're going to hear gurgling and a rumbling sound throughout the system for the rest of its life until it dies a very early death. I clean my systems out with nitrogen which is a very expensive process but the only reliable way to clean the lines out and it removes all the old trapped oil and nasty debris. Cut off the old filter drier. Anytime you access the sealed system you must replace that filter drier. That's reason number two why it probably failed early. They can become clogged and make the compressor work harder until it burns up. Step 3 is finally cutting the old lines and removing the old compressor. Cut your lines after putting your new compressor up next to it and figuring how you're going to run these lines to your new one. If you're lucky they'll line up exactly the same if you're not lucky you might have to Route things slightly. Having a good copper tubing Bender is always a plus. But you can slightly Bend copper as long as you do not cause a pinch anywhere. If you cause a pinch you'll have to cut that part out and try again. Once everything is lined up with your new one in a couple of copper couplings you'll need to clean where you're going to weld these first. I have a wire brush attachment for my drill that I use that does it very quickly. The condenser line being black you want that thing looking silver when you're finished cleaning it. If you don't and there's any black left on that condenser line you're going to get a bad weld. I clean it several inches up past where my coupling is going to be just to be safe. Always use C flux and take your clean connections and copper couplings and put them together. Then put your flux on the connections. You must be good with a torch to do this correctly. Take your torch and go up and down a couple inches before the coupling on each side slowly up and down working the heat evenly. Once you see the flux starting to Bubble then you will be able to touch the connections with your lead free solder. One tip is to use the torch Flame to direct the flow of the solder. If I'm soldering the left side of the coupling I will take my heat slowly to the right and the solder will basically go in and follow the Heat. If you're new to this good luck it takes a lot of practice to get efficient. The thing is after you're done and you're testing this if you hear that dreaded whistling or air flow seeping out noise. You'll have to cut it all out go through the cleaning process again and do it again. That's why you must be proficient with the torch really before you even start something like this. In my case 30 years ago I had to do three or four cut out and retries so don't feel bad if you do. It'll fill that much better when you're done. Once your welding is done give it 5 to 10 minutes to completely cool off. Attach your starter. Oh yeah hopefully you have attached a fill valve. Usually on the left side. When I weld my fill valve on you have to make sure you have removed the needle. If you will that fill valve with a needle on it it will Warp it. So you need the little four-way needle remover and remove that needle before you weld on the fill valve. Lastly install that fill valve needle not over tighten. Give it just a little bit of R134 in vapor form to get a little pressure I usually get it to at least 20 lb. Now while looking at the gauge you can plug in the unit you will see the pressure drop immediately once the refrigerator comes on that's what you want to see. Let it run for a few seconds if you don't hear any thing blasting out of your welds then slowly fill that thing up to the appropriate amount. There is a sweet spot of refrigerant for every system. You have put too much if you hear that compressor start cutting out. The bad part is this number comes with years and years of doing this. So I'm not going to blurt a number out there. Do this take the cover off the evaporator and just give it a few pounds and stop go look at the evaporator. That evaporator should look Frosty head to toe within 10 minutes when you have it perfect. Hope this helps.... Chuck's Appliance Repair Hot Springs Arkansas ... show more
Reviewed in the United States on September 27, 2025 by Chuck Thompson Chuck Thompson

  • The best
100% quality, operation and performance
Reviewed in the United States on September 29, 2025 by Areskia Cruz

  • Great compressor Great price
Installed on a tall 2 door TurboAir reach in refrigerator in a commercial kitchen compressor is working great, its quite, and starts smooth. Also the compressor I received came with all electrical components
Reviewed in the United States on April 20, 2025 by Andrew T.

  • Pissed off
Item doesn't even work , ran past my window, no return 😤
Reviewed in the United States on August 4, 2025 by Donald O.

  • Good product.
Good product.
Reviewed in the United States on September 27, 2025 by Erica Teodorescu

  • Received and it fit my old fridge. Working very well
Installed it, adapter the lines, and put new terminals on the wire connections. It fired right up, pulled static pressure to 0 in less than a minute and my fridge is ice cold in the freezer and cold in the fridge. It shuts off indicating it's over accomplishing which is what I can hope for. It's not any nosier than the old one, so A++ will buy again. ... show more
Reviewed in the United States on September 13, 2024 by Kckckc

  • This is an all temp range.
I installed this on an upright commercial freezer that gets high usage in a fast paced restaurant where the door is almost always being opened. It fit with a little bit of reworking the copper tubing plus I always replace the condenser fan motor when installing a new compressor just to save grief later. After it started up within an hour it was at 24dg. below zero and it had no problem holding at 10dg below while being used in the busy kitchen. Embraco compressors have been my go to compressors for years because of their dependability and rugged build. Plus their price point is $100 dollars less then the other big name brand. ... show more
Reviewed in the United States on June 24, 2021 by Arizona kid

  • Great package
It came well packaged, looks good, I haven’t installed yet
Reviewed in the United States on February 9, 2025 by Jose

Can't find a product?

Find it on Amazon first, then paste the link below.
Checking for best price...