Search  for anything...

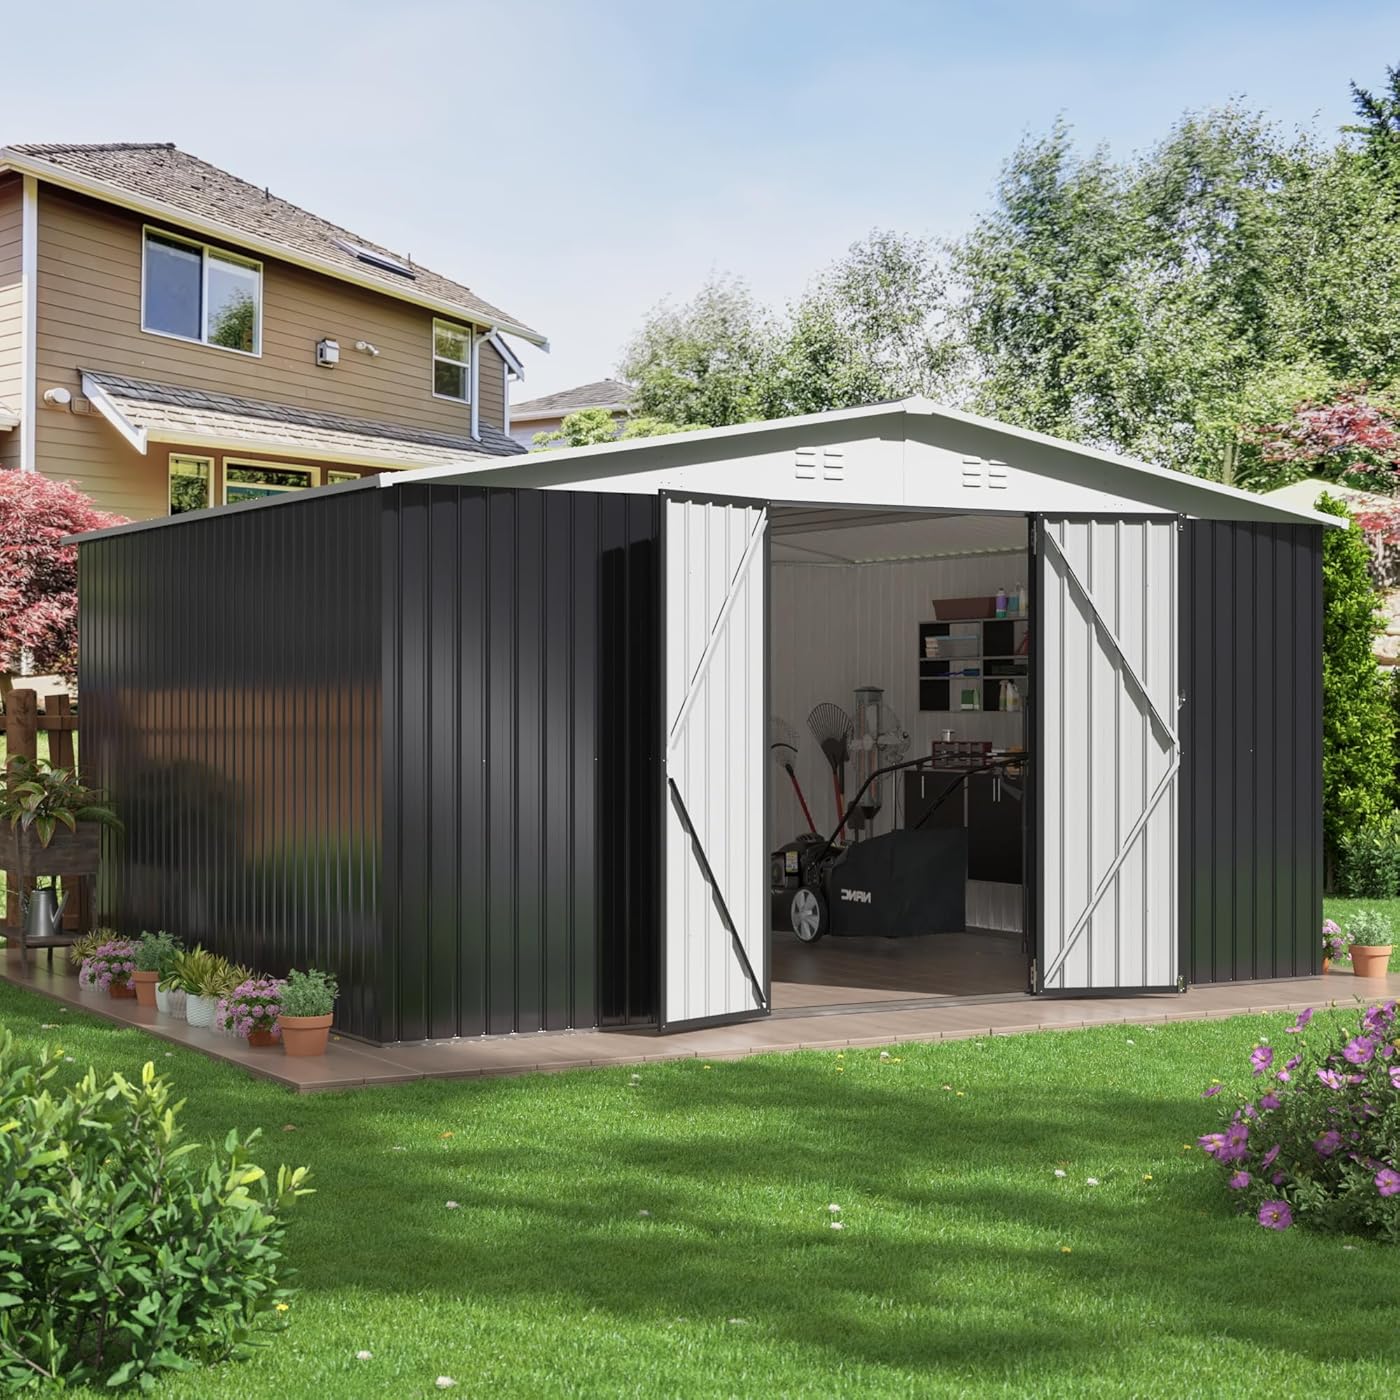
Polar Aurora 12x14 FT Outdoor Storage Shed, Garden Shed with Updated Frame Structure and Lockable Doors, Metal Tool Sheds for Backyard Garden Patio Lawn, White

  • Based on 971 reviews
Condition: New
Checking for the best price...
$539.99 Why this price?
Save $610.00 was $1,149.99

Buy Now, Pay Later


As low as / mo
  • – Up to 36-month term if approved
  • – No impact on credit to apply
  • – Instant approval decision
  • – Secure and straightforward checkout

Ready to go? Add this product to your cart and select a plan during checkout.

Payment plans are offered through our trusted finance partners Klarna, Affirm, Afterpay, Apple Pay, and PayTomorrow. No-credit-needed leasing options through Acima may also be available at checkout.

Learn more about financing & leasing here.

Selected Option

Free shipping on this product

30-day refund/replacement

To qualify for a full refund, items must be returned in their original, unused condition. If an item is returned in a used, damaged, or materially different state, you may be granted a partial refund.

To initiate a return, please visit our Returns Center.

View our full returns policy here.


Availability: Only 3 left in stock, order soon!
Fulfilled by LKF USA

Arrives May 10 – May 11
Order within 16 minutes
Available payment plans shown during checkout

Protection Plan Protect Your Purchase
Checking for protection plans...

Color: White


Size: 12x14 FT (No Window)


Features

  • Spacious Storage SolutionMeasuring a generous 163"D x 138.2"W x 81.5"H, our shed offers ample space to house your gardening tools, equipment, and outdoor necessities without clutter.
  • Premium Material SelectionThe garden shed features superior-grade metal with waterproof and UV-resistant capabilities. Its robust construction ensures reliable all-weather protection, standing up to even the most challenging conditions.
  • Detailed and Functional Design Our shed boasts lockable doors ensuring security, a sloped roof designed for efficient water runoff, vents for better air flow, and durable corner protectors. Each detail is meticulously crafted, keeping the buyer's requirements in focus, to deliver a product that excels in safety, ease of use, and long-lasting quality.
  • Easy InstallationFor ease of assembly, each part of the outdoor shed is clearly labeled with a part number, and it comes with a detailed step-by-step manual.
  • 24/7 Customer SupportPolar Aurora is committed to high-quality products that enhance your outdoor living experience. If you have any questions after receiving your shed, please contact us. Our professional team is ready to provide top-notch after-sales support.

Brand: Polar Aurora


Color: White


Material: Metal


Product Dimensions: 163"D x 138.2"W x 81.5"H


Style: Contemporary


Item Dimensions D x W x H: 163"D x 138.2"W x 81.5"H


Floor Area: 192 Square Feet


Brand Name: Polar Aurora


Manufacturer: Polar Aurora


Manufacturer Part Number: PSS1214WH


Model Number: PSS1214WH


Material Type: Metal


Base Material: Alloy Steel


Top Material Type: Metal


Frame Material: Alloy Steel


Color: White


Style Name: Contemporary


Door Style: Lockable Doors


Water Resistance Level: Water Resistant


Required Assembly: Yes


Frequently asked questions

If you place your order now, the estimated arrival date for this product is: May 10 – May 11

Yes, absolutely! You may return this product for a full refund within 30 days of receiving it.

To initiate a return, please visit our Returns Center.

View our full returns policy here.

  • Klarna Financing
  • Affirm Pay in 4
  • Affirm Financing
  • Afterpay Financing
  • PayTomorrow Financing
  • Financing through Apple Pay
Leasing options through Acima may also be available during checkout.

Learn more about financing & leasing here.

Top Amazon Reviews


  • You need a friend, and a whole day
This review is for the 8x6 Polar Aurora Outdoor Metal Shed. It's a long review, go get yourself a beer. (TLDR about midway.) I bought this shed to store my yard tools in. I placed it on a prepared concrete pad, anchored it with expanding lag bolts, and sealed the underside with butyl tape. It's big enough to hold my large (3" throat @ 10hp) chipper/shredder; a lawn mower; all of my shovels, hoes, and rakes; my weedeater and all of its attachments; and some yard chemicals like fertilizer and grass killer. I wanted to get a wheelbarrow in there too but the 8x6 just wasn't big enough. That's not any kind of criticism about the shed - it's just meant to give you an idea of how much stuff it can hold. As other reviewers have mentioned, all the painted metal pieces were covered in plastic. I strongly recommend that you remove this plastic, and I truly hate to make that recommendation because it's a time-consuming task that is 100% not enjoyable. But, the plastic is imperfectly applied in places, and in these places where it isn't in contact with the metal, there's a chance water can get in there and sit. This metal is super-thin, folks. Even galvanized metal succumbs to rust eventually. Don't leave the plastic on. I included some hints on removing it at the end of my review. The shed arrived extremely early. So early, in fact, that the concrete wasn't ready yet. I had to let the shed boxes sit outside for 5 days while my concrete cured. I planned the whole concrete pour around the delivery date of the shed. So while I normally love to get my orders early, in this case, it wasn't ideal. The boxes are large and I had no place to keep them indoors. However, I'm not deducting stars for that, it's just FYI in case you try to plan as carefully as I did. Packaging was OK but not the best. There were a couple of pieces that had slight damage to one edge or another. Nothing was dented, though. None of the damage was a deal-breaker for me and most of the damage was obscured after assembly. I did take off a star for this. They could easily add in some foam to help the packaging without much trouble and without affecting the excellent price point by much. The assembly hardware is plainly marked and it's just about impossible to mix up which screws are used in which steps. I had extra screws and washers at the end so they definitely made sure to include spares. The assembly instructions were well-done and easy to follow. (I will suggest that you find and use a magnifying glass, though. Sometimes the way to tell how to orient a piece is to observe which way the oblong holes are running - horizontal vs. vertical - and man are they tiny in the pictures.) Generally speaking, though, you shouldn't be able to assemble things incorrectly. Build quality was surprisingly good. I expected a much less solid structure at this price. Fitment was overall pretty excellent, holes lined up during assembly ~95% of the time. (Keep in mind that in something this complex with literally hundreds of screws, NO ONE is going to get 100% perfect fitment. Not the manufacturer, and not the builder.) When holes didn't align I was able to move one piece or another to force alignment. This is where the helper comes in really handy. Only when that didn't work, did I resort to my own self-tapping screws. That was pretty rare, though. To reinforce to you how sturdy this shed is: in order to fasten the roof cap ridge thingy, I had to actually lay down on the shed's roof. I weigh over 250 pounds and it was solid. I did create a couple of dents, but that was my fault for putting weight down in an unsupported spot. So, this shed is definitely sturdy. Don't let the thin-gauge metal walls fool you. I'm really pleased with this purchase. Buying this and assembling it myself saved me several hundred dollars over getting one locally - which more than paid for the concrete that I put the shed on. The shed surprised me with its quality and ease of assembly. The finished product looks good. The doors open easily and the shed is solid. I would definitely recommend this shed to others, and in fact, if I needed a second shed, I'd buy one of these again. ***TLDR*** A surprisingly solid shed that anyone with decent DIY skills can build. A helper is needed. Peeling the plastic takes about as long as assembling the shed. Instructions and assembly materials are very organized and easy to follow. You may encounter some fitment issues that can be easily overcome with some self-tapping screws. Shipping was really fast but packaging could use a little improvement. You need to make plans for flooring (none included) and/or anchoring to the ground. Assembling the shed required: *A friend/helper + beer for payment *A stepladder *A step stool (or, the ladder, if it's short enough to go inside the partially-constructed shed) *An impact driver w/ phillips and allen bits *Pliers or sockets (there are a few bolted connections in addition to all of the screws) *An enormous amount of patience (because, plastic peeling) Other things I used that others might not need to worry about: *concrete anchors *Butyl tape or other sealant *Self-tapping screws (I mostly used these where fitment issues kept me from getting the holes to align.) OK, here are some pointers you may find helpful.... *The plastic you've read so much about in these reviews is actually regular old plastic wrap. It's not applied with any adhesive, it's just shrink-wrapped. Removing it is very much like peeling sunburn skin off your arm. Heat guns/hair dryers don't help, and neither do rubber wheel adhesive removers. *When peeling the plastic, look for thin little straight lines. They usually run long-ways for the whole length of the piece. These lines are actually perforations, and they are meant to rip away from the rest. Typically, you'll want to focus on a plastic strip near one of these lines to get it started. Once it's started, work just that one strip all the way down the piece until it's removed. Then go back to where you started from and start the next strip, and remove that one. Continue in this way until it's all pulled off. My helper and I experimented with this technique and it seemed to be the fastest way. For reference, he was trying to peel the plastic from a piece all at once and keeping it all together. Once I started just pulling the individual sections/strips, I was getting done faster. ALSO - don't worry so much about the plastic that's on the interior of the shed. It's not likely to get wet. *The washers are nylon and come in a 12x10 sheet. What I did was pull one row off the sheet, so I'd have like 10 or 12 of the washers together in a line. Then, when placing screws, I'd just hold the whole strip, put a screw into the last washer in the row, position it, and drive it in. Finally, I would yank on the strip of washers to break off the one that I just screwed down. This was easier and faster than trying to separate all the washers individually. *Don't allow things to lean against the walls of the shed until it's all the way together. The walls can flex quite a bit until the roof pieces go on. I caused some fitment issues by leaning my roof pieces against the walls while assembling other parts. *The screws they give you are not self-tapping, so if you do have a fitment issue that keeps holes from coming into alignment, go get a self-tapping screw. The ones they give you will just spin and not dig in. *When putting on the roof pieces, the instructions have you go from front to back. I found the easiest way to do this was to work from inside the shed, standing on a short step stool to get my head and shoulders above the roofline. It's a tight squeeze to put on the next-to-last roof pieces, but if you can get those from inside, the last two pieces are really easy to reach from outside when you're on a stepladder. How I anchored and sealed it: The instructions have you build the floor frame first. Immediately after that you start screwing on the wall pieces. In between those two steps, we did the following: *Centered the frame on the concrete pad and marked its boundaries *Helper stood on the frame to keep it steady while I made starter holes for the anchor bolts *Removed frame, made anchor holes, sank anchors *Returned frame, ensured proper alignment. Then, flipped frame upside down in-place *Applied butyl tape to the outermost edge of the frame's underside *Flipped frame back over and settled it down on the anchor bolts *Tapped frame into place with a 2x4, then went around the edges and tapped it some more to seat the butyl tape against the concrete. Bolted the frame down on the anchors. ... show more
Reviewed in the United States on September 11, 2023 by Jim Seefeldt

  • Excellent Value, and Clever Design
Color: Black Size: 8x12 FT (No Window)
This is for the 8x12 version of the product. For the price I was skeptical I'd be satisfied with this shed, but happily I was wrong. I'll echo the comments of some here and strongly recommend that the first thing to do is go through the parts lists and verify you have every part. I did this, and discovered I was missing one piece. It greatly reduced build delays to contact customer support right at the beginning and arrange to have them ship it out In addition I advise wearing gloves for most steps of assembly - the sheet metal pieces are sharp I did this installation myself, and only needed a second person when I was attaching the upper pieces of the rectangular frame near the beginning, but your mileage may vary. Even if I had NO option for a helper I could have managed even this by myself with a little ingenuity. I did find that there were a number of times I couldn't get holes to line up and was forced to drill some new (5/64") holes but that didn't surprise or bother me. Overall I was very impressed with the cleverness of the design. I don't agree with those who might complain that the sheet metal was too thin. Those boxes are HEAVY, and to increase the gauge of the steel would have made them SO heavy as to possibly be unmanageable, or increase the number of boxes, therefore with increased product cost and shipping cost, etc. Once it's fully up, the design is really quite sturdy. The floor and/or anchoring of the shed is something to give some serious thought to. I didn't have the option to make this a permanent, fixed installation, so instead of bolting the shed to concrete, I arrayed some paver bricks (over 100) on top of my concrete, laid three 4x8 sheets of tongue & groove OSB subfloor on them, and screwed the wood to the paver bricks with Tapcons. This worked out well for me, but required a great deal of planning and forethought to the brick layout. I'll go back to customer service though: they are excellent, and respond quickly. I misunderstood a step related to the roof beams, and they clarified that for me by sending a photo of the completed shed specifically showing what I was asking about, which was very helpful. The only improvement I think could be made is possibly to switch to providing the "installation manual" as an app instead of paper. Could be me and my own aging eyesight, but several of the installation steps would have been clearer if I could have zoomed in for greater detail magnification. There are a few minor misprints in the paper manual, but they were easy to spot and didn't cause any problems for me. I'd definitely suggest that you don't attempt this unless you are a strong DIY type, or are comfortable with assembly, aren't pressed for time, and have access to helpers. ... show more
Reviewed in the United States on May 29, 2025 by Mike Bond

Can't find a product?

Find it on Amazon first, then paste the link below.
Checking for best price...