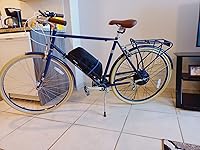
eBikeling 36V 700C Rear 750 Watt Ebike Conversion Kit, Electric Bike Conversion Kit with Waterproof Components, Add On Electric Bike Kit for Effortless Cycling, High Performance, Durable and Reliable


Notify me when this product is back in stock
Buy Now, Pay Later
- – Up to 36-month term if approved
- – No impact on credit to apply
- – Instant approval decision
- – Secure and straightforward checkout
Payment plans are offered through our trusted finance partners Klarna, Affirm, Afterpay, Apple Pay, and PayTomorrow. No-credit-needed leasing options through Acima may also be available at checkout.
Learn more about financing & leasing here.
Selected Option
30-day refund/replacement
To qualify for a full refund, items must be returned in their original, unused condition. If an item is returned in a used, damaged, or materially different state, you may be granted a partial refund.
To initiate a return, please visit our Returns Center.
View our full returns policy here.
Recently Viewed


Size: Rear
Style: 750w
Features
- Powerful Bike conversion kit to electric or Electric Bike Conversion Kit: Transform your bike with our 36V, 750 watt ebike kit. This comprehensive e bike conversion kits package includes everything you need for a seamless bike motor kit or ebike conversion kits upgrade, ensuring a powerful, efficient ride.
- Versatile Ebike Kit Options: Choose an electric conversion kit for bicycle from our range of power options including 750 Watt Ebike ensuring this ebike kit meets your specific needs. Our electric motor kit provides flexibility for various riding conditions and preferences.
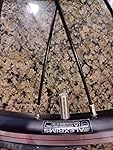
- Waterproof Electric Motor Kit: The 700C rear wheel electric bicycle motor conversion kit to electric rides confidently in any weather with our waterproof e bike kit. Designed for durability and reliability, this ebike motor is perfect for those who demand consistent performance from their e bike conversion kit.
- Efficient Ebike Conversion Kits Hub Motor Design: Our e-bike conversion kit features a streamlined hub motor for smooth and efficient power delivery. This bike conversion kit ensures optimal energy use, enhancing your cycling experience with each ride.
- Complete Electric Bicycle Conversion Kit: This comprehensive ebike hub motor conversion kit electric mountain bike conversion kit, beach cruiser ebike conversion kit, bicycle trike conversion kit, and turning traditional bike includes everything needed for a successful electric bike conversion. Ideal for enthusiasts, our ebike conversion kit provides a seamless transition to electric cycling.
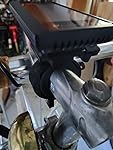
- E Bike Conversion Kit includes all necessary components for installation; the wheel hub motor, controller, display, throttle, brake levers, pedal-assist system, torque arm, and cable ties. BATTERY & TIRE IS NOT INCLUDED in this electric bike kit. Bike conversion kit to electric, We offer a 1-year warranty on the hub ebike motor and battery. All other components are under a 3-month warranty. Based in Chicago.
Brand: EBIKELING
Material: Aluminum
Color: Black
Wheel Size: 29 Inches
Rim Width: 19 Millimeters
Package Dimensions : 26 x 26 x 9.6 inches; 19 Pounds
Item model number : 750w700C
Date First Available : March 9, 2021
Manufacturer : EBIKELING
Best Sellers Rank: #561,184 in Sports & Outdoors (See Top 100 in Sports & Outdoors) #1,804 in Adult Electric Bicycles
#1,804 in Adult Electric Bicycles:
Customer Reviews: 4.0 4.0 out of 5 stars 13 ratings
Frequently asked questions
To initiate a return, please visit our Returns Center.
View our full returns policy here.
- Klarna Financing
- Affirm Pay in 4
- Affirm Financing
- Afterpay Financing
- PayTomorrow Financing
- Financing through Apple Pay
Learn more about financing & leasing here.
Similar Products


Top Amazon Reviews