Search  for anything...

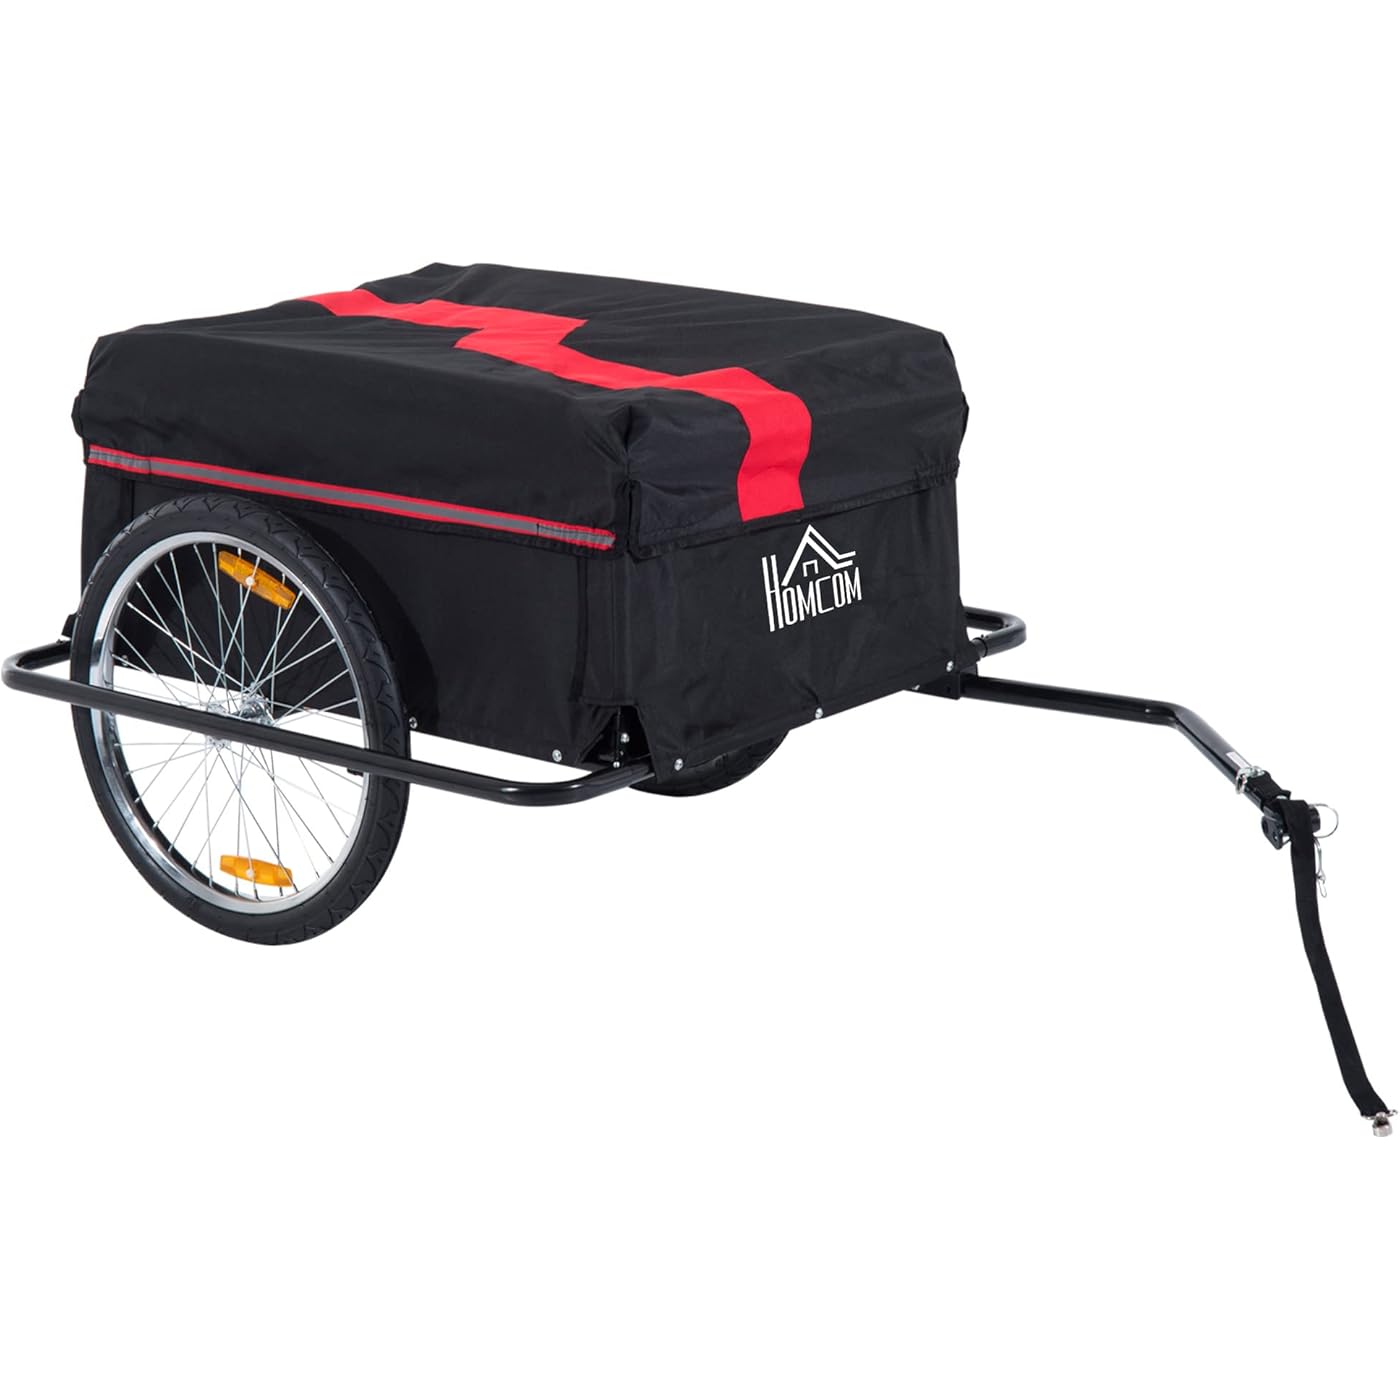
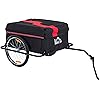
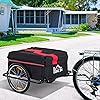
Aosom Bicycle Cargo Trailer, Two-Wheel Bike Luggage Wagon Bicycle Trailer with Removable Cover

  • Based on 559 reviews
Condition: New
Checking for product changes
$114.99 Why this price?
Save $28.00 was $142.99

Buy Now, Pay Later


As low as $19.17 / mo
  • – 6-month term
  • – No impact on credit
  • – Instant approval decision
  • – Secure and straightforward checkout

Ready to go? Add this product to your cart and select a plan during checkout. Payment plans are offered through our trusted finance partners Klarna, PayTomorrow, Apple Pay, and PayPal. No-credit-needed leasing options through Acima may also be available at checkout.

Learn more about financing & leasing here.

Selected Option

Free shipping on this product

This item is eligible for return within 30 days of receipt

To qualify for a full refund, items must be returned in their original, unused condition. If an item is returned in a used, damaged, or materially different state, you may be granted a partial refund.

To initiate a return, please visit our Returns Center.

View our full returns policy here.


Availability: In Stock.
Fulfilled by Amazon

Arrives May 12 – May 14
Order within 16 hours and 24 minutes
Available payment plans shown during checkout

Size: 4.5' x 3'


Color: Black and Red


Features

  • Spacious Bag: Spacious storage allows more items, larger items, or extra amounts of room for the things you need to bring with you. If you want to come back with more items than you started with, the roominess will be there for you. This trailer is big enough for camping equipment, shopping essentials, books, firewood, or anything else.
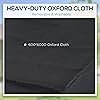
  • Removable and Washable Waterproof Fabric: The heavy-duty durable oxford fabric balances its outdoor-strong design with the ability to remove and wash the fabric, allowing cleanliness to get rid of dirt after rain or mud has gotten in the way. Thick, waterproof, and equipped with a top cover, this design protects your belongings from rain and snow. Without the cover, you can fit larger objects.
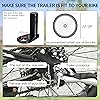
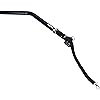
  • Easy to Store: The bike wagon trailer disassembles easily with quickly removable wheels and folds up into a small package to keep out of the way. It includes a simple-to-use hitch that fastens onto your back wheel to allow for quick and easy attaching and removing.
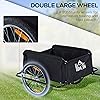
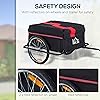
  • Heavy-Weight Ready: The large 16" wheels handle more at heavier weights for keeping you prepared to travel with loads that would be worse in backpack form. The thick tires offer traction and absorb vibrations to keep things smoothreflectors on both sides of this bicycle sidecar ensure visibility and safety.
  • Pull Trailer Information: Overall Dimensions: 53.25" L x 28.75" W x 23.5" H. Inner Dimensions: 33.25" L x 24" W x 15" H (Bottom); 29.25" L x 24" W x 15" H (Top). Maximum Load 88 lbs. Compatible with 22"-28" diameter bike wheels.

Brand: ‎Aosom


Color: ‎Black and Red


Item Weight: ‎35.2 Pounds


Frame Material: ‎Alloy Steel


Maximum Weight Recommendation: ‎88 Pounds


Seating Capacity: ‎1


Maximum Height Recommendation: ‎23.5 Inches


League: ‎Not Available


Product Dimensions: ‎53.25"L x 28.75"W x 23.5"H


Item Package Dimensions L x W x H: ‎34.25 x 27 x 8 inches


Package Weight: ‎41.6 Pounds


Brand Name: ‎Aosom


Model Name: ‎5664-0005R


Material: ‎Steel, 600D Oxford


Suggested Users: ‎Unisex


Manufacturer: ‎Aosom Direct


Part Number: ‎5664-0005R


Model Year: ‎2017


Style: ‎Athletic


Included Components: ‎Aosom Elite II Bike Cargo / Luggage Trailer - Red / Black


Size: ‎4.5' x 3'


Sport Type: ‎Cycling


Date First Available: June 6, 2017


Frequently asked questions

If you place your order now, the estimated arrival date for this product is: May 12 – May 14

Yes, absolutely! You may return this product for a full refund within 30 days of receiving it.

To initiate a return, please visit our Returns Center.

View our full returns policy here.

  • Klarna Financing
  • Klarna Pay in 4
  • PayTomorrow Financing
  • Apple Pay Later
Leasing options through Acima may also be available during checkout.

Learn more about financing & leasing here.

Top Amazon Reviews


  • Review plus how to add a canopy, mount on trike, and advice on accessories
Size: 4.5' x 3' Color: Black and Red
REVIEW I really like this trailer for pulling behind my adult trike. I can haul my dog in it or a lot of whatever else I want to because it's rated to hold up to 180 lbs – although I haven't tested this limit. Assembling it was pretty easy. The front and rear fabric panels can be detached from the top and side of the frame, via Velcro patches – I suppose for those times you need to haul a longer load. As others have noted, you need to be careful not let the fabric sides bulge out and touch the tires or you'd get a hole worn through pretty quickly. I'm not entirely happy with the cover because there's no way to attach it – it's possible to have a good wind blow it off, which may not be discovered until you were miles away. Bungee cords running from corner to corner in an X-shape would work, but I'd have liked to have Velcro patches for affixing it to the trailer sides from the manufacturer (hint, hint). It's nice that it can be folded for storage. The side bars which protect the tires from getting tangled, and possibly damaged or ripped off on turns ("Oops! Didn't notice that sign post!"), can be left off if you want to save a little on the weight. There are even caps to cover the end of the frame tubes if you do. The hitch has a spring to make turning easier and acts as a shock absorber for bumpy roads. The cover has night-time reflective stripes, but there is nothing to provide visibility if the cover is not in place – the sides and back are solid black, although the sides have two reflectors on each tire. Note: the tires come only partially inflated and are cheap. The bottom is a solid metal, painted plate, which is nice. The cargo area is approximately 22" wide by 31" long by 14" high. I would have liked it if the manufacturers had provided a tube for a safety flag to be mounted at the rear (another hint, hint). For those who want to be able to mount this trailer to more than one bike, it takes an ”Aosom Bike Trailer Type 'A' Hitch Coupler". Although the trailer pulls nicely once you get going, the added weight, even without a dog on board, can really be felt going uphill. I had to get off and push the rest of the way up a few hills that I previously was able to climb before attaching the trailer – even the electric motor couldn't get me up them. Guess I'll have to look into having my dog "mush" me up those hills. Kidding... maybe. ;-) The Aosom Elite II Bike Trailer can also work as an adult TRIKE trailer. I live in a very small town in Colorado where there are more dirt roads than paved roadways. Needing more exercise for both myself and my 65 lb. Goldendoodle, after a LOT of research, I got a Mt. Trike (Extreme edition, made in Cedar Rapids, UT) with fat tires and an electric motor (to help me on hills). While I allow my dog to run off-leash when I ride the back roads, she needs to be leashed on the "busier" roads in town. ("Busier" is in quotes because when your entire county has a population less than 4,500, "busy" means something different than where you likely live). ;-) I found a bike leash which you could get an adapter for (from the manufacturer) to mount it on a trike ( Best Bike Dog Leash - Bike Tow Leash - Stable and Safe - Medium to Large Dogs Bundled with eOutletDeals Collapsible Pet Water / Food Travel Bowl (Red) ). Since I planned to go on longer rides (over 10 miles) I knew I'd also need a trailer for those times my dog was tired or if she injured herself on a trip (a cut paw is something that has happened to her, necessitating a rescue trip from my brother in his SUV). After seeing the adapter for the bike leash, I realized that it would work for this trailer too AND it was something that could be made from scratch for much cheaper than buying another. I needed two because the leash and trailer needed to have an adapter mounted in different positions on the back axle. I also added a canopy to the trailer to provide shade for when my dog rode in it. I chose this option, rather than getting a "doggy trailer", because I could use the trailer for hauling things other than my dog. Since more people will likely be interested in the canopy than attaching the trailer to a trike, I'll start with that. Also, at the end of this review, there is a list of other items that I'd recommend for a bike or trike. ATTACHING A CANOPY My dog is a shadow-diver. Whenever we are on a walk she will take every opportunity to dive for shade whenever possible on warm days. Because of this, I knew that I'd need something to shade the trailer. I was lucky to find a pre-made canopy that was for a dog bed, but which I thought could be adapted for use with the trailer – and it worked well. This is the canopy ONLY – the bed is a separate purchase, but I don't need it anyway – K&H Manufacturing Pet Cot Canopy Medium Gray 25-Inch by 32-Inch . You want the MEDIUM size. *See the four pictures labeled "Canopy 1-4" that illustrate the following instructions.* To attach the canopy to the trailer, first you need to drill four holes, one in each top corner of the front and rear trailer frame. To more easily do this, first lower both the front and rear fabric panels by pulling loose the Velcro holding the panels to the top and side frame tubes. Drill the holes in the corners through the TOP of the frame tubes ONLY (do not continue through the bottom of the tubes, you want the bottom of the canopy poles to rest on the inside bottom of the tubes). In some of the corners you will be drilling through only the plastic, but in others you will need to also drill through the metal frame tubes inside the plastic. Again, only a SINGLE hole in each corner through the top of the tubes is needed for each corner. See picture "Canopy 1". The canopy instructions show inserting the poles into the holes and then throwing the fabric canopy over them, however, if you look at the underside of the canopy there are fabric tubes through which you can feed the poles and each corner also has a tube. I preferred to go the extra step to push the poles through these tubes because I thought the canopy would be better attached. Each of the two poles come in three pieces – push the pieces through the tubes of fabric before attaching them together. The two poles will be crossing each other in an x-shape. Once both poles are connected together, bend the poles and push the ends into the holes you just drilled. Make sure that the logo on the canopy is on one of the long sides of the trailer. So that my big dog would have an easier time of climbing into the trailer, I deliberately shifted the fabric so that it was lower towards the front of the trailer and higher at the rear – this gave me a bigger opening at the rear for my dog to climb through. To do this, I attached the elastic corner loops of the canopy differently for the front and rear. In the front (the side closest to the trike/bike), I pushed the fabric as far down the poles to the trailer as I could, so that it touched the trailer tubes where the holes were drilled. I then detached the trailer side tubes that protect the tires - just from the front of the trailer. Then I stretched the canopy loops until they hooked over the end of the tubes, and then reattached the side tubes (see picture "Canopy 4"). For the rear canopy loops, I attached a Velcro strap ("VELCRO Brand - ONE-WRAP Cable Management, Thin Self-Gripping Cable Ties: Reusable, Light Duty - 8" x 1/2" Ties, 100 Pack – Black”) to the end of the loop (see picture "Canopy 2"), stretched the loop as far as I could, and wrapped the Velcro strap around the top frame tube between the canopy pole and the corner (See picture "Canopy 3"). To make sure the Velcro wouldn't come loose; I also took another Velcro strap and wrapped it over the first strap. MAKING AN ADAPTER FOR AN ADULT TRIKE * See the five photos labeled "Adapter 1-5" that illustrate the following instructions. * First, you need the tools necessary for cutting and drilling holes in an aluminum u-channel – or in my case, a brother who has such tools, and the know-how to use them. ;-) To make the adapter, you need to buy a 36" length of aluminum u-channel ( 6061 Aluminum U-Channel, Unpolished (Mill) Finish, T6 Temper, AMS QQ-A-200/ASTM B221, Equal Leg Length, Rounded Corners, 0.13" Wall Thickness, 36" Length ) and two muffler clamps. The size of the muffler clamps will depend upon the size of your trike's rear axle. For my trike, I got two 1 1/2" clamps ( Walker Exhaust 35325 1 1/2" Hardware-Clamp ). You will also need four sets of bolts/nuts/washers to connect the two pieces of u-channel together, a bolt/nut/washer to attach the trailer hitch (in place of the bike's axle), and some sort of non-slip, cushioning material to wrap around the axle to keep the clamps from scratching the paint and to keep the adapter from slipping. I'm not sure what the material I used was. I just used something I had on-hand. It appeared to be a rubberized fiberglass material. Make sure the clamps fit loosely enough to allow the cushioning material to fit underneath when wrapped around the axle. You may want to go up one size for the clamps, depending on the thickness of your cushioning material - just make sure that the clamps fit tightly around the axle once the bolts are tightened. Wrap the cushioning material around the axle more than once, if needed, to insure a tight fit. Cut an 18 1/2" and a 6" section of u-channel. My brother used a hack saw. Drill four holes in both pieces of the u-channel to attach the 6" piece to one end of the 18 1/2" piece, back-to-back (flat sides together), with the ends lined up. Make sure you leave room so the nuts and washers won't overlap each other and will clear the u-channel legs. Also, drill two holes for each clamp in the short sides of the adapter, two holes in each u-channel. You may want to wait to drill these holes until you determine which side of the trike axle the adapter will be mounted to (above or below) in order to make the trailer level. You can also tilt the adapter to achieve the proper angle for leveling the trailer. You want the flat side of the longer u-channel to face to the left for mounting the hitch (the same side the hitch would be attached to a bike). You want to mount the adapter as near to the center between the two rear trike tries as you can so that the trailer will track centered behind the trike. Getting it perfectly centered may not be possible depending on how the rear axle is made. In my case, the adapter was mounted off to the left of center because the axle was exposed in the center. Although this meant that the trailer tracked a little off-center, it still pulls fine. You also need to drill a hole in the opposite end of the longer u-channel of a size that will accommodate the proper size bolt for attaching the trailer hitch - the same size as a bike axle. As mentioned earlier, before you actually drill the four holes in the u-channel sides and attach the adapter to the axle, hold the adapter in place by hand to determine the best position to make the trailer level when attached. If you first drill the hole at the end where the trailer hitch attaches, you can attach the trailer to the unconnected adapter. Check how level the trailer would be, mounted above and below the axle, and see how much, if any, you will need to tilt it to get the trailer level. You might want to mark the position where the adapter will be on the axel with a grease pencil or similar. Once you have found the best position and angle, turn the trike upside-down to make working on it easier. In my case, the adapter worked best mounted below the axle, and tilted up slightly. You may also want to remove one of the rear wheels to give you more room to work. Wrap the cushioning material around the axle where the first muffler u-clamp will go. Position the u-channel and bottom portion of the clamp (bracket) on one side of the axle (over the wrapped cushioning) and the u-bolt on the other side, inserting the ends of the u-bolt first through the holes in the clamp bracket and then through the holes you drilled in the short sides of the u-channel. Attach the clamp to the u-channel with the washers and nuts. Do not fully tighten yet. Repeat with the other clamp. Once again, check the position and angle of the u-channel before fully tightening the bolts. Turn the trike back over to an upright position, attach the hitch to the flat side of the end of the adapter with the bolt which is replacing the bike axle (if you haven’t already done so), attach the trailer safety strap to your trike, and you're ready to go! I also used a heavy-duty zip tie to suspend the end of the adapter from the underside of the trike's rear basket to give it more support and to keep it from dropping lower in position since there could potentially be a significant amount of weight in the trailer (it's rated to 180 lbs). Now some other info you might find useful for your trailer. The bottom of the trailer is painted metal and is about 22" wide by 31" long. To help keep your loads from shifting, you can use a non-slip shelf liner material. It will also minimize scratching the paint. This is a good solid liner – "Duck Brand 877705 Solid Grip Easy Liner Non-Adhesive Shelf Liner, 20-Inch x 4-Feet, Black". This may also be what you want to use to wrap around the axel to cushion the muffler clamps since it's non-slip. You may want to wrap it around two or more times to get a tight fit for the clamps. If you will be placing breakable items into your trailer, like grocery bags with glass jars, you might want to add another layer or two of something like this to provide cushioning – "Con-Tact Brand Grip Premium Non-Adhesive Non-Slip Shelf and Drawer Liner, 20-Inches by 4-Feet, Black". This will also help quiet the load. The reason I used both liners is that the Con-Tact liner provided cushioning while the Duck liner keeps dirt from falling through to the trailer bed and scratching the paint. If you want to keep the trailer secure, this lock MIGHT fit the hitch - Master Lock 2847DAT Stainless Steel Adjustable Coupler Latch Lock . I say "might" because there are size allowances in manufacturing which means that either the size of the lock rod or the size of the holes in the hitch may be slightly larger or smaller than 1/4". Because of this, I had to enlarge the holes in the hitch with a drill, just a tad, to allow the lock to fit. The canopy and the cover and sides of the trailer are NOT water-proof, or even water-resistant. I sprayed the fabric with this to help these items resist water – "Camp Dry Heavy Duty Water Repellent Spray". Since I wouldn't be using the trailer cover most of the time, and because there is reflective material only on the cover, I attached this highly reflective tape to the bottom of the back of the trailer to increase visibility at night – "ABN DOT-C2 2" X 10' Trailer Conspicuity DOT Reflective Red/White Tape". After pressing a strip of the tape across the lower back fabric panel, I hit it with a blow dryer set on high on both sides while pressing with my fingers and moving in a circular motion against the tape and fabric panel to make sure the adhesive adhered well to the fabric. Some people remarked about the cheapness of the trailer tires and tubes, so I inflated the tires with this, rather than just air – "Slime 60089 Quick Spair Tire Inflator - 16 oz. " I don't know if this will really help, but since they sell tubes with Slime already in them, I figured it might help extend the life of the cheap trailer tires. Check the tire pressure one or two days after filling with Slime since they will likely need more air after the Slime foam has had time to settle. For those of you who will be using the trailer to carry their canine companion, you might want to consider getting a cushion like this - MidWest Quiet Time Pet Bed Deluxe Tan Ombre Swirl 29" x 21" . The 30" size fits in the trailer bed (with a few inches to spare on all sides) and the bottom is made of a slip-resistant material to keep your pet from sliding about. For when it's hot, I add this over the pet bed, wrapped in a sheet, to help keep my dog cooler - Milliard 2nd Generation Pet Cooling Gel Mat / Dog Bed, Extremely Comfortable and Nontoxic - 36" x 27" . Please note, not all dogs can be trusted to ride in an open trailer. My dog is very well trained and well behaved. I've ridden with her lying down on the back of an ATV in the passenger seat and she understands she should not sit up and should stay put - even when we have to stop to let deer, cattle, or horses cross the road, or if we are being chased by dogs. Once I trained her, my dog understood not to jump out of the trailer unless I tell her to. However, I still keep her either on the bike leash, or in (and tied to) the trailer, when in town or on busier roads. No sense taking unnecessary chances. For those of you who need to keep your dog enclosed, I found a collapsible dog crate that should fit the trailer - Petsfit 31x20x25 Portable Pop Open Cat Kennel,Cat Cage,Dog Kennel,Cat Play Cube,Lightweight Pet Kennel . I don't know if it will fit under the canopy since I didn't need a crate. Now, for those of you who are attaching the trailer to an adult trike, this is a very nice cover to protect your trike from the elements - Adult Tricycle cover for Schwinn, Westport in Black ss400 75"L x 30"W x 44"H . It fits my trike nicely, including the front and rear baskets. You'll probably want to add waterproofing to it, as I did after an unexpected spring snow storm dumped 18" of snow on us. I brushed most of the snow off, but some fell afterwards and wound up melting and soaking through the cover, as well as soaking through a sweatshirt I had left on top on the back basket. Many trikes have a rear basket. I got this to cover mine to protect the contents from rain, prying eyes, and sun (hence choosing the silver color),– "Natuworld Pure Color Nylon Backpack Rucksack Rain Cover Waterproof Dustproof Cover for Hiking / Camping / Traveling Outdoor Activities - Fit for 35L/45L/60L/70L/80L Available" (the 45 liter size fit my basket with room for six or so inches of stuff sticking above the top of the basket). I waterproofed this too, even though they say it's waterproof because it did leak. Then I added this over the top to keep the cover in place – "Coleman Motorcycle Bungee Cargo Net". For navigation, I use a Garmin GPS ( Garmin nüvi 55LM GPS Navigator System with Spoken Turn-By-Turn Directions, Preloaded Maps and Speed Limit Displays (Lower 49 U.S. States) ), coupled with a battery charger ("PowerGen 13000mAh External Battery Pack High Capacity Power Bank Charger Dual USB output for Apple iPhone 5s 5c 5 4s 4 3Gs 3G (Lightning Cable NOT included), iPod Touch, iPad mini 1 2 3 4 Air, / HTC One mini Max, One X S V, Desire 600 700 / Samsung Galaxy"). They BOTH fit in this case for carrying – "BIRUGEAR Hard Shell Carrying Case for Garmin nüvi® 55LM, 54LM/54, 52LM/52, 2597LMT, 2577LT, 2557LMT, 3597LMTHD, Magellan -RoadMate, TomTom 5inch GPS - Purple". What I especially like about the Garmin is that there's a setting I can turn OFF that avoids unpaved roads, since what we have most of here are dirt roads. I mount the Garmin on my trike handle bars with this – "ChargerCity 5-Inch Water Resistant GPS Case Bicycle/Motorcycle Handle Bar Mount with Security Screw Bundle with Micro SD Memory Card Reader" with this to shade the screen from the sun: "ProAm USA 5" LCD Video Monitor Hood / Sunshade". I leave the battery charger in the purple case and keep it plugged into the Garmin with a short USB cord. I attach the purple case to the front basket with carabineer clips. This battery backup has enough juice to keep the Garmin charged for DAYS, even with the screen brightness set to max. On its own, the Garmin battery lasts only 1.5 hours with the brightness set to max. Although I live in a very small town and crime is very low, still I lock everything to the bike that I can. I use these cables for the smaller items like the Garmin and battery charger cases – "Onguard Akita Loop Cable Lock (Black, 53 cm x 5 mm)", and this cable for larger items, like a container for miscellaneous items in the rear basket – "Onguard Akita Loop Cable Lock (Black, 10mm x 4ft"). I bought six of these luggage locks to use with the cables – "BV TSA-Accepted, Set-Your-Own Combination Travel Lock, Pair - BV-TL02-PAIR". The nice thing about these locks is that you can set your own combination, so you need to memorize only one 3-digit combination for all the locks. While these cables and locks provide only light-duty theft protection, it's enough for me since I need to prevent only the occasional opportunistic thief when I park outside local stores for short periods of time. Many people here in my small town don't even bother to lock their cars, houses, or bikes, but I grew up in a large city, so I'm more cautious – especially during the warmer months when there are a lot of out-of-town tourists. Here are some other items I bought for my trike, after researching each item, and can recommend (Amazon limits the number of product links in a review to 10, so I couldn't make these links. But you can copy/paste the part between the quotes to the Amazon search field): "Cocoweb Sport Armbar Curl U-Lock with Lotuslock Bike Flex Loop Cable Bike Lock Duo Combo - Orange (Curl)" (Extremely heavy-duty bike lock and cable. The lock mechanism is also protected from rain and dust.) "Crank Brothers Multi Bicycle Tool (19-Function, Gold)" "Stalwart 75-2105 Hawk 15 in 1 Bicycle Wrench Park Tool TL-1 Tire Lever (Pack of 3)" "Park Tool TL-1 Tire Lever (Pack of 3)" (For installing bike tires and tubes) "Cycling Bicycle Bike Bag Top Tube Triangle Bag Front Saddle Frame Pouch Outdoor Red" (To hold the previously listed tools – it fit in the triangular area of the trike frame under the seat) "Bright Eyes Aircraft Aluminium Waterproof 300 Lumen LED Bike Light Set (Headlight, TailLight), 2 Pack" (Headlights are removable flashlights. I mounted both headlights on my trike handlebars and both tail lights on the rear basket) "LOPOO X5 Smart Bike Tail Light, USB Rechargeable Bicycle Rear Light with Wireless Remote,Turn Signal,LED Laser Beam for Bicycle or Motorbike User" (I learned soon after starting to ride my trike around town that many people don't remember what arm-signals are. More than once my arm-signal for a left turn was misinterpreted to mean, "go ahead and pass me", which almost got me hit by the car. However, this light only works at night.) "Bell Adult Radar Helmet (Red Dart, 59-61-cm/Medium/Large)" (Better safe than sorry – especially when you ride on back roads with very little traffic) "Race Icon Bike Helmet Mirror - Our Clear View Flat Lightweight Bicycle Mirror Is a Must Have for Any Road Cyclist + Lifetime Warranty" (With this, there's no need for mounting mirrors on your handlebars and I get a better view of what's behind me by just tilting my head a bit to look in any direction, including at the trailer) "Accu-Gage Bicycle Gauge for Schraeder Valve" "Finish Line DRY Teflon Bicycle Chain Lube, 4-Ounce Drip Squeeze Bottle" "Ohuhu® Rust-Proof Quick Release Front Handlebar Bicycle Lift Off Basket / Wire Mesh Bike Basket with Holder, Mesh Bottom, Black" (I don't remove the basket, so I wrap one of those Velcro straps around each handle to make it inconvenient for someone to take it – this locks the basket in place. I like to keep my Kindle (which I use for riding music via Bluetooth headphones) and other items in a sling pack which I toss into this basket – I also keep an air horn and pepper spray here for times when we are chased by dogs) "4ucycling Unisex (Men's/Women's) 3D padded Bicycle Cycling Underwear Shorts - 2XL(haimian)" (I realized the need for these after my first long distance ride – now no more sore tail bones or chafing and rash) "Butt Shield Skin Care - Roll on Non-Greasy Chafing Guard (1.5oz) by 2 Tom's " (Also to avoid chafing your tender tuchus on long rides – really helps!) "Polar Bottle Insulated Water Bottle (24-Ounce, Red)" (I fill half way with water and freeze overnight, then finish filling with water to take on the ride – I bought two) "Shoreline Marine Air Horn, Large, 8-Ounce" (For when dogs chase us, although it doesn't work with all dogs, and because we have bears, cougars, and coyotes in the area) "SABRE RED Pepper Gel - Police Strength Pepper Spray - Pink Flip Top Key Case with Finger Grip" (For when the air horn doesn't work on dogs – although even this doesn't always work either; I was chased by a pack of three dogs once and two backed off after using the air horn but the pit-bull mix didn't, so I hit him with the pepper spray, but he just squinted and kept it up – some dogs have high tolerance for pain – fortunately, once he cornered my poor, frightened dog, who sat down and cowered submissively, all he did was sniff. Why don't people take more responsibility for keeping their dogs out of the streets? Grrrr...) "Plano 1612 Deep Water Resistant Field Box with Lift Out Tray" (A lockable, water-resistant box for the rear basket to hold miscellaneous items, like a first aid kit, emergency supplies, spare house keys, maps, bungee cords, Velcro ties, zip ties, etc.) "Master Lock 2300D Pen Oiler Lock Lubricant with PTFE, 0.25 Ounces" (To lubricate all those locks) "2pc Super-Reflective Snap Bracelets Pant Cuff - Auto Roll-Up" (For nighttime visibility) And, for my dog for the rides: "Canine Friendly High Visibility Dog Vest, Large" (For visibility at night) "Bergan Bright Steps 1.6 to 2-Inch Leg Bands, Medium, Red" (Also for visibility at night, although I learned that they tend to run small, a large would have been better. I needed to stretch these bands by putting them around a shampoo bottle and leaving them there all winter, to prevent them from cutting off my dog's circulation) "PAWZ Disposable Reusable Boots - 12 Pack Medium in Navy Blue" (To protect paw injuries until we get home. They're like thick rubber balloons and protect cuts from getting dirty and add protection to make walking less painful. Still, paw injuries is one of the reasons I got the trailer – when you're miles away from home when the injury occurs, no amount of protection will make walking that far possible for your dog.) "Invisible Dog Boots - Protect Paws From Sand, Hot Pavement, Ice, and Salt with All Natural 100% Wax-Based Cream. For Dogs Who Just Won't Wear Boots. – " (To prevent dry, cracked paws) but I've switched to organic, virgin coconut oil because it's cheaper ("Carrington Farms Organic Extra Virgin Coconut Oil, 54 Ounce"). I melt a heaping teaspoon full in a dish in the microwave and put it on my dog's paw pads with a cotton ball once a week during the summer because I live in an Alpine desert area –it's very dry, and can lead to cracked paw pads. My dog loves to lick it off afterwards (and my cat helps her) because it's so delicious! Enough soaks in to moisturize though. It also has antibacterial, antiviral, and anti-inflammatory properties to help heal injured paws. And I use it to give popcorn that special movie-theater flavor too! (Popping in coconut oil is the secret, plus adding melted butter after)). ... show more
Reviewed in the United States on June 5, 2016 by Doodle Doodle

  • Best Value For A Cargo Trailer!
Working my minimum wage retail job and living just .75 miles from it, I decided to commute to work year round by bicycle to save money on gas. Previously, (on my Magna Excitor mt. bike) I have been using a Schwinn seat post rack with a 12inch by 12inch by 12inch milk crate bungie corded and zip tied to it. It would fit 4 gallons of milk in the crate or about 3 to 4 days worth of groceries, but it was much too top heavy with anything more than 2 gallons of milk in it. I considered buying pannier bags, but I knew anything I put in them would be covered in mud or road salt no matter how "water proof" they claimed. Most front baskets wouldn't work considering my front suspension and would interfier with the headlights on my handlebars. I then decided I needed a trailer, but didn't want to spend over $150, considering there is a good chance it might be stolen outside the store I work at. I was pretty much set on buying a (sub $100)Instep or Schwinn trailer (meant for kids), trashing all the nylon covering, putting on a plywood floor, and screwing on a rubber/plastic 30 gallon tote when I saw this gem here on Amazon. It saved me alot of time and work and it is still more heavy duty than a modified kiddie trailer. A lot of "bike snobs" will tell you this trailer is junk just because its cheap, heavy, and doesn't have a fancy name all over it. This is definetly not the case with this trailer. I know the difference between a good or bad mig or tig weld, and to be honest, they are actually not too bad considering the price. They are a little sloppy but are solid, surprisingly. The nylon sides are different than what they show in the picture. The bottom of the nylon actually screws on to the outside of the round tube frame of the trailer. This nylon is at best water resistant. You put it up to the light, you can seen tons of pin holes. The top cover fits well and has a refective tape strip on the sides. You do need a little muscle to stretch the nylon sides over the top rails to reach the velcro though. The paint on it is better than what comes out of a rattle can and really shines with a little wax. However my first 2 mile trip the store with a 1 gallon milk jug sliding around scratched it up more than expected. The tires seem low quality: tons of pitting in the rubber and has a tread reminiscent of many 80s bmx bikes. One tire called for 300psi and another 35psi(not a typo on my part), I ended up putting in 40psi and it works great. Before mounting the wheel assembly on the trailer I took the tire off the rim to make sure the rubber rim strip was aligned and glued on properly so the tube wouldn't blow the first time I put air in it. It was aligned properly but was only glued in one spot. The rim strip was the thinnest I have ever seen (it looked like felt) so I added 2 narrow layers of duct tape to hold them in place. The tubes seemed like your average 20inch ones and the chrome steel wheels actually seemed pretty heavy duty and were fairly true. I did notice when I re-mounted the tires one of the tires' beads had excessive rubber on it where somone neglected to trim it off. Installing the axles and snap rings on the wheels were the the only semi-difficult thing to install. There are only pictures given for instructions and they are grainy at best. Most wheel bearings on cheap bikes are adjusted way too tight from the factory. The cartridge bearings on this trailer(2 on each wheel) were some of the best I've seen in a while (operating smooth as glass and definetly not loose). However, I do not like the quick release system for the wheel/axle assembly, any one who knows this trailer could steal your wheels while you are not around. After you install the wheels/axle assembly you can decide if you want to install the bar/bumper that surrounds both wheels of the trailer. I don't think they are pictured? They prevent you from breaking off your axle if you run a wheel of your trailer into a side of a building or such. I decided not to use them and take my chances as they add about 5 pounds to the trailer. The hitch is very easy to install just make sure you set the angle of the hitch (up or down wise) so the hitch doesn't bind up when going uphill or downhill. Attach the hitch to the trailer first and then to the bike so you know what proper angle you will need. Unloaded this trailer rides wells but the metal bottom (while unloaded rattles)sounds like thunder while going over small bumps. While accelerating the trailer does surge a little (even when unloaded), but I assume all trailers do that have spring type hitches. Loaded this trailer rides real nice, no rattling and almost no swaying. I'm glad I got the 20" version instead of the 16" one because my hitch arm is still not level with the ground even with 20" wheels(it angles up a tad). (You dont want items boucing out the back if you don't use the cover). I haven't hauled more than 50 pounds yet, so time will tell in terms of durability. Once you get this trailer rolling to a speed your comfortable at, you can barely feel it (atleast on flat ground). Being that this is the first item I ever purchased from Amazon, I was leery about the cheap price. I got this for about $75 shipped to my door and couldn't be happier considering the price. Even at $150 I'd be happy. I searched long and hard for a sub $150 dedicated cargo trailer and Amazon was the only one who could make it happen, and with a heavy duty metal bottom to boot. Great Job Amazon! ... show more
Reviewed in the United States on September 28, 2011 by John Boy

  • Fabric side panel will be damaged when load shifts (and it will). SOLUTION: LARGE plastic tote.
Size: 4.5' x 3' Color: Black and Red
Load shifting will cause fabric to rub tire/create hole in fabric. SOLUTION: I bought used plastic tote w no lid for $3. Cut off top portion at appropriate height so load NEVER pushes fabric towards wheels. Also make unloading trailer easy. Trailer in well made except for issue I've addressed. Trailer is very noisy if empty. Thick pipe insulation solve that problem and very inexpensive. ... show more
Reviewed in the United States on April 2, 2023 by LOU R.

  • perfect for my applications.
Size: 4.5' x 3' Color: Black and Red
I am a 65 yrs. old. Rebel w/o a truck. This lil buggy adds totally new dimensions to my old hippy life. Thank Ya'll. Greg
Reviewed in the United States on April 24, 2023 by Gregory Glasgow

  • Excellent load carrying!
Size: 4.5' x 3' Color: Black and Red
I needed this trailer as my only transportation is my ebike so I can get groceries, water, fuel, etc and it gets the jib done nicely! I can load it with (2) 5gal water jugs and another 10 full plastic grocery bags enough for nearly two weeks of living per trip.
Reviewed in the United States on April 11, 2023 by JONATHAN WALTERS

  • Holds up good
Size: 4.5' x 3' Color: Black and Red
Bought this for hunting I would hook it behind my moutain bike put all my gear in it then pull it three miles down a rough road on public land. I put a deer and all of my gear and pulled it all the way back to the truck it never had am issue with all the weight great product.
Reviewed in the United States on March 22, 2023 by Anthony ward

Can't find a product?

Find it on Amazon first, then paste the link below.