Search  for anything...

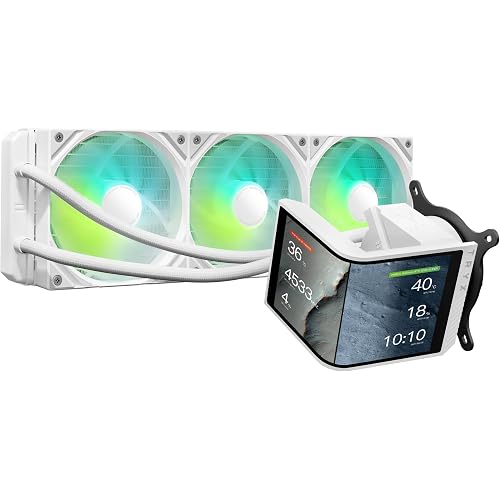
Thermaltake TH420 ARGB Sync All-in-One Liquid Cooler Snow Edition, AMD(AM5/AM4) Intel(LGA 1700/1200), 420mm High Efficiency Radiator, CL-W369-PL14SW-A,White

  • Based on 1,085 reviews
Condition: New
Checking for product changes
$132.99 Why this price?
Save $7.00 was $139.99

Buy Now, Pay Later


As low as $22.17 / mo
  • – 6-month term
  • – No impact on credit
  • – Instant approval decision
  • – Secure and straightforward checkout

Ready to go? Add this product to your cart and select a plan during checkout.

Payment plans are offered through our trusted finance partners Klarna, PayTomorrow, Affirm, Afterpay, Apple Pay, and PayPal. No-credit-needed leasing options through Acima may also be available at checkout.

Learn more about financing & leasing here.

Selected Option

Free shipping on this product

This item is eligible for return within 30 days of receipt

To qualify for a full refund, items must be returned in their original, unused condition. If an item is returned in a used, damaged, or materially different state, you may be granted a partial refund.

To initiate a return, please visit our Returns Center.

View our full returns policy here.


Availability: In Stock.
Fulfilled by Amazon

Arrives Saturday, Jul 26
Order within 18 hours and 20 minutes
Available payment plans shown during checkout

Style: ARGB


Size: 420mm


Color: White


Features

  • [CPU Socket Compatibility] - Intel LGA 1700/1200/2066/2011-3/2011/1366/1156/1155/1151/1150, AMD AM5/AM4/AM3+/AM3/AM2+/AM2/FM2/FM1

Description

TH420 ARGB Sync white edtion is a 420mm all-in-one liquid cooler capable of dissipating heat from the next-generation Intel and AMD CPUs. It has three performance-enhanced 140mm ARGB Sync Fans with a maximum speed of 1800 RPM and supports 5V RGB-compatible motherboards for lighting control. Moreover, it can go with our Ceres 500 Mid-Tower Chassis, build a PC with great cooling performance, and remain synchronized. P/N CL-W369-PL14SW-A PUMP Speed : 3100 R.P.M Rated Voltage : 12 V Rated Current : 0.28A Power Input : 3.36W WATER BLOCK Material : Copper FAN Dimension : 140 x 140 x 25 mm Speed : PWM 500~1800 R.P.M (2510-4PIN) Noise Level : 35.7 dB-A Rated Voltage : 12 V & 5V Rated Current : 0.32A & 0.31A (one fan) Power Input : 3.84W & 1.55W (one fan) Max. Air Flow : 84.32 CFM Max. Pressure : 3.02 mm-H2O Connector : 2510 – 4 Pin , 5V ARGB header – 4 Pin TUBE Length : 460 mm Material : Rubber RADIATOR Dimension : 450 x 140 x 27 mm Material : Aluminum COMPATIBILITY Intel LGA 2066/2011-3/2011/1700/1200/1156/1155/1151/1150 AMD AM5/AM4/AM3+/AM3/AM2+/AM2/FM2/FM1 (CPU Socket)

Product Dimensions: 5.51"L x 0.98"W x 5.51"H


Brand: Thermaltake


Power Connector Type: 4-Pin


Voltage: 5 Volts, 12 Volts


Wattage: 3.36 watts


Cooling Method: Water


Compatible Devices: Desktop


Noise Level: 35.7 dB


Material: Copper


Maximum Rotational Speed: 1800 RPM


Product Dimensions ‏ : ‎ 20.3 x 8.4 x 6 inches; 5.98 Pounds


Item model number ‏ : ‎ CL-W369-PL14SW-A


Date First Available ‏ : ‎ February 8, 2023


Manufacturer ‏ : ‎ Thermaltake


Country of Origin ‏ : ‎ China


Best Sellers Rank: #994 in Computer CPU Cooling Fans


Customer Reviews: 4.4 4.4 out of 5 stars 1,085 ratings


Frequently asked questions

If you place your order now, the estimated arrival date for this product is: Saturday, Jul 26

Yes, absolutely! You may return this product for a full refund within 30 days of receiving it.

To initiate a return, please visit our Returns Center.

View our full returns policy here.

  • Klarna Financing
  • Affirm Pay in 4
  • Affirm Financing
  • Afterpay Financing
  • PayTomorrow Financing
  • Financing through Apple Pay
Leasing options through Acima may also be available during checkout.

Learn more about financing & leasing here.

Top Amazon Reviews


  • But you have elected the way of pain
Style: ARGB Size: 360mm Color: Black
Instructions have never been a strong point for just about any product, but the instructions provided by the Thermaltake TH360 take 'bad instructions' into a whole new universe. First, you get one page with 'documentation' for all configuration. It contains no words, just images. But wait, there's one of those square box things you scan with your camera and it says it will take you to the web site to get the instructions. So I scan it, go to the web site, and ... it's exactly the same as the piece of paper. It even has the piece to scan to take you to the place where you already are. I guess they figure you'll get caught in an endless loop and never be able to break out and call for help. OK. Fine. There's videos online. Oh, youtube has two Thermaltake Australia videos. Nice. But they are only for AMD. The intel LGA1700 has a different bracket. OK. I'll watch the videos since they are most likely just the same but use a different bracket. OH. Take of the back plate... bla bla bla... OK. I got it. So I look at the brackets and I have one for AMD, one for LGA1700 and one for something like x115 or whatever. The LGA1700 and X115 ones seem to be the same. That's strange, but oh well. So I take the back plate off, put the LGA1700 one one and... it doesn't seem to screw in. That's strange. And the sticky part that is exposed after you peel off the paper is in the air. It doesn't touch the motherboard. It's almost as if... Oh. You DO NOT remove the back plate on the intel. The instructions just show the top of the motherboard with arrows pointing up to the bottom but never actually show the back plate. To be fair, they don't say to take the back plate off, but then again they don's say anything. I did look for other videos online and the only one I found talking about the TH 360 had the guy unboxing it but then saying "and I'll install it off camera..." So then what was the point of the video? Fail city. Fine. Back plate back on. TH360 back plate sticks correctly. I'm good. What's next. Oh, the screws. So the silver screws are for the LGA1700 and the black screws are for the x115 or whatever it is. I try to put in the silver screws and they won't fit. I try as much as I dare without forcing the screws and breaking them and they just won't go in. OK. Let me think. What are the chances they got the screws backwards? Let me try the black ones. Oh, they DO work. So they must have gotten it backwards, right? Let me try the silver ones in the other bracket. Nope don't work there either. Only the black ones work. So two identical back plates and two sets of screws. The black screws work with the one they are labeled for as well as the other one while the silver screws don't work on anything. I know you are probably thinking those must be for the AMD bracket, but the documentation clearly shows that the silver screws go to the LGA1700 back plate and the silver screws do not work on that. Fine. Fine. It's all good. So I get the CPU set up with the cooler. Lets connect the power cables. OK. Hmm. There are two power connectors. Oh, the documentation shows parts Y and Z. Let me see what those are. The parts list only goes up to "P". So how are these labeled parts "Y" and "Z" but not shown in the parts list? Oh, they are the ends of the cable connected to the fan. But the end parts of the cable have no writing on it indicating "Y" or "Z". So what's the point in labeling something "Y" and "Z" in the documentation if those letters show up nowhere else in the documentation or on actual parts? I don't understand how a company can spend all this time and effort to come up with a product and then be so negligent when it comes to telling you how to use it. How much money is saved by putting out crappy documentation and how much does it cost in customer support and returns to deal with the fallout from that? I'm not a business person, so maybe it works out OK but I can definitely say that thermaltake has taken documentation to a whole new low. Hopefully this information will help anyone who is confused with the documentation. Maybe I just missed something or misunderstood, but considering the brevity of the documentation that's not really too difficult to do. There are enough reviews about the hardware, but I'm thinking if you can't figure out how to set it up the best component in the world is not very useful. ... show more
Reviewed in the United States on August 7, 2023 by Thomas Testa

  • Super quiet and works great to cool down my I7 13700k
Style: ARGB Size: 120mm Color: Black
UPDATE: I have gone through quite the upgrade process. I originally got the 120 AIO as it was the only one that would fit in my case. the 120 worked very well, but my temps were still a little high on this 13700k, so I decided to get the 240 since my case supports it now. I got the same brand since IO was happy with the 120 and all the mounting brackets are the same. I left my two fans in the front of the case and decided on a pull configuration. Had to rewire 3 fans and the new pump so that took a while re doing the cabling. And then figuring out which way to orient the pump to minimize the stress on the water lines. Initial testing was great with Idle temps between 38-41 and peak temps of 81. After putting all the side covers and front panel back on I got idle temps around 45 and peak temps between 86-90. I wasnt getting much airflow out the front of the case so I took the front panel off and for now am leaving it off. I am back down to idel 37-38 and peak temps of 81-85. So I have reduced both my idle temps by about 6 degrees and peak temps by 15-20 degrees. And this AIO is super responsive as the watts come down the temps come down. I also did play with all of my fan settings for the pump and fans. I happen to use the stair instead of slope and also have the fans running at a higher percentage than the pump up until about 55 degrees to IMO keep the radiator as cool as possible. If you have room in your case the 240 definitely works better than the 120. I think the brand is good and both these pumps work great. As a side note, before I upgraded to the 240, I ran a tube from my window AC into one of my input fans and near the back of the case where the radiator was. It made the radiator cold and all my internal temps were in the 20's and my high temp was around 60. I havnt tried that with the 240 yet. With everything so low in temps I gained 1000 points on my CPU benchmark. :) ORIGINAL REVIEW: Lots of parts, not the greatest of instructions, but does a great job of cooling down the hot running I7 13700k processor. I had a little trouble getting the radiator to mount in place of my rear fan, so I ended up using the fan to pull across the radiator instead of pushing through it. My case just wasnt quite big enough for the radiator to replace the old case fan. I mounted the radiator first so I could figure out the best rotation of the pump to minimize any pull on the hoses. It would have been a lot faster had the radiator fit perfect, the mounting holes were a bit off from my case, but I just used 2 screws diagnol to mount it securely. This is my first water cooled system, so I was pretty leary of any leaks and still probable a little shy about having water in my case. But, my new processor was running so hot that I had to do something and thins was easier to install than some of the air cooled options and even cheaper. I dont have room for a 6" tall heatsink and fan and this fit the bill. Performance wise, I ran several CPU benchmarks and peaked at 95 c for a split second before it dropped below 60. The bulk of the CPU stress test, was around 60. The unit kicked in quickly and brought my temps down just as fast. Idle temp is around 41. As a bonus, my CPU mark actually increased anywhere from 900-1300 over what I was getting prior to this install. Basically I roughly went from 43000 to 44000 just by installing this unit. Honestly, I can probably squeeze more out of it because I had several background tasks running that I normally shut off. The power are all 3 pin not 4 and I am still not 100% sure of which MB plugs to use. I plugged the fan into the cpu fan header and the pump into the cpu pump/fan option header, but I also have another pump header on the MOBO. So IDK. The RGB lights plugged into my 4 pin on the MB and worked. I didnt test the included remote nor did I play around with the lighting. I was mostly concerned about the heat situation, which this thing rocked. There is an insane amount of wire length for the Lighting connections. Overall, this thing is great, does a great job of cooling and is quiet. ... show more
Reviewed in the United States on January 10, 2023 by Craigc Craigc

  • I'd probably give it 4.5
Style: LCD Size: 360mm Color: White
This was the cheapest AIO with an LCD screen I could find. It works and it looks fine, so no major complaints. I will say the instructions are pretty garbage as people have noted already. Still, if you've got youtube you can figure anything out. The one thing that was especially unclear I will spell out -- THE MINI-USB THAT CONNECTS TO THE WATER BLOCK LCD SCREEN CONNECTS TO THE MOTHERBOARD'S ONBOARD USB PORT (probably at the bottom of your mobo). The other mini-USB is apparently for connecting to a ThermalTake Fan hub to control their fans and the LCD screen. The LCD screen itself looks fine but good lord the software is pretty terrible. That said, it works and does basically what I want it to out of the box. Razer Chroma seems to recognize that it's there, but I have yet to figure that whole process out. If I have any tips I'll update. ... show more
Reviewed in the United States on November 11, 2023 by Owen Wirth

  • V2 ULTRA Does not fit Thermaltake tower 200 with AM5 platform read more
Style: LCD Size: 240mm Color: Black
I bought the argb v2 ultra. I have a thermaltake tower 200 with a b650 itx board. The only way the pump block fits on the cooler is tubes up(case orientation). tubes down they run into the memory. And with AM5 and this design you get two options. On top of that specifically with the tower 200 case that I thought would be seamless the side mount where you put the radiator fits fine if you don't plan to plug in the usb to the block. it fits 100% fine without that usb cabled plugged in. I was able to shift the radiator over in the mount and I may drill some extra holes in it to fit. But for now it works. Just a heads up if you plan to have similar specs with this cooler in a tower 200. ... show more
Reviewed in the United States on November 8, 2023 by Anon

  • Se siente y escucha el liquido
No se si en esta marca o modelo es normal que se escucha el liquido en el radiador, tengo una Corsair y para nada suena así, por eso no la uso aún, pronto veré si la instalo en mi gpu.
Reviewed in the United States on November 8, 2023 by Francisco Rodríguez Reyna

Can't find a product?

Find it on Amazon first, then paste the link below.