Search  for anything...

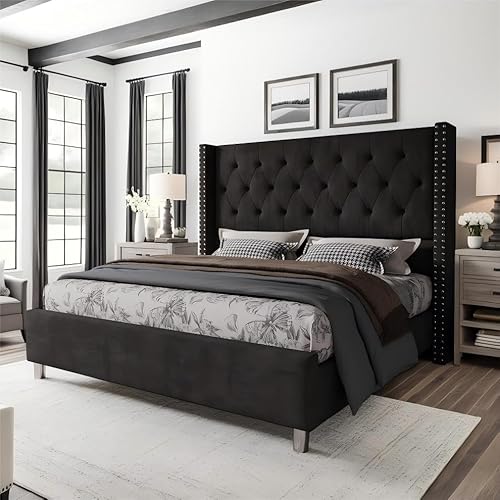
SHA CERLIN King Size Platform Bed Frame with Upholstered Headboard, Metal Slats Support, Button Tufted Square Stitched Headboard, Noise Free, No Box Spring Needed, Easy Assembly, Dark Grey

  • Based on 4,410 reviews
Condition: New
Checking for product changes
$154.18 Why this price?

Buy Now, Pay Later


As low as $25.70 / mo
  • – 6-month term
  • – No impact on credit
  • – Instant approval decision
  • – Secure and straightforward checkout

Ready to go? Add this product to your cart and select a plan during checkout.

Payment plans are offered through our trusted finance partners Klarna, PayTomorrow, Affirm, Afterpay, Apple Pay, and PayPal. No-credit-needed leasing options through Acima may also be available at checkout.

Learn more about financing & leasing here.

Selected Option

Free shipping on this product

30-day refund/replacement

To qualify for a full refund, items must be returned in their original, unused condition. If an item is returned in a used, damaged, or materially different state, you may be granted a partial refund.

To initiate a return, please visit our Returns Center.

View our full returns policy here.


Availability: In Stock.
Fulfilled by Amazon

Arrives Monday, Jun 23
Order within 18 hours and 17 minutes
Available payment plans shown during checkout

Size: King


Color: Dark Grey


Features

  • Comfortable Headboard: Characterized with a skin-friendly linen fabric headboard, the bed is comfortable to lean on to read or watch without deformation and easy to clean and maintain. Wear-resistant and easy-care.
  • Study & Durable: Sturdy metal frame structure with EVA material reduces friction between the slats and with U-shaped groove firmly holding the slats in place, say goodbye to noise. The plastic pads attached to the bottom of the bed feet prevent your beloved floor from injury.
  • Space Saving: 12.4 inches of clearance under the bed brings you extra storage space. Make your room look more serenely uncluttered.
  • Easy To Assemble: Everything you need is included for stress-free assembly. The assembly instructions were so clear and easy to follow. You just fasten all the screws and can put this bed frame together.
  • No Box Spring Needed: Reliable and closely spaced slats are designed to support and extend the life of your memory foam or spring mattress without the need for a box spring.

Size: King


Product Dimensions: 81.5"L x 78"W x 40.9"H


Special Feature: Squeak Resistant


Color: Dark Grey


Finish Type: Lacquered


Size: King


Product Dimensions: 81.5"L x 78"W x 40.9"H


Special Feature: Squeak Resistant


Color: Dark Grey


Finish Type: Lacquered


Included Components: Headboard


Compatible With Mattress Size: king


Brand: SHA CERLIN


Furniture Finish: Gray


Product Care Instructions: Wipe with Dry Cloth


Assembly Required: Yes


Ground To Item Distance: 12.4 Inches


Manufacturer: SHA CERLIN


UPC: 749655406330


Form Factor: Platform with Headboard


Item Weight: 60.2 pounds


Country of Origin: China


Item model number: AK-40115DGK


Date First Available: January 30, 2023


Frequently asked questions

If you place your order now, the estimated arrival date for this product is: Monday, Jun 23

Yes, absolutely! You may return this product for a full refund within 30 days of receiving it.

To initiate a return, please visit our Returns Center.

View our full returns policy here.

  • Klarna Financing
  • Affirm Pay in 4
  • Affirm Financing
  • Afterpay Financing
  • PayTomorrow Financing
  • Financing through Apple Pay
Leasing options through Acima may also be available during checkout.

Learn more about financing & leasing here.

Top Amazon Reviews


  • Easy to build
Size: King Color: Dark Grey
Very easy to build! Clear directions. Look exactly how it does in pictures. Perfect size for our mattress and very easy to maintain and keep clean, especially with dogs who shed.
Reviewed in the United States on May 27, 2025 by Sarah Swartz

  • Great buy and easily assembled
Size: King Color: Dark Grey
Love it. Super easy to assemble and since I bought it I was able to throw out my box springs and got my bed off the floor too. Love the headboard. I would buy it again if I had to.
Reviewed in the United States on May 21, 2025 by Joanna Glover

  • Exactly what we needed!!
Size: Twin Color: Dark Grey
Incredibly easy to assemble, didn’t take long at all! Everything was labeled and tools were included. I was a little skeptical of the quality, but these will definitely hold up until it’s time to switch to a bunk bed!
Reviewed in the United States on May 19, 2025 by Dreama

  • Good quality for money spent, assembly is so so
Size: Queen Color: Dark Grey
This bed looks very much like the pictures! All the pieces were included and clean. There weren't any signs of dirt or rust and it was packaged very nicely. The headboard looks very nice but I wouldn't say that it's the sturdiest. Definitely use caution when leaning against it. The screws come with special tools that you use to put the frame together. The only downer is that my thumb and pointer finger are bruised due to the force needed to tighten the screws. If you're looking to use a box spring with this frame it won't fit. There's space enough for a mattress only. I took a picture using just the mattress by itself and the mattress and the box spring together on the frame. All in all I'm glad I purchased this bed. The assembly is a completely different story. I went into the assembly with blind confidence. I was very quickly humbled. The disappointing part about the instructions is there are no words describing what you're supposed to do in each step. I got to the very last step before I realized that I didn't have the holes for the slats facing inwards and I had to disassemble the whole thing. I was so frustrated that I slept on the couch instead of trying to build it for the THIRD time in one night. I put it together by myself (I'm 5'5" and 110lbs for reference), and while it is doable if you have low patience and/or are depressed (this was almost my 13th reason) I highly recommend getting a partner to complete it. I wanted to die after taking it apart twice. So for your sanity and convenience I'll outline the tricks I used the time I successfully put it all together. I would start by organizing all your pieces. You have several different kinds of bars and putting like pieces in bars helped me stay focused and know where everything is easily (ADHD girl here). I even put the different screws in piles to make access easier. If you have padded gloves I would suggest wearing them so your thumb doesn't end up getting bruised like mine. -Step 1: You start by making the headboard first. Line up both A bars vertically across from each other. There should be one hole at the top and two holes in the middle. Both B bars and the C bar were packaged together. You'll have one B at the very top, one B in the middle, and the C bar goes at the bottom in the middle of bar A. Make sure that the top B has tabs for the screws facing down and the lower B has the tabs facing up. When connecting two vertical bars with a horizontal bar I HIGHLY recommend screwing both sides in halfway BEFORE tightening all the way. If you tighten one side first and then the other side, it's very likely that it will become crooked. So by only screwing them all in halfway AND THEN tightening, you ensure that the holes are aligned and you won't have any problems with crookedness. I recommend doing this throughout. It may take a bit more time but I promise it's worth it, especially at the one step. -Step 2: You get part D which is the gray part of the head board. Lay it down with the black back facing up. You'll need to lay the frame you just made on top of D. There's not a ton of wiggle room to align the holes but I didn't have any problems with that. There is a bit of fabric that covers parts of the holes on D so you'll have to make sure you just keep twisting if it doesn't go in right away. The head board was the easiest part of the process. -Step 3: You are now building the main frame. Parts F and G look almost exactly the same with one difference: F slides into G. IT IS IMPERATIVE THAT YOU MAKE SURE YOU HAVE THEM THE SAME WAY THE PICTURE IS DISPLAYED. If you're dumb like me it is absolutely not a suggestion. The holes for the slats will be facing inwards. So on the left side F is at the top and G is on the bottom. On the right side G is on the top and F is on the bottom. There are two holes in the middle that you will screw 2 P1 screws into. This secures them together. -Step 4: This is where it starts to get hairy. You will essentially be building everything from the underneath from now on. If you think you can turn it over and assemble that way; DON'T. I did that and that's why my toxic trait is thinking I know better. I did not know better. There are two K bars, one for the top and one for the bottom. Ensuring that the holes on yoru F/G combination bars are facing INSIDE the frame, screw K securely using the above mentioned technique of halfway tightening to line up evenly. -Step 5: You will be taking H and securing it to the middle of your frame. Still working underneath and still tightening halfway before tightening fully. There are two holes on each side so you'll need a total of 4 P2 screws for this step. -Step 6: At this point, I truly began to believe the designer of this bed hates humanity. You'll begin to attach the legs to the H bar. THERE ARE TWO TYPES OF LEG BARS. MAKE SURE YOU ARE ATTACHING THE I LEGS TO THE H BAR. YOU WILL HATE YOURSELF IF YOU USE J. This part was insanely tricky. I hooked both legs onto H bar and then used a box to balance the whole frame. If you don't use a box to rest the frame on, it will wobble around while you're trying to screw on the legs. You will need 2 P4 screws, 2 P6 circular thingys and a P5 nut/bolt thingy. (I have no idea what they're really called.) Put P6 on P4 and then insert through the H bar and I leg. There is a tiny lip on P5 and that will face the bottom. I used both the tiny wrench and the L screw driver to get this on. Use the L screw driver to hold the screw in place while simultaneously using the wrench to screw on P5. The halfway tightening rule still applies here. -Step 7: You will now be attaching the headboard and bar E (ie the foot bar). I recommend attaching the headboard first as you have the box at the other end helping to balance the frame. P3 isn't clearly labeled in the package but you'll know its P3 because it's the fattest screw. Start by putting the bottom screw in first (halfway only) and then go to the opposite side and screw the bottom in halfway. Then screw both top P3 screws in halfway on the top. DO NOT TIGHTEN ALL THE WAY. Go down to the end on the frame and begin to put on bar E. Do the same as the headboard (screw both P3 screws into the bottom halfway and then screw in the tops halfway). Now go around and tighten all the way. I know this seems time consuming but it significantly saved my sanity. I tried tightening all the way first and it was too uneven and the holes didn't match up. -Step 8: There are two L bars. You will be installing these with the foam side up. The foam is what your slats will rest on. There's also a hook on the opposite end of where the screws go. The hook will attach onto the H bar once it's been screwed into the K bars. Use 2 P1 screws to secure the L bar into the K bar. Do not put the hook into the hole on the H bar until it's been fully screwed in. -Step 9: Now you will be securing the two hooks. You'll need two P4 screws and two P5 nuts to secure the M plate. Place the M plate over top of the hooks and insert the P4's through all the holes. Screw on the P5's. This will be the same trick I used with the L screw driver and the wrench. Next you will be attaching the final leg bars. Remember that only I legs go on the H bar. The J legs will go under the L bars. You'll need two P2 screws for each leg and they go underneath the bar. You'll be a professional contortionist by the time you finish securing these legs. -Step 10: Arguably the easiest part of this whole da** thing. I took a picture of this so you can visualize this part. Each N bar has a hook and a skinny part before the hook. You have to insert one end of the bar and then the other. This takes a bit of maneuvering so I recommend putting the first two N bars by the middle (where you secured the M plate) as well as the N bars closest to the headboard and foot bar. You need to ensure that the N bar clicks all the way to bottom of the hole because after you insert all the slats you'll need the red bag of gray O parts. The O part snaps into the top of the hole . I took a picture of both side by side so you can see how both look at beginning and end. And that's it! If this doesn’t deter you from buying the frame I hope you aren't as miserable as I was while putting this all together. I haven't slept on it yet but it seems to be very sturdy. I'll probably update in a couple months once I've bee able to use it. ... show more
Reviewed in the United States on February 6, 2022 by Hope S. Hope S.

  • Very good
Size: Twin Color: Dark Grey
Had it for a few years still in perfect condition
Reviewed in the United States on June 4, 2025 by Gianna Capistrano Gianna Capistrano

  • Good! I need help lol
Size: Full Color: Black
I lost the bolts, screws and washers and everything , anyone know how many of each size!? 😭😂🥲
Reviewed in the United States on May 22, 2025 by whitney

  • Great bed!!
Size: King Color: Black
No noise, best quality, easy assembly, easy bending, functional, label was easy.
Reviewed in the United States on May 26, 2025 by Kindle Customer

  • Love this
Size: King Color: Dark Grey
I love it nice and sturdy I have the king size bed frame, I just be hitting my toes on the end of the bed, but other than that I love this metal bed frame. Got my mattress from mattress firm though
Reviewed in the United States on April 17, 2025 by Nelly Hill

Can't find a product?

Find it on Amazon first, then paste the link below.