


Notify me when this product is back in stock
Ready to go? Add this product to your cart and select a plan during checkout. Payment plans are offered through our trusted finance partners Klarna, PayTomorrow, Affirm, Apple Pay, and PayPal. No-credit-needed leasing options through Acima may also be available at checkout.
Learn more about financing & leasing here.
This item is eligible for return within 30 days of receipt
To qualify for a full refund, items must be returned in their original, unused condition. If an item is returned in a used, damaged, or materially different state, you may be granted a partial refund.
To initiate a return, please visit our Returns Center.
View our full returns policy here.
Color: Forest Green
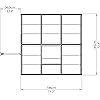
Size: 6' x 6' x 7'
Style: Greenhouse
Features
Description
The Hybrid 6' x 6' Greenhouse from Palram - Canopia combines two types of polycarbonate panels to create a balanced environment for your plants. The translucent polycarbonate roof panels have twice the heat retention of single layer panels and allow the light to reach your plants at all angles while the crystal-clear polycarbonate side panels provide over 90% light transmission and block harmful UV rays. Polycarbonate is a virtually unbreakable polymer that provides the light transmission of glass, but is lighter, stronger, and safer. Palram - Canopia engineers their panels and aluminum frames to be strong, highly resistant to harsh weather and sun, and durable. This attention to detail continues with an integrated gutter system for drainage as well as a roof vent and hinged door to provide airflow and allow adjustment of heat, humidity, and ventilation. The 6' x 6' Hybrid Greenhouse comes as a complete kit and can be easily assembled with simple tools. Extend the enjoyment of your growing season and protect your plants from harsh weather and pests with the Hybrid Greenhouse kit from Palram - Canopia! Manufacturer Contact Information
Product Dimensions: 73.2 x 72.8 x 81.9 inches
Item Weight: 80 pounds
Manufacturer: Palram
Item model number: HG5506G
Is Discontinued By Manufacturer: No


