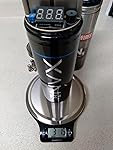
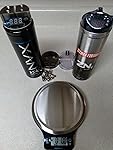
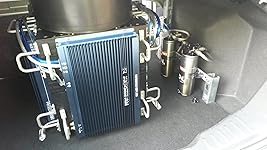
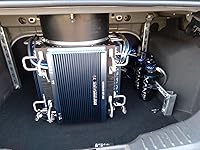
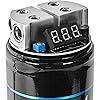
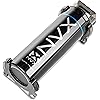
Search  for anything...
NVX

NVX® XCAP1F True 1.0 Farad 20V Digital Capacitor with Digital Read-Out Built-in Distribution Block

  • Based on 286 reviews
Condition: New
Checking for product changes

Buy Now, Pay Later


As low as $14.17 / mo
  • – 6-month term
  • – No impact on credit
  • – Instant approval decision
  • – Secure and straightforward checkout

Ready to go? Add this product to your cart and select a plan during checkout. Payment plans are offered through our trusted finance partners Klarna, PayTomorrow, Affirm, Apple Pay, and PayPal. No-credit-needed leasing options through Acima may also be available at checkout.

Learn more about financing & leasing here.

Selected Option

Free shipping on this product

This item is eligible for return within 30 days of receipt

To qualify for a full refund, items must be returned in their original, unused condition. If an item is returned in a used, damaged, or materially different state, you may be granted a partial refund.

To initiate a return, please visit our Returns Center.

View our full returns policy here.


Availability: In Stock.
Fulfilled by NVX®, Victor Fitness®, Belva® Official

Arrives May 17 – May 19
Order within 8 hours and 23 minutes
Available payment plans shown during checkout

Style: True 1.0 Farad


Features

  • True 1 farad capacitor for systems up to 1200 watts
  • Built-in distribution block
  • Bright blue LED voltage display
  • Improves bass response (SPL)
  • Increases the peak power of your amp

Capacitance: 1 Farad


Brand: NVX


Shape: Rectangular


Operating Voltage: 20 Volts


Maximum Voltage: 20 Volts


Is Discontinued By Manufacturer ‏ : ‎ No


Product Dimensions ‏ : ‎ 12.8 x 9.65 x 4.33 inches; 3.73 Pounds


Item model number ‏ : ‎ Trie 1.0 Farrad


Date First Available ‏ : ‎ October 3, 2012


Manufacturer ‏ : ‎ NVX


Best Sellers Rank: #48 in Car Amplifier Capacitors


Customer Reviews: 4.4 4.4 out of 5 stars 286 ratings


Frequently asked questions

If you place your order now, the estimated arrival date for this product is: May 17 – May 19

Yes, absolutely! You may return this product for a full refund within 30 days of receiving it.

To initiate a return, please visit our Returns Center.

View our full returns policy here.

  • Klarna Financing
  • Affirm Pay in 4
  • Affirm Financing
  • PayTomorrow Financing
  • Apple Pay Later
Leasing options through Acima may also be available during checkout.

Learn more about financing & leasing here.

Top Amazon Reviews


  • Going from STREETWIRES to NVX - KEEPING IT CLEAN, STRONG, LOUD!!!
Style: True 1.0 Farad
The media could not be loaded. Hi There! I did a cap upgrade from StreetWires to NVX. I hope the project details and review are helpful! READ ENTIRE PROJECT POST OR SCROLL DOWN TO AREA OF INTEREST PROJECT GOAL/REQUIREMENT: Two NVX 1.0 farad caps replace two trusty but old (and possibly damaged) StreetWires ZN1 1.0 farad caps. The NVX caps are expected to eliminate parasitic draw on battery. Performance outcome must be as good or better after replacement. DETAILS of PROPOSED SYSTEM CHANGES: - One NVX 1.0 cap will support one Soundstream (2nd Gen, 2009) REF1.500 Class G amp driving an ImageDynamics IDQ12 D2 V.4 subwoofer. Note 1: ImageDynamics subwoofer is in overdamped sealed .9 cubic feet box with dual voice coil impedance of 1 ohm matched to amp impedance of 1 ohm. Note 2: Sub faces up and output is directed through package shelf and into cabin via a 12-inch diameter/6-inch high rubber collar. Think of this as a stubby bass or wave cannon. Note 3: Given that all sound system output has an energy cost, I capitalize on subwoofer output by directing all energy into the listening area which has vibration damping material throughout. - One NVX 1.0 cap will support two Soundstream (2nd Gen, 2009) REF2.370 Class A/B amps driving Boston Acoustics Pro50 SE front and rear speakers. Note: Four new ImageDynamics XS passive crossovers replaced the old Boston Acoustics crossovers. I configured the new ID XS crossovers for a wide distance between the midrange and tweeter, typically found in door mount (midrange) and front sail panel/rear deck mount (tweeter) system designs. Two of the XS crossovers are mounted on the sub box while the other two are tucked inside the front doors. ESSENTIAL SYSTEM COMPONENTS NOT BEING CHANGED: - Pioneer DEH-80PRS in Front/Rear/Sub mode, with six 6-inch Straight Wire flying RCA leads (from Schiit Audio) connected via AudioQuest RCA couplers to six 25-feet Monster Cable Interlink 250 RCA cables. - Optima Yellow Top D35 with gold plated brass clamps from Summit Racing. Note: StreetWires Power Ring/Inter-Lock lugs for battery clamp connections and all distribution blocks throughout the vehicle. Also, the stock battery negative and positive power cables have been replaced with StreetWires 4-gauge cables. - StreetWires ZN5 UltraCable 12-gauge speaker cables (twisted pair, 12-gauge conductors) from amps to subwoofer and custom speaker cable harness under back seat. - Monster Cable XLN16s 16-gauge speaker cables (twisted pair, 16-gauge conductors) from custom speaker cable harness to main speakers throughout car. - Custom speaker cable harness male and female spade connectors are heavy duty, gold plated, and have thick silicone sheaths. - Fastronix 500A Ultimate Duty battery disconnect switch placed near NVX caps and StreetWires power distribution blocks in trunk. - Stock alternator in my 2012 Ford Focus SE is good. All vehicle lights are incandescent or halogen. Exterior lights are always on when driving and jamming, and never dim or pulse. CASE for PROJECT (as if anyone needs to ask!): My StreetWires ZN1 caps were pushed relentlessly for years and worked flawlessly. But recent Optima battery depletions and Optima trickle charger quirkiness led me to believe one of the ZN1 caps went bad. Beyond that, time and that need to upgrade/replace something old with something new got hold of me and I soon found myself on that "hunt" people like us know all too well. RESEARCH: I looked for and came across the NVX 1.0 caps in a variety of videos and posts with titles like, "Let's learn how to charge NVX caps!" and "Let's saw an NVX cap in half and see what's inside!" In those searches, I encountered something very important: the NVX 1.0 cap is being taken seriously by people who are serious about caps. It was the real deal, as they say. Of course, way back in the day some of the same concerns (i.e., merits vs demerits) which accompanied caps back then are the same as now: "Who makes it, really... what's inside, really... what is the demographic being targeted by the marketing folks, really... etc." PURCHASE: I get most everything on Amazon anyway, and the NVX caps were available there for a very reasonable price. I was quite impressed with both the NVX Amazon site and the NVX public site. I ordered the two caps and they arrived safe, sound, and on-time. UNPACKING: When the caps arrived, I really appreciated the included charging circuit board, the hardware and other accessories, and the documentation... all good! HEFT and BUILD: I weighed the NVX 1.0 and StreetWires ZN1 caps on a food scale set to pounds+ounces, and their weights were very close. The NVX was a bit heavier but some of that extra weight - about 4 ounces - was probably attributed to the distribution blocks which, by the way, did NOT have the sleeve inserts or set screws on the cap when it was being weighed. In fact, after removing the sleeves and set screws, the distro block appeared to be mostly hollow - though NEVER appearing or seeming to be flimsy. All-in-all, I was very impressed with the cap's build. INSTALLATION: The installation of the caps was a bit tricky but only because the terminal blocks offered many connection options that weren't my "go-to" options. Notably, my "go-to" practice of using post-mounted lugs was not gonna happen, unless I turned them upside down and added a washer or two, forego the protective cover, etc. Anyway, I kinda saw where that was going and decided, NOPE... not gonna do that. However, the aforementioned limitation is actually a bit of genius on the part of NVX. For, used properly, the distribution blocks and the plastic cover practically scream, "Hey! Make sure you don't burn down your car by leaving the plastic cap off the top of the cap... and, BY THE WAY, make sure you plan for and make connections which allow you to ACTUALLY USE the plastic cap!!!" But, SURPRISE! My being forced to acknowledge and receive the benefit of the plastic cover pointed me straight to my other preferred method of power connections! For, if practically achievable, the best way "electrically" to make power connections to caps and amps is to expose the tinned copper strands and fold them back over the cable jacket (at least that's my opinion). Then just push the cable end with the folded filaments into the distro block's recessed power ports and turn the set screw firmly down so it bites into the cable jacket and the folded-back filaments. Done right, you could hold the cable and swing the cap around vigorously and the cable would not come out (though, the screw holding down the distro block might). With the NVX cap, a 4-gauge cable with folded back filaments is a perfect fit and it allows you to use the protective cap. In my case, I just had to make sure to cinch the set screw down tight into the folded filaments and the cable jacket. This I did while holding the distribution block halves in such a way that they did not spin on their unseen axis around the block's recessed mount screw. Finally, after all the cables were connected, I was able to put the protective caps on and breathe a sigh of relief that no metal was exposed or protruding beyond the plane of the plastic cap's exterior. (Note: The top set screws were recessed beneath the plastic cover but were still exposed to some degree, say, for multimeter probes. Even so, as a general precaution, take care to never put anything conductive on top of the cap's protective cover when it is energized.) CHARGING: First, and I can't say this more urgently: DO NOT TRY TO AGGRESSIVELY CINCH CABLES IN THE DISTRIBUTION BLOCKS AFTER THE CAP IS CHARGED!!! I know there are videos out there that show how to charge this particular cap, and the demonstrators indicate you should charge the cap FIRST, then connect and cinch your cables into the capacitor's distribution block, and then connect your amps after that, etc. Setting aside the order of the connections for the moment, it is VERY IMPORTANT to note the demonstrators seem to quite implicitly (even if not explicitly) indicate they are not aggressively "putting their shoulder" into the cinching of the cables into the distribution block. If they aren't putting their shoulder into it, then that tells me something important: if my connections are very difficult to seat and cinch, then something's wrong and needs to be addressed before going further. Second, after giving the charging matter some thought - and given the way I do my cable connections - my only option was to make all connections between the NVX caps' distribution blocks and the amps but leave the NVX caps' power and ground cables unconnected to the battery and body. In other words, without the amps being turned on by the head unit's remote turn on lead, the amps' places in the circuit were nullified or were presenting as an "open" (i.e., no voltage potential or current flow). This electrically left the cap as the only responsive device in the circuit. Perfect! Third - and this relates to the cable cinching on the cap itself, the finessed muscling required to do that, and doing so BEFORE CHARGING THE CAP. Now, because my circuit at this point was a giant "open" circuit, even with the amps already connected to the caps, I had liberty to make my connections to the distribution blocks on the caps and risk slight movement of the brass as I tightened the set screws down into the cables. Yes, the brass distro blocks did move slightly BUT BECAUSE THE CAP WAS NOT CHARGED it was easy enough to wedge a flat tip screwdriver or a small allen wrench between the blocks and slowly move the blocks ever-so-slightly back into their original position. All told, the realignments probably required no more than 1/16"-3/32" at worst. (** By the way, I totally agree with others who say to put an insulator between the blocks prior to connecting-cinching the cables. The restricted movement and the non-conductive material between the blocks should allow more torque and likely prevent discharging if the cap is already charged. Oh!... and do all this only after removing any metal from your wrists and fingers. **) Fourth, I used the included charging circuit-board and my own 14-gauge, 20-inch alligator clip cables to then charge the caps. The battery's positive source voltage was available on the "In" post of a Fastronix 500A Ultimate Duty battery disconnect switch that was in the "Open" position (you can read more about that in the next paragraph). The car's main body ground circuit was also available via its own nearby distribution block. To get the short wires of the NVX charging circuit-board to make decent connections to the NVX cap's distribution block, I lifted the front of the protective plastic cover a little and slid the circuit-board's yellow and blue wires between the plastic cover and the distro blocks. Once the blue and yellow leads were in place, I then pushed the plastic cover back down securely in place. Voila! The circuit-board's wires were now pinched between the brass distro blocks and the protective plastic cap. Connecting my alligator clips to the voltage source and ground of the car, and then attaching the clips to the small circuit-board took only a few seconds. The cap reached its resting voltage and current stopped (as indicated by the circuit-board's LED turning off) after a couple minutes of charging. I do want to point out that the cap only charged up to 11.7 volts when I decided to remove the charger. Had it remained connected, the cap voltage might have kept going up, but it wasn't necessary. I then removed the charging tools and directly connected the cap's positive and ground cables to their respective battery positive and car body negative distribution blocks. I did the same for the second cap, and then I prepared to expose all circuits and devices to the battery positive voltage that would be available in normal operation... and hope for no smoke! (The next paragraph goes into more details on this final connectivity test.) Fifth, and finally, up to this point the Fastronix 500A Ultimate Duty battery disconnect switch in the trunk was in the "open" position which prevented any voltage from reaching any audio components in the trunk. Sooo, how did I get the caps charged with an open circuit back there?? To facilitate cap charging, I used the red (i.e., positive) alligator clip lead to tap the upstream (i.e., toward battery) positive post on the back of the Fastronix switch. Then I attached the black (i.e., negative) alligator clip lead to the ground cable which was attached to the inside of the rear right fender well of the body. Once the caps were completely charged and all the caps' final connections were made, I then closed the Fastronix switch and thus completed/closed all circuit paths and was ready to test both the car operation and sound system operation (aka "smoke test"). I mention all this about the Fastronix switch to answer the question of whether I removed the fuse on the positive power cable near the battery in the engine compartment prior to starting all this work. The answer is that I did not need to remove the fuse on the positive power cable near the battery in the engine compartment since the Fastronix essentially did that for me where it mattered... in the trunk. And, even better, the Fastronix switch opens or closes the circuit in one second with a simple but forceful turn of the wrist. (NOTE: You probably figured out that I use distribution blocks to facilitate a common, battery positive power source for the system, as well as a common, body negative power ground for the system. While other people do rightly and fairly indicate this type of design can lead to alternator whine or other noise, I rarely encounter such bugs in my systems. Now, to be fair, my system configs likely differ from many other systems in several ways. First, I never use the radio and I physically decouple and move the car's built-in whip antenna lead under the center console; I just twist and tuck it under the carpet covering the firewall. Next, I remove the antenna's flying lead from the head unit itself, if possible. Also, I never connect the head unit's positive power cable through the car's ignition-switched wires. Rather, my head units are always connected to an always-on wire to the battery - usually a yellow, thicker wire in the loom. Finally, the head unit's ground wire is bolstered with 12-gauge, high quality twisted pair cable and then it is connected to welded steel brackets which can usually be found on the body under the center console.) SMOKE TEST and INITIAL EVALUATION: After I re-seated all the RCA and remote cables, it turned out that all the hard work... worked!!! I have no noise introduced into the music from the car, whether it is running or off. Of course, all elements can take credit for the superb results. And, just in case you are wondering, I do not have a specialty alternator. My stock alternator handles everything just fine. However, to be safe, I did have the car dealer put in a new stock alternator when my car hit 160,000 miles. HOW CONFIGURED for CRITICAL LISTENING: Regarding the music's settings, years ago I did all the "tuning/listener position timing/EQ and crossover curves/etc." via the head unit's outstanding built-in analyzer. At that time, I made a couple fader and crossover-point and -slope tweaks after the initial install. But, since then I only do two things with the head unit: 1) turn the volume up or down, and 2) increase the sub volume up or down... which, in 30 years of jamming, are really the only two adjustments I ever make. The sub volume control knob is where the car's stock clock used to be, and the control has a handy clipping indicator to let me know if things are getting a bit out of hand. MUSIC USED FOR TESTING: It should be noted that all my music comes from CDs only. I convert them to lossless .WAV files and put them on USB drives with FAT32 formatting. Regarding the music itself, some reliable hard rock/metal tests of "clean music" (i.e., intensity without fatigue) are: - Korn "Did My Time" on their Greatest Hits CD. It's a song they did for the "Lara Croft: Tomb Raider" franchise. - Ozzy "Believer" and "Suicide Solution" live with Randy Rhoads on the Tribute CD (a Sony "Super Bit Mapping" remaster). - White Zombie from the "Supersexy Swingin' Sounds" CD. It's a bunch of juicy remakes of previously released songs. - Tool "Vicarious" and "The Pot" from their 10,000 Days CD are just as stellar as one would expect. - Slipknot "Unsainted" and "Spiders" showcase depth and articulation, fast or slow. For Female and other "smoother" vocals and synth'ed music, regardless of genre, these proved the NVX caps did their job well: - Alanis Morissette "So Called Chaos" lost none of its gritty lustre. - Within Temptation "The Howling," "What Have You Done," "Our Solemn Hour" and "Final Destination" should sound strong without sounding shrill. - Sade "Ordinary Love" and "Mermaid" were luxurious and hypnotic. - Tears for Fears "Bad Man's Song" is always a must-hear. Its talented musicians and vocalists did not fail to evince a familiar ethereal awe. - Pink Floyd "Comfortably Numb" came through as crystalline, complex, and crushingly and tragically pure as ever. - Daft Punk "Arena," "Rinzler," "The Game Has Changed," and "Disc Wars" from the "Tron:Legacy" soundtrack should be as dramatic and tense as they are smooth and hypnotic. - Dune, Part 1 "Dream of Arrakis," "Herald of The Change," "Leaving Caladan," "Arrakeen" and "Ripples in The Sand" should hold together boldly, subtly and menacingly. - Enya "O Come, O Come, Emmanuel" and "Evening Falls" should be sweet and ethereal without sounding grainy or veiled. TORTURE TESTS FOR AUDIOPHILES The music below is for critical, full signal chain evaluation (i.e., power, conduction, system noise floor/suppression, amps, subs, x-overs, mids/tweeters). In a nutshell, this section's music - with its loud and quiet parts - aids the listener in assessing coherence and realism along with high dynamic range. So, after evaluating my system with the more popular music above, I was ready to treat myself to some audiophile tracks gathered from a variety of high-end sources, some of which Boston Acoustics put on compilation CDs for testing their systems. Over the years, I have found the tracks useful for testing any and all systems. Some favorite system torture tracks are listed below: - Sheffield Lab "Roads Less Traveled" by Pat Coil, and "Drum Improvisation" are eye popping in their smoothness and dynamics. (CAUTION: The drum improv should not be taken lightly.) - Ramsey Lewis "People Make the World Go 'Round" and Dave Weckl's "Heads Up" are the epitome of smooth and sharp! - Telarc "Carmen Suite for orchestra, No. 1 (assembled by Ernest Guirard)- Act 1- Prelude" is a tough test of smooth low frequency response. - Telarc "Carmen Suite for orchestra, No. 1 (assembled by Ernest Guirard)- Act 1- La Garde Montante" will make you sad if your mids and tweeters are not up to this challenge. - Telarc "El Cid - Fanfare and Entry of the Nobles" from The Great Fantasy Adventure Album CD. Several tracks go down to 5 Hz. "El Cid" is not one of them but, trust me, "El Cid" is nonetheless very low and very powerful. - Boston "We're Ready-The Launch-Cool The Engines" on Mobile Fidelity Sound Lab-issued Ultradisc II original master recording... hold on tight! CONCLUSION: The NVX caps eliminated the parasitic draw! My battery now only loses about .2 volts after 5 days parked. Not bad given the always-on dealer installed aftermarket security system. As well, my trickle charger now functions properly! So, is the NVX 1.0 farad cap worth the investment of time and money? Absolutely! Get them to stiffen power in the car, to stabilize and benefit other elements of your system, and to overall obtain cleaner sound. Your ears will thank you!!! ... show more
Reviewed in the United States on August 27, 2023 by RLM RLM

  • This is the ONLY capacitor to buy!!
Style: True 1.0 Farad
The media could not be loaded. First off let me start by saying that this product actually works. If you’re look at this capacitor you’re probably wondering if capacitors actually do anything at all because there is this age old debate about them opposed to a second battery. Let me tell you. This thing is a beast! My subs at hitting harder than ever. My setup is a Star audio 1200 d mono with 2 12 Skar sdr subs. Stock battery and alternator. I did however do the big 3 upgrade which I also highly recommend. I only used 4 gauge wire for that. With all that being said; my voltage never drops below 12v and that’s at full tilt. Before I couldn’t even go that hard because the voltage drop was sending clips to my amplifier. In so many words I’m saying If you have something similar to my setup or anything around 1200 watts,GET THIS PRODUCT! It actually works. It’s very good quality. This may just save you from a second battery setup. Also it cuts on and off if it’s not sensing variable voltage so if the lights go out while you’re not bumping hard do t worry about that. ... show more
Reviewed in the United States on September 17, 2021 by deondrick braxton

  • No more blown fuses
Style: True 10 Farad
I had a 4 guage run to a 100 amp fuse and i would constantly blow fuses before when i really got into some bass songs and this has fixed that issue and also allowed me to add a secondary amp for all my door speakers with out much effort and still no issues very happy with this would definatly recommend ... show more
Reviewed in the United States on March 30, 2023 by Steven Gresham

  • Does not stop dimming.
Style: True 1.0 Farad
I have this paired with the NVX NBA201 700w rms amp with 2 NVX 12” subs and before installation of the capacitor my headlights and interior lights would dim and after installation it made no change to the amount of dimming in my lights, and for $80 the build quality is not bad but it made no effect on my dimming problem. I could’ve gotten a better capacitor for half the price. ... show more
Reviewed in the United States on August 8, 2023 by Leo Vogt

  • Solved weird sub power flocculation issue
Style: True 1.0 Farad
"UPDATED" Distribution block fix included... I have had a weird power issue to my sub amp in my Nissan pickup. My Bass would be fine when I was parked or driving in town but once I hit the freeway the power to the sub would cut back (not shut off it would just dim down and the bass got weak). Everyone one I asked had never herd of this and said it's road noise causing the issue but I know it's not I drive the truck and I know its not road noise. I don't have a huge sound system (but it ain't no el' cheapo crap either) and the problem has followed me through 3 entirely new sound systems all decent stuff (bigger and smaller) with brand new battery's and 4awg oxygen free copper wire with solid grounds (everything replaced due to theft all 3 times thanks butt-heads...) The battery's and alternator have all been stock style (no super alternator or multiple battery's) and are functioning just fine I didn't even have headlight dimming issues... Anyways I added this NVX True 1 farad capacitor and just like that it solved the problem. The sub hits hard! No more weird bass fade on the freeway and I swear the bass sounds cleaner and punchier. Everything is functioning properly now. I can't say anything about it being better that cheaper caps or a replacement for mondo alternators and multiple battery's and all that jazz as this is the first car audio power capacitor iv ever bought or used all I know is that this one worked for my annoying issue... So YES I'm happy with my purchase and will use this cap with future sub install's. I will buy again... """UPDATE""" I had to discharge and remove the capacitor to do some work on my truck and when I reinstalled the cap the positive distribution block became loose and shifted position and made contact with the negative terminal (good thing I discharged it first) So I removed the set screws and and took out the 4awg terminal reducers and removed the Philips head screws holding the distribution blocks in place and found a little 1/16" plastic stud that keeps the blocks from twisting had broke! My fix was to put a chunk of rubber between the distribution blocks as a insulator and reassembled the cap. The fix was not hard to do and works very well. I did remove one star from my review due to the "WEAK LINK" of the "PLASTIC STUD" and feel NVX should "BEEF UP" the the distribution block mounts as that could be very dangerous for the average person. I would still buy again but I would do my upgrade before using... ... show more
Reviewed in the United States on September 5, 2022 by willy b

Can't find a product?

Find it on Amazon first, then paste the link below.