Search  for anything...

Mavic Mini 4 Pro Drone Motor Arm Repair Parts Compatible with DJI Mavic Mini 4 Pro-Front Left

  • Based on 2 reviews
Condition: New
Checking for the best price...

Buy Now, Pay Later


As low as $13.33 / mo
  • – 6-month term
  • – No impact on credit
  • – Instant approval decision
  • – Secure and straightforward checkout

Ready to go? Add this product to your cart and select a plan during checkout.

Payment plans are offered through our trusted finance partners Klarna, Affirm, Afterpay, Apple Pay, and PayTomorrow. No-credit-needed leasing options through Acima may also be available at checkout.

Learn more about financing & leasing here.

Selected Option

Free shipping on this product

FREE 30-day refund/replacement

To qualify for a full refund, items must be returned in their original, unused condition. If an item is returned in a used, damaged, or materially different state, you may be granted a partial refund.

To initiate a return, please visit our Returns Center.

View our full returns policy here.


Availability: 12 left in stock
Fulfilled by Amazon

Arrives Thursday, Nov 27
Order within 11 hours and 17 minutes
Available payment plans shown during checkout

Color: Front Left Arm


Features

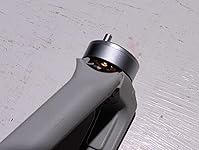
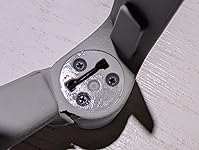
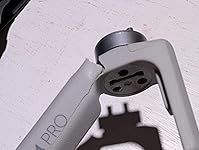
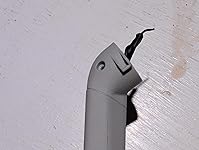
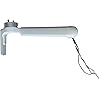
  • This drone motor arm is compatible with the Mavic Mini 4 Pro quadcopter.
  • It is used to replace your worn or damaged Mini 4 Pro drone arm parts.
  • Front left drone motor arm assembly replacements for Mavic Mini 4 Pro.
  • High-quality materials ensure its good performance, making you fly safely and funny.
  • Please be careful when you replace it.

Description

Package includes 1pcs Front Left drone motor arm for Mavic Mini 4 Pro drone.

Color: Front Left Arm


Brand: Taoke


Compatible Devices: Mini 4 Pro


Item Weight: 0.05 Kilograms


Product Dimensions: 4.72 x 1.57 x 1.97 inches


Item Weight: 1.76 ounces


Item model number: MG-Mini 4 Pro Front Left


Date First Available: January 8, 2024


Manufacturer: Taoke


Frequently asked questions

If you place your order now, the estimated arrival date for this product is: Thursday, Nov 27

Yes, absolutely! You may return this product for a full refund within 30 days of receiving it.

To initiate a return, please visit our Returns Center.

View our full returns policy here.

  • Klarna Financing
  • Affirm Pay in 4
  • Affirm Financing
  • Afterpay Financing
  • PayTomorrow Financing
  • Financing through Apple Pay
Leasing options through Acima may also be available during checkout.

Learn more about financing & leasing here.

Top Amazon Reviews


  • The replacement part you need for isolated damage to the arm or motor of the DJI Mini 4 Pro drone.
Color: Front Left Arm
I wish this was cheaper!! $79.99 was a little more than what I was hoping to pay for my mistake, but this was exactly what I needed. It looks no different than the arm I just removed. If you don't want to send your drone to DJI for repairs, and you're proficient with taking plastic parts apart and with soldering thin wires, this is what you need. My drone was tracking a walking target when it got stuck between two dead branches on a pine tree, and soon, it fell about 20 feet onto the ground. Thankfully, the only damage was to the front left arm and to all of the blades. All of the other arms and motors, and the body seemed fine. There really isn't a lot of information on the internet on replacing these arms. Removing the sticker under the motor of the arm shows that the motor is secured with three screws which appear to be glued or epoxied so the screws can't come loose. I simply could not get the screws out. There is also an antenna in each of the arms, which would probably be very difficult to remove and insert into a new blank arm. Based on this, I believe this is the replacement part you need if the motor or the arm is damaged. Some of the YouTube videos mention removing the top and bottom covers, the top and bottom obstacle sensing proximity sensors, the GPS module, the heatsink, the main board, the ESC board, and then desoldering and soldering the new arm and its wires back on. Properly done, I'm sure that's what needs to happen, but I thought that the chance of new damage caused during attempts to do all of the above was too great. I took a chance and figured out how to fix it myself, in a much more simpler way. I didn't take photos or videos of my process, so I'll just have to type it out. All attached photos are of the broken arm that was removed from the drone. All screws except the blades use T5 Torx. 1. Remove battery, SD card, and all blades. 2. Remove the small plastic trims to the sides of the gimbal. 3. Remove the two screws above the gimbal and the two screws near the end of the battery area, then pry off the top cover. 4. Remove the two screws on the bottom cover, then pry off the bottom cover. 5. Remove the screws holding the upper and underside obstacle sensing sensors. Carefully leave the sensors in place. 6. Locate the black antenna wire under the underside obstacle sensing sensors, and find the two spots of hot glue holding the black wire in place. Using a small attachment for a soldering iron or a heated knife or needle, melt the two spots of hot glue. You can use an unheated sturdy needle, knife, tweezers to pick at the hot glue, but I found that these two hot glue spots are adhered to the plastic strongly, and they didn't come apart by simply picking at it. 7. Trace the black antenna wire to the main board. Remove the screw of the heatsink closest to the front right arm, which is near where the four antenna wires attach to the main board. 8. Slightly lift the heatsink to make room for the next few steps. Be careful not to lift or rotate the heatsink too much, as there is thermal compound under the heatsink and components on the circuit board. 9. Locate the line of hot glue over the antenna wire attachment to the main board, and pick at and remove the section over the black wire. These are not strongly adhered, and picking at the hot glue will easily remove it. 10. Lift and remove the black antenna wire attachment off the main board. 11. Remove the two screws holding the front left arm onto the axle arm. Carefully leave the arm dangling. 12. Remove the three screws holding the axle arm onto the body, and remove the axle arm. 13. Fish out the black antenna wire or cut it and remove it. 14. Pull out all of the slack of the triple motor wire (red, white, black) from the Electronic Speed Controller (ESC) board to the front left arm, and fish it out of the arm socket. 15. Cut the triple motor wires from the ESC board leaving as long of a section as you can. 16. Prepare the new arm by pulling the black antenna wire in through the arm socket, following the original routing through the body, and attach the antenna wire onto the main board. This wire is a very thin and fragile coaxial wire, so use care not to damage it while fishing it through the drone. If you pull on it too hard, the wire will rip and tear. 17. Apply hot glue over the antenna attachment to the main board. 18. Fasten the screw removed in step 7. 19. Pull the slack out of the black antenna wire toward the arm, and apply hot glue to the two spots under the underside obstacle sensing sensors. 20. Splice the triple motor wire of the new arm to the triple motor wire from the ESC board. 21. Apply liquid electrical tape over the exposed wires in the spliced sections. Heat shrink would be preferred, but it probably won't work as the added bulk will make it hard to fish the wires back into the drone. 22. Fish the excess wires through the arm socket, and tuck it into the original location. Leave enough slack so that the arm can rotate when deploying/collapsing the arm for flight/storage. 23. Reinstall the axle arm, and install the new arm onto the axle arm. Double check the slack of the wires. 24. Fasten the screws for the upper and underside obstacle sensing sensors. 24. Install the blades, insert a battery, turn on the drone and the controller, and perform a test flight to test the new motor and other motors, if needed to be checked for function, as well as the GPS module, obstacle sensing sensors which may have become disturbed during the handling of the components. 25. If there are no error messages or issues, reinstall the top and bottom covers. 26. Reinstall the small plastic trims near gimbal. If the edges of the gimbal covers bind up with the bottom cover of the drone, loosen the screws of the bottom cover, pry up the bottom cover, and once the bound up sections are corrected, fasten the bottom cover screws. I hope this helps others who need to replace the front left arm. For other arms, the steps are similar, but the antenna wire color and routing is slightly different. If I didn't make it clear in this long review, this is the replacement part you need if you have an isolated damage to the arm or the motor of the DJI Mini 4 Pro drone. If you somehow manage to remove the motor or the antenna out of the arm, you can find replacement arms on Amazon without these components, but I don't think these tasks can easily be done. I just wish it was cheaper. :( Good luck on your repair. ... show more
Reviewed in the United States on July 30, 2025 by tredunlimited tredunlimited

Can't find a product?

Find it on Amazon first, then paste the link below.
Checking for best price...