Search  for anything...

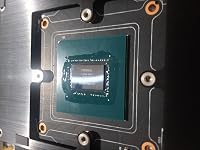
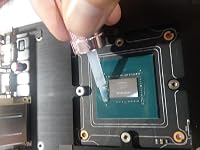
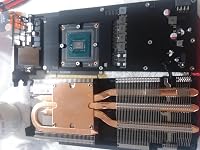
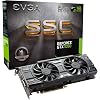
EVGA GeForce GTX 1060 6GB SSC GAMING ACX 3.0, 6GB GDDR5, LED, DX12 OSD Support (PXOC) Graphics Card 06G-P4-6267-KR

  • Based on 3,388 reviews
Condition: Used - Very Good
Checking for product changes
$273.74 Why this price?

Buy Now, Pay Later


As low as $45.62 / mo
  • – 6-month term
  • – No impact on credit
  • – Instant approval decision
  • – Secure and straightforward checkout

Ready to go? Add this product to your cart and select a plan during checkout. Payment plans are offered through our trusted finance partners Klarna, PayTomorrow, Affirm, Apple Pay, and PayPal. No-credit-needed leasing options through Acima may also be available at checkout.

Learn more about financing & leasing here.

Selected Option

Free shipping on this product

This item is eligible for return within 30 days of receipt

To qualify for a full refund, items must be returned in their original, unused condition. If an item is returned in a used, damaged, or materially different state, you may be granted a partial refund.

To initiate a return, please visit our Returns Center.

View our full returns policy here.


Availability: Only 4 left in stock, order soon!
Fulfilled by HDD Shop

Arrives Thursday, May 30
Order within 9 hours and 59 minutes
Available payment plans shown during checkout

Set: SSC


Size: 6GB


Features

  • Real Base Clock: 1607 MHz / Real Boost Clock: 1835 MHz; Memory Detail: 6144MB GDDR5
  • Run Longer, Play Longer with EVGA "ACX 3.0" Cooling.240Hz Max Refresh Rate. Max Digital : 8192x4320
  • What you see is what you get! No additional software required to achieve listed clock speeds
  • DX12 OSD Support with EVGA Precision XOC

Description

Operating System Support : Windows 10 32/64bit , Windows 8 32/64bit , Windows 7 32/64bit Requirements : Minimum of a 400 Watt power supply , One available 8-pin PCI-E power dongle

Graphics Coprocessor: gddr5


Brand: EVGA


Graphics Ram Size: 6144 MB


GPU Clock Speed: 1607 MHz


Video Output Interface: DisplayPort


Memory Speed: ‎1607 MHz


Graphics Coprocessor: ‎gddr5


Chipset Brand: ‎NVIDIA


Graphics Card Ram Size: ‎6144 MB


Brand: ‎EVGA


Series: ‎06G-P4-6267-KR


Item model number: ‎06G-P4-6267-KR


Item Weight: ‎2.35 pounds


Product Dimensions: ‎10.5 x 1.5 x 4.38 inches


Item Dimensions LxWxH: ‎10.5 x 1.5 x 4.38 inches


Number of Processors: ‎1


Manufacturer: ‎EVGA


Is Discontinued By Manufacturer: ‎No


Date First Available: ‎September 13, 2016


Frequently asked questions

If you place your order now, the estimated arrival date for this product is: Thursday, May 30

Yes, absolutely! You may return this product for a full refund within 30 days of receiving it.

To initiate a return, please visit our Returns Center.

View our full returns policy here.

  • Klarna Financing
  • Affirm Pay in 4
  • Affirm Financing
  • PayTomorrow Financing
  • Apple Pay Later
Leasing options through Acima may also be available during checkout.

Learn more about financing & leasing here.

Top Amazon Reviews


  • 2164 Mhz GPU Core Clock / 4498 Mhz Memory Clock on Liquid Metal with Additional Air Cooling!
Set: SSC Size: 6GB
Amazing product . I did use the following products also to overclock with this: Thermal Grizzly Liquid Metal ( Warning this probably does void your warranty - I used this to replace the stock GPU Paste ) Thermal Grizzly Conductonaut Thermal Grease Paste - 1.0 Gram Titan Adjustable PCIE FAN ( Placed under the EVGA GTX 1060 for increased airflow ) Titan Adjustable Dual Fan PCI Slot VGA Cooler (TTC-SC07TZ) Sally Hansen Clear Nail Polish ( For covering the capacitors and power connectors around the GPU because Nail Polish is Non-Conductive ) Sally Hansen Color Therapy Nail Polish, Top Coat 0.5 Ounce Long-Lasting Nail Polish with Gel Shine and Nourishing Care DISCLAIMER: I don't recommend you try the modifications I have in my review unless you know what you are doing, do so at your own risk as this most likely will void your warranty. But if $350 doesn't matter to you and you are an expert, then read on. I first unscrewed the cooler from the Graphics Card on the back plate with 4 phillips screws and disconnected the side fan connector, this exposed the copper heat sink and the GPU. I used Alcohol Wipes to gently remove all of the stock GPU Paste and waited a few minutes to dry, then I used the Sally Hansen Color Theraphy Nail Polish, which by the way is NON CONDUCTIVE and is safe to use, by applying it around the GPU Die on the capacitors and power connectors creating a protective cover. I waited 10 minutes for it to dry and then applied 3 more layers, this was done to prevent a power short circuit in case liquid metal got on the capacitors around the GPU Die. Just to be clear the Nail Polish was placed around the GPU and note directly on it. Once the Capacitors were completely covered in Nail Polish, I placed a pea sides amount of liquid metal on the GPU Die and used the QTIP to spread it nice and evenly on the GPU Die like butter. Turning on my computer the Idle Temperature went from 42 Degrees Stock Paste to 36 Degrees Ambient Temperature with the Liquid Metal. Starting off with testing, I did download the latest drivers from EVGA Website and as of this review it is display driver 398.11 with BIOS 86.06.68.00.62 as of 06/06/2018. Stock the card does come with a stock clock speed of 1607 MHz / Real Boost Clock: 1835 MHz. However, I was able to get that up to 2164 Mhz on the GPU Clock and 4498 Mhz on the Memory clock. Using the following settings with my modifications, I downloaded EVGA Precision OC from EVGA's website and also EVGA Scanner X For EVGA Precision OC I used the following settings: Turn on KBOOST ( Forces GPU to operate at full boost clock 100% of the time) 120% Power Target (This is your TDP - Thermal Design Power) - Gives your Graphics Card 20% more power for higher overclocks Break the link for both Power Target and Temperature ( You want this so that you get more power regardless of temperature) Set Priority to Power Target For Voltage I set it to 70% For Fan Speed, I set it to 70% ( It's loud but I can use a Gaming Headset ) GPU Clock Speed Offset set to +160 Mhz Memory Clock Offset set to +496 Mhz Also Motherboard Southbridge Voltage was increased to 1.25 Volts, VDDR Voltage increased to 1.25 Volts, VDDR PCIE Voltage increased to 1.25 Volts. This was done to increase power delivery to the Graphics Card from the PCIE Slot on the motherboard due to the high 120% TDP. Running a stress test for at 4K Resolution at 3840 x 2160 Pixels with 8X MSAA produced a steady frame rate of 43 Frames Per Second at 65 Degrees Celcius, up from 10 Frames Per Second at stock and this test ran for 10 minutes rendering over 25,000 Frames without crashing. This pretty much turned my GTX 1060 into a GTX 1070 for a much lower price as the 1070's sell for about $500 and made gaming at 4K on the 1060 to be actually playable. Gamers probably won't need to run 8X MSAA and can do just fine with 2X MSAA when Gaming at 4K with my modifications since you can't really notice jagged edges at 2X Anti Aliasing and 4K and overclocked the frames never ran below 30 Frames per second. Final Conclusion: The EVGA GTX 1060 6GB overclocks like a champ and with liquid metal, great cooling fans from your case and a PCIE Fan Cooler, you can easily turn your overclocked 1060 into a stock 1070 when running at 4K Resolution that is 24/7 Stable. Your results may vary with the Silicon Lottery, but I highly recommend this product if you are buying it with overclocking in mind, it does great. Pushing it past 2,200 Mhz however did not happen for me and most I was able to do was 2164 Mhz, it is probably possible to go to 2,200 Mhz by doing shunting mods, but that is probably a 2-4% increase in performance from 2164 Mhz and honestly not worth it IMO. ... show more
Reviewed in the United States on June 8, 2018 by Miguel C. Miguel C.

  • This card is powerful, but really loud by default.
Set: SC Size: 6GB
First I'll disclaim I wanted to initially give this two stars for the noise, then three after I fixed it in my own way, but I'm finally opting for a four star review, mainly because EVGA provides very good service and warranty, and was very responsive to queries online. So consider the card 3.5 stars and an additional half star for the quality of service behind the product. ============================== I bought this card because Amazon wouldn't allow more than one per household on the MSI GTX 1060 AERO ITX model. This card is technically more powerful than that model, being "superclocked" and all. And I have to admit, it's a great card. However the enclosure and fan leaves something to be desired. The fan on this card is much too aggressive. Apparently it initially had a max fan speed of 2600RPM but a BIOS update on later revisions bumped it to 3900RPM after some issues with the EVGA 1070 and 1080 models. This card isn't impacted but I guess it was a precautionary measure. But because of this, the card sounds like a jet engine once you get into the mid-50% speeds on the fan, and the stock fan curve is extremely aggressive, ramping up as high as 70%+ speed when the card is around 70c (when it can easily go up to 80c without any throttling or problems). This was a souce of confusion, since video reviews on the card note it's whisper quiet, but that was way back before the vBIOS was changed. MSI Afterburner or similar software is a must for this card, not for overclocking, but for fan control. A custom fan curve goes a long way, and you can keep this card at around 75c or below at 100% load with a fan speed of about 52%, at least in my case (Corsair Carbide 100R Silent edition with two front intake 120mm fans and one rear exhause 120mm fan). I highly recommend installing MSI Afterburner or EVGA's own Precision X OC immediately after installing this card and setting your own fan curve. Doing so will turn this card from "powerful but I don't want to use it" to just "powerful." So basically, I tentatively recommend this card. It's good, and a fantastic 1080p gaming card, and pretty decent even at 1440p. But without an aftermarket cooler or a custom fan curve it's really noisy. ========================= Lastly, a note for Linux users: Obviously you don't have access to tools like MSI Afterburner. That's cool though, you've got bash. I got some help online and came up with a script that controls this card's GPU (well, any Nvidia card) based on the temperature. You can find it at the link below: https://pastebin.com/2iANCPEy The script controls the fan by using an offset value to set the fan speed to an offset of the temperature. If the card is below 56c the fan will stay on at 12% speed which is essentially spinning but inaudible. Once it passes that temperature threshold, it sets the fans speed to the temperature plus the offset. In my case an offset of -22 worked well. That way at 60c the fan will be at 38%, at 70c the fan will be at 48%, and so on. Seems to be perfectly adequate for cooling during gaming, and I'm seeing max temps of around 73-74c under load at 51-52% fan speed with the script. You can modify the offset value however works for you. To run the script, just make a copy locally and save it, chmod the file with a value of 755 (or just chown it, whatever), and call it with "bash ./filename.sh" If you do "bash ./filename.sh -v" it will do verbose output to the console and display the fan speed and gpu temp at each interval (8 seconds by default). If you're doing this from a remote terminal, you can use ctrl+z and then bg to set it as a background job, or just call it with the & symbol at the end when starting it so it doesn't take over the terminal session. Be aware, you need to be using the proprietary Nvidia driver for this to work, and you'll need to enable cool bit for fan control via "sudo nvidia-xconfig --cool-bits=4" (or --cool-bits=12 if you'd also like to enable overclocking). Then reboot for the cool-bit value change to take effect. A value of 4 enables manual fan control, 8 for OC in nvidia-settings. 12 enables both. You can also enable voltage control in addition to the rest with a value of 28. This only works on more recent revisions of the Nvidia driver (I believe versions above 340). I'm on Ubuntu 18.04, and this should work on at minimum 16.04 and up, plus other distros with similar versions and kernels. If you have a really old distro or much older drivers for some reason, you can use the script I originally based mine on, which can be found at the link below: https://gist.github.com/loathingKernel/995777d2aab6dc82316ea2da62142975 ... show more
Reviewed in the United States on May 23, 2018 by TK

Can't find a product?

Find it on Amazon first, then paste the link below.