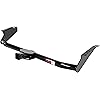
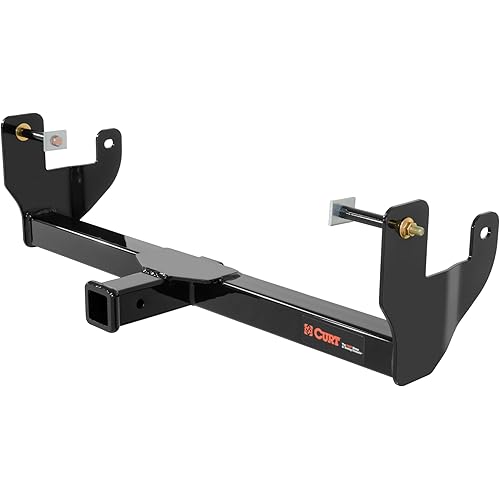
CURT 13105 Class 3 Trailer Hitch, 2-Inch Receiver, Exposed Main Body, Fits Select Toyota Sienna


Buy Now, Pay Later
- – 6-month term
- – No impact on credit to apply
- – Instant approval decision
- – Secure and straightforward checkout
Ready to go? Add this product to your cart and select a plan during checkout.
Payment plans are offered through our trusted finance partners Klarna, Affirm, Afterpay, Apple Pay, and PayTomorrow. No-credit-needed leasing options through Acima may also be available at checkout.
Learn more about financing & leasing here.
FREE 30-day refund/replacement
To qualify for a full refund, items must be returned in their original, unused condition. If an item is returned in a used, damaged, or materially different state, you may be granted a partial refund.
To initiate a return, please visit our Returns Center.
View our full returns policy here.
Recently Viewed


Features
- DEPENDABLE STRENGTH This trailer hitch is rated for 3,500 lbs. gross trailer weight, 350 lbs. tongue weight, 5,000 lbs. weight distribution capacity and 500 lbs. weight distribution tongue weight (limited to lowest-rated towing component)
- VERSATILE DESIGN This class 3 hitch equips your vehicle with a standard 2-inch x 2-inch hitch receiver (not compatible with vertical hanging bikes / bike racks that require the bikes to be hung / mounted vertically)
- FULLY TESTED Every CURT class 3 trailer hitch design is tested in real-world, on-vehicle conditions at our Detroit engineering facility. Aftermarket hitches are tested according to SAE J684 standards for the utmost safety while hauling
- RUST, CHIP, UV-RESISTANT This tow hitch is protected with a unique dual-coat finish of rust-resistant liquid A-coat and highly durable black powder coat. The two finishes are co-cured together for exceptional resistance to rust, chipping and UV rays
- EASY TO INSTALL This hitch offers a custom, factory fit on select model years of the Toyota Sienna
Description
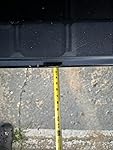
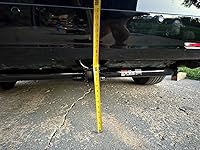
Whatever your task at hand -- whether it's launching that boat before daybreak, setting up your camper before the rush or getting a final load to the dump before close -- CURT class 3 trailer hitches offer the strength needed for serious towing. They make it easy to hitch up and Bring It, offering a vehicle-specific fit and the weight capacity to handle a variety of trailers. Custom class 3 hitches are the most common type of receiver hitch for pickup trucks and SUVs. Because of their weight range, they are also found on full-size cars, crossovers and minivans. Each custom-fit class 3 hitch package is made for vehicle-specific mounting. This particular kit fits certain years of the Toyota Sienna (see application info to verify vehicle compatibility). It provides a weight carrying capacity of 3,500 lbs. GTW and 350 lbs. TW. It is also compatible with a weight distribution hitch for level towing and a rating of 5,000 lbs. WD and 500 lbs. WDTW. CURT class 3 trailer hitches are typically used to attach and haul utility trailers, boat trailers, campers, snowmobile or ATV haulers and more (NOTE: Never exceed the lowest- rated towing component). Each class 3 hitch has a 2" receiver tube and is tested in accordance with SAE J684 for safety. To ensure that CURT class 3 receiver hitches have what it takes for serious trailering, they are designed using a hands-on approach and are constructed with rugged, high-strength steel and precise welding. We also protect our class 3 hitches in a co-cured finish of liquid A-coat and black powder coat for superior resistance to rust, chipping and UV damage.
Brand: CURT
Vehicle Service Type: Cars
Material: Carbon Steel
Finish Type: GLOSS BLACK POWDER COAT
Pull Force: 3500 Pounds
Brand: CURT
Vehicle Service Type: Cars
Material: Carbon Steel
Finish Type: GLOSS BLACK POWDER COAT
Pull Force: 3500 Pounds
Automotive Fit Type: Vehicle Specific Fit
OEM Part Number: 13105
Manufacturer: CURT
Maximum Towing Capacity: 3500 Pounds
UPC: 612314131051
Global Trade Identification Number: 51
Model: Class 3 Hitch
Item Weight: 39.8 pounds
Item model number: 13105
Is Discontinued By Manufacturer: No
Exterior: GLOSS BLACK POWDER COAT
Manufacturer Part Number: 13105
Position: Rear
Date First Available: June 1, 2011
Frequently asked questions
To initiate a return, please visit our Returns Center.
View our full returns policy here.
- Klarna Financing
- Affirm Pay in 4
- Affirm Financing
- Afterpay Financing
- PayTomorrow Financing
- Financing through Apple Pay
Learn more about financing & leasing here.
Similar Products


Top Amazon Reviews