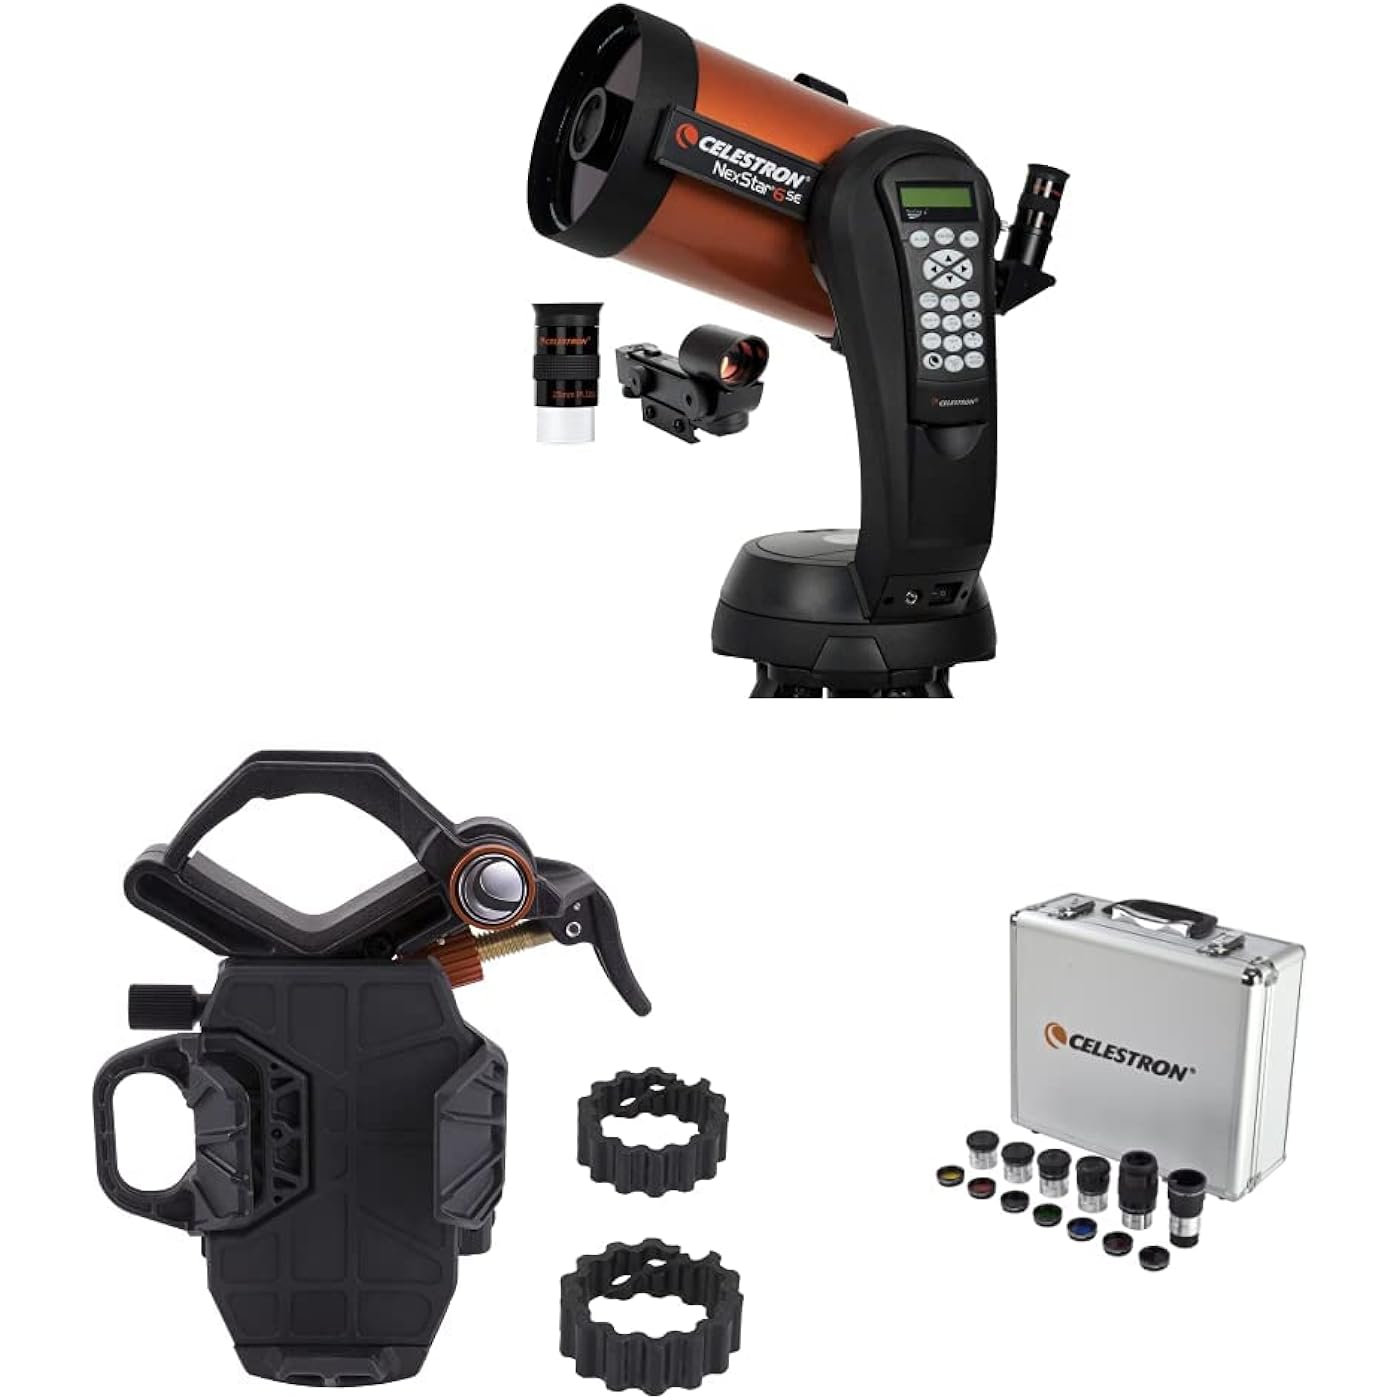
Celestron - NexStar 6SE Telescope - Computerized Telescope & NexYZ – 3–Axis Universal Smartphone Adapter for Telescope & 1.25” Eyepiece and Filter Accessory Kit – 14 Piece


Buy Now, Pay Later
- – Up to 36-month term if approved
- – No impact on credit to apply
- – Instant approval decision
- – Secure and straightforward checkout
Ready to go? Add this product to your cart and select a plan during checkout.
Payment plans are offered through our trusted finance partners Klarna, Affirm, Afterpay, Apple Pay, and PayTomorrow. No-credit-needed leasing options through Acima may also be available at checkout.
Learn more about financing & leasing here.
Selected Option
30-day refund / replacement
To qualify for a full refund, items must be returned in their original, unused condition. If an item is returned in a used, damaged, or materially different state, you may be granted a partial refund.
To initiate a return, please visit our Returns Center.
View our full returns policy here.


Style: NexStar 6SE Computerized Telescope
Set: Telescope + Adapter + Accessory Kit
Features
- Product 1: NEXSTAR 6SE COMPUTERIZED TELESCOPE: Celestrons iconic orange tube telescope combines legendary 8" Schmidt-Cassegrian optics with updated technology and the latest features for an amazing stargazing experience for beginners and experienced observers.
- Product 1: 6-INCH APERTURE SCHMIDT-CASSEGRAIN TELESCOPE: Large, 6-inch primary mirror packs enough light-gathering ability to deliver impressive views of the Moon and planets, along with deep-sky objects like the Orion Nebula, while retaining a compact form.
- Product 1: FULLY-AUTOMATED GOTO MOUNT: With a database of 40,000+ celestial objects, NexStar SE's GoTo mount locates and tracks objects for you. It's the perfect telescope for astronomy beginners. NexStar SE is also compatible with StarSense and SkyPortal WiFi.
- Product 2: CAPTURE IMAGES AND VIDEO THROUGH YOUR SCOPE: NexYZ connects your smartphone to your telescope, spotting scope, binocular, monocular & microscope You can capture amazing images and video through the eyepiece in seconds with the unique Z-axis adjustment.
- Product 2: UNVERSAL SMARTPHONE ADAPTER: Works with a wide range of smartphones, including all the latest devices from Samsung Galaxy, Google Pixel, and Apple iPhone. Most devices fit in the adapter with their cases still on.
- Product 2: EASY AS X-Y-Z: NexYZ's patent pending design features 3 directional knobs (X-, Y-, and Z-axis) that perfectly align your phones camera with the eyepiece. You can also make tension adjustments to hold even the heaviest phones firmly in place.
- Product 3: THE PERFECT ALL-IN-ONE EYEPIECE AND FILTER KIT: See more with your telescope! This expertly curated kit features the most popular 1.25" telescope eyepieces and filters, plus a 2x Barlow lens. The sturdy, foam-lined case has room to grow your collection.
- Product 3: 5 SUPERIOR-GRADE PLOSSL EYEPIECES: The Celestron Accessory Kit includes 5 Plossl telescope eyepieces, ranging from low to high power: 32mm, 17mm, 13mm, 8mm, and 6mm. Each eyepiece features a four-element design with a 52-degree field of view.
- Product 3: 2X BARLOW LENS: The 2x Barlow lens pairs with each of the 5 eyepieces in this kitor any 1.25 eyepieceto double its magnification, enhancing your view and instantly boosting power. Its like having 10 telescope eyepieces in your kit!
Description
Celestron - NexStar 6SE Telescope - Computerized Telescope for Beginners and Advanced Users - Fully-Automated GoTo Mount - SkyAlign Technology - 40,000 plus Celestial Objects - 6-Inch Primary Mirror The best telescope is the one used often to enjoy the beauty and intrigue of the night sky. For those searching for telescopes for astronomy beginners that are infused with the latest computer technology, Celestron’s NexStar 6SE Schmidt-Cassegrain Telescope fits the bill perfectly. The NexStar 6SE Computerized Telescope features Celestron’s iconic “orange tube” design and updated technology with the latest features for amazing stargazing for beginners and experienced observers. Celestron’s signature telescope combines advanced features and excellent optics in one easy-to-use system, the NexStar 6SE. It’s the perfect choice for your first serious telescope, offering striking views at an economical price. We recommend a load of no more than 10 pounds at 2.3 inches away from the 6 inch Schmidt corrector. The six-inch primary mirror in this computerized telescope packs enough light-gathering ability to observe the best that our Solar System has to offer, from Saturn’s rings to the cloud bands on Jupiter and geographic features on the surface of the Moon. When it comes to deep sky objects, take your 6SE to a dark-sky site and you’ll see hundreds of pinpoint stars in the Hercules Globular Cluster, the spiral arms of the Whirlpool Galaxy, and more. Featuring a database of more than 40,000 celestial objects, the 6SE’s GoTo mount automatically locates and tracks objects for you. You can also take a Sky Tour and let your telescope show you the best objects currently visible. The single fork arm design and sturdy steel tripod all assemble and break down from separate components for easy transportation. SkyAlign technology gets your telescope aligned and ready to observe in minutes. Even if you’re unfamiliar with the night sky, you can easily align your telescope on any 3 bright objects. The NexStar 6SE is a telescope that will grow with you as you advance in the hobby of astronomy. It’s compatible with all the high-tech accessories advanced users love. Provide GPS coordinates to your telescope with SkySync, or add automatic alignment functionality with StarSense AutoAlign. Buy with confidence from the world’s 1 telescope brand, based in California since 1960. You’ll also receive a two-year warranty and unlimited access to technical support from our team of US-based experts. Manufacturer Description Portability and serious performance come together in the NexStar 6 SE. Celestron's first new Schmidt- Cassegrain optical system in over a decade is now available in a high performance altazimuth computerized telescope. With a total weight of 30 pounds including the tripod, the ultra portable 6 SE features a precision optical system with 1500mm focal length (f10) and offers 44% more light gathering than a 5-inch telescope. The NexStar 6 SE has all the same features as Celestron's most advanced computerized GoTo telescopes, including our revolutionary SkyAlign alignment technology, a sky tour feature, a database of over 40,000 celestial objects, and easy-to-use hand control. Plug the optional SkySync GPS Accessory (93969) into NexStar's auxiliary port and download data from orbiting GPS satellites for truly quick and easy alignments. The universe may be full of mysteries, but using the NexStar 6 SE isn't one of them. In the tradition of Celestron's famous orange optical tubes, the NexStar SE Family combines the classic heritage of the original orange tube telescopes with state-of-the-art features including a fully computerized operating system, flash upgradeable hand control, our superior StarBright XLT coatings, our revolutionary SkyAlign telescope alignment software, and much more. Whether you are a seasoned astronomer looking for a portable scope with advanced features, or just starting your astronomy adventure and looking for an easy way to enjoy the night sky, a NexStar SE will help you take a closer look. Every NexStar SE includes a free download of Celestron Starry Night Special Edition. Available for PC and Mac. Celestron – NexYZ – 3–Axis Universal Smartphone Adapter for Telescope – Digiscoping Smartphone Adapter – Capture Images and Video Through Your Telescope or Spotting Scope NexYZ fits any eyepiece from 35 mm to 60 mm in diameter including telescopes with 1.25” and 2” eyepieces, spotting scopes, monoculars, and binoculars. NexYZ will also attach to microscopes with the addition of the included adapter ring, which takes the usable diameter down to 25 mm, the size of a standard microscope eyepiece. A strong spring and a threaded twist lock provide a two-level strong and secure grip on the optical instrument’s eyepiece so you can image with confidence. NexYZ also accommodates a huge range of smartphones. The phone platform is fully adjustable and can fit any device—usually with the case still on. Even larger “phablets” like the iPhone 8 Plus and latest Samsung Galaxy devices work perfectly. The secure platform stands up to the weight of these heavier devices with ease. If multiple people want to capture a shot through your optic, NexYZ’s simple spring-loaded clamps make it easy to remove one device and replace it with another in seconds. NexYZ is the ideal solution for star parties and group bird walks where everyone wants their own shot of the action. Easy as X-Y-Z - What makes NexYZ different from other smartphone adapters? The three-axis adjustment. Most adapters rely on you placing your phone perfectly on the platform and only offer limited adjustment in two axes. But NexYZ gives you the power to place your phone on the platform, center it over the eyepiece with the X and Y knobs, and then move up or down over the eyepiece until you have the entire field of view in your shot. And even though this adjustment is ultra-precise, it’s still quicker and easier than with other adapters. From start to finish, the process only takes about 30 seconds, including the time it takes to insert the phone into NexYZ, attach NexYZ to an eyepiece, start the camera app, and center the camera over the eyepiece using the knobs. If you switch phones, eyepieces, or optical instruments, you will need only slight adjustments to re-center the camera over the new eyepiece. You can also switch your image from portrait to landscape simply by turning the padded eyepiece clamp and readjusting the X, Y, and Z axis to realign your phone with the eyepiece. NOTE: NexYZ fits telescopes, spotting scopes, binoculars, monoculars, and microscopes. It will not fit riflescopes. NexYZ will work with most phone cases, but if you have an especially large phone case with built-in batteries or a folio style case, Celestron recommends removing it for optimal use. US and International Patents Pending. The phone clamp can open to 92mm in width. The bottom of the phone can be as much as 160mm from the center of the camera on the phone. Imaging Tips and Tricks Camera Controls The standard camera apps that come preinstalled with your smartphone offer very rudimentary controls and are designed to automatically adjust focus and exposure. This is not a problem for everyday photography such as landscapes or portraits, but can be a problem for imaging a planet or the Moon where you have a very bright object against a very black sky. The phone’s camera tries to compensate for the imbalance of lighting by brightening up the dark areas, but this causes the bright areas to overexpose and blow-out the details. If your camera app settings do not allow you to manually select the focus point or have an option to disable the autofocus or auto-exposure, you may want to consider using a different camera app. You can find lots of aftermarket apps for iOS and Android that offer a greater amount of control for your camera. Many of these are free. Vibration To help eliminate any vibration induced when you touch the camera to snap the image, try using a shutter delay. Some apps offer a 2, 5, or 10 second delay before snapping the image. This will give the vibrations a chance to dissipate before actually taking the images. Subjects to Shoot Using this method, you should be able to take images of daytime terrestrial objects and nighttime astronomical images of the Moon and bright planets (Venus, Mars, Jupiter and Saturn). Unfortunately, smartphone camera sensors are not designed to work well in very low light, so it will not be possible to capture faint astronomical objects such as galaxies or nebulae in this manner. Magnification When looking at the Moon or planets with a stationary telescope, you will notice that the object appears to drift across the field of view. This is actually caused by the Earth’s rotation. If you were looking visually through your 20mm eyepiece, a planet would take approximately 3.0 minutes to drift across the entire eyepiece’s field of view. If you are using the 10mm eyepiece, it would only take 1.5 minutes. The smartphone does not use the entire eyepiece’s field of view and only uses the center of it, making the motion appear even faster. When centering an astronomical object in the phone’s field of view, try leading the target. Try to point the scope ahead of the planet so that it is just entering the field of view. This will maximize the amount of time it takes to drift across the entire field, allowing you more time to take images before needing to re-aim the telescope. The 10mm will have a narrower field of view and will need to be adjusted more often as a result. Working with the 20mm eyepiece will be easier at the start. Once you are comfortable with it, try stepping up to the 10mm eyepiece.
Brand: Celestron
Model Name: NexStar 6SE
Eye Piece Lens Description: Barlow
Telescope Mount Description: Altazimuth Mount
Focus Type: Auto Focus
Power Source: Battery Powered, Solar Powered
Finderscope: Reflex
Compatible Devices: Smartphone
Lens Coating Description: StarBright XLT
Focal Length Description: 1500 millimeters
Date First Available: April 23, 2023
Manufacturer: Celestron
Frequently asked questions
To initiate a return, please visit our Returns Center.
View our full returns policy here.
- Klarna Financing
- Affirm Pay in 4
- Affirm Financing
- Afterpay Financing
- PayTomorrow Financing
- Financing through Apple Pay
Learn more about financing & leasing here.