Search  for anything...

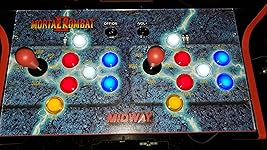
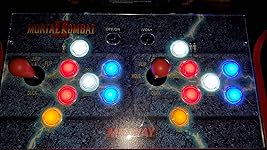
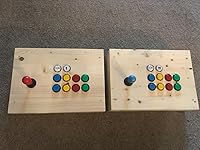
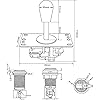
Arcade Kits 2 Player Classic Arcade DIY USB Encoder to PC Joystick Games + 2x 5Pin Rocker + 16x 30mm 5V LED Push Buttons 1 + 2 Players Coin Buttons For Raspberry Pi 1 2 3 3B Mame Fighting Stick

  • Based on 87 reviews
Condition: New
Checking for product changes

Buy Now, Pay Later


As low as $10 / mo
  • – 4-month term
  • – No impact on credit
  • – Instant approval decision
  • – Secure and straightforward checkout

Ready to go? Add this product to your cart and select a plan during checkout. Payment plans are offered through our trusted finance partners Klarna, PayTomorrow, Affirm, Apple Pay, and PayPal. No-credit-needed leasing options through Acima may also be available at checkout.

Learn more about financing & leasing here.

Free shipping on this product

This item is eligible for return within 30 days of receipt

To qualify for a full refund, items must be returned in their original, unused condition. If an item is returned in a used, damaged, or materially different state, you may be granted a partial refund.

To initiate a return, please visit our Returns Center.

View our full returns policy here.


Availability: Only 9 left in stock, order soon!
Fulfilled by Amazon

Arrives Sunday, May 19
Order within 16 hours and 53 minutes
Available payment plans shown during checkout

Features

  • Beautiful LED Arace Game DIY Parts for MAME JAMMA Project!
  • 100% Zero Delay USB Encoders and Perfect work for all windows systems!
  • Perfect Parts for 2 Player Arcade MAME DIY Project!
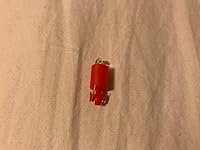
  • include: 2x USB Controllers + 2x 5Pin Joystick + 2x USB Encoder + 19x 30mm LED Buttons (1Player + 2Player + Coin Buttons)
  • Perfect LED Kit for Arcade PC Game DIY Project! Easy Install!

Description

This is a LED Arcade Game DIY Parts for 2 Player DIY Project. The encoder support all the windows systems! All the buttons are not metal. If the LED does not light. Then please exchange the location LED interface. Each player has its own USB cable to make sure that Multiplayer can play the games in the same condition! The Joystick is a 8 way professional joystick! The buttons are 5V Full Colors LED Illuminated push buttons with build-in Microswitches inside. The default buttons as lighted all the time. If you purchase one of this items, what will included in the package 2x Zero Delay LED USB Encoder 2x USB Cable 2x 5Pin wires for Joystick 19x 3Pin wires for LED Push Buttons 1x Red 5Pin 8 way joystick 1x Blue 5Pin 8 way joystick 1x 1 Player 30MM 5V LED Push Buttons (White) With LED Lamp and Micro Switch 1x 2 Player 30MM 5V LED Push Buttons (White) With LED Lamp and Micro Switch 2x Coin 30MM 5V LED Push Buttons (White) With LED Lamp and Micro Switch 16x 30MM 5V LED Push Buttons With LED and Micro Switch (4x Red 4x Yellow 4x Green 4x Blue) 1x Instructions Tips for installation 1. Plese read our user manual before starting your diy actions. 2. It's very important! Connect Joystick's 5Pin cable to the 5Pin slot that opposite the USB-B terminal. A lot people connect the joystick to the wrong 5Pin slot. 3. There is no need separate the button's functions when you connect wire to push buttons and encoder board exept you want add " Auto-Fire", " Tubro", "Clear" & " Mode" Functions. All the fight button functions can be set in MAME or RetroPie. "Auto-Fire", "Tubro","Clear" & "Mode" Functions have its own slot on the encoder board. 4. For Professional Players. We suggest your change all the buttons and joysticks into SANWA Brand or SEIMITSU Brand. Tips for New User: 1. The item need work with MAME emulator. So before your build your own project, please download one to work with the parts. 2. If you use this kit to build your own Raspberry Pi Retropie Projects. Please search the steps before your DIY. Product Display Make your own DIY game dreams.This product does not include a game box Read more Button wiring method Please note: LEDs distinguish between positive and negative. If the LED is not lit. Please replace the LED cable interface location. However, pay attention to the direction of the LEDs. When connected, I inverted 75% of the LEDs that were installed upside down. Everything is fine by removing them and turning them over. Read more Joystick Can replace the different ball It's hight quality 5Pin 8-ways joystick model. The service life reaches 1 million clicks.New interface mode. Reject the wrong interface. Joystick bottom Applicable to the wooden shell and iron shell machine, the return of flexible, More wear-resistant; Iron base parallel cone; square gate Specification map All the silver conduction point, contact sensitive; within the iron bar for the stainless steel; 2.0 thickness of the electrolytic plate; dust washers; ball detachable, can replace the different ball; Read more Push Buttons 1 Player 2 Player + 2x Coin Buttons Individually independent stickers.Buttons can be opened separately to add brand LOGO. Create your own style.Each button has 2 switch interfaces and 2 LED light connectors. Full LED 4 Color Buttons High quality material manufacturingHigh temperature resistant plastic partsHD translucent button body & coverRotary design Specification map Comes with lighting effects, can be used for wood console, metal panels, with the use of various types of animation gamePlucked gold-plated, gold-plated contacts, micro-sound, long life, test life of up to 10 million timesUse voltage: 5V Read more USB Controllers USB Encoder The USB Cable: 87InchThe 5Pin Cable: 7.9 InchThe Buttons Cable: 7.9 InchUSB encoder imported SMD components. Work more smoothly. Longer life expectancy. Lower energy consumption. Button wiring The LED distinguishes between positive and negative.If the LED is not lit. Please exchange the LED cable interface location. PCB Board USB Print TerminalsK1-K12 Push Buttons Terminals5Pin Joystick Terminals2Pin Joystick TerminalsAuto, Turbo, Clecet, Mode Terminals6 and 6-1 is Output 5V Power Terminals Read more


Product Dimensions: 8.31 x 5.79 x 4.29 inches


Item Weight: 2.82 pounds


Manufacturer recommended age: 248832 years and up


Is Discontinued By Manufacturer: No


Mfg Recommended age: 248832 year and up


Manufacturer: EG Starts


Frequently asked questions

If you place your order now, the estimated arrival date for this product is: Sunday, May 19

Yes, absolutely! You may return this product for a full refund within 30 days of receiving it.

To initiate a return, please visit our Returns Center.

View our full returns policy here.

  • Klarna Financing
  • Affirm Pay in 4
  • Affirm Financing
  • PayTomorrow Financing
  • Apple Pay Later
Leasing options through Acima may also be available during checkout.

Learn more about financing & leasing here.

Top Amazon Reviews


  • Works good but needs some modifications... to be great...
I used this kit for a Marvel's super hero conversion. It was cheap, the buttons light up, it comes with the USB controller boards and the joysticks are bats not ball shaped. Overall this is a great kit for under $50 and includes everything for the joystick and button setup. I did have to change and modify to make it better and mount correctly. First I swapped the joystick metal mounting plate with the one that came on the 1up's joystick. OEM is the joystick on the right in the picture, and the mounting holes don't match up with this one. Just remember to mark top and bottom on the joysticks and on the metal plates when you swap them. Also use the screws that came with each joystick, only swap the metal plate itself. The OEM screws have a little glue on the heads so they will need broke lose, but they work great and you don't have to drill new holes in the 1up board to mount. I also used a little blue thread locker on the joystick bats so they didn't come unscrewed while kids were playing. Second thing is the coin and player buttons. Or any button you want an identifier or label on. The way these buttons are setup it allows the buttons to spin the housings causing the coin or player icon to get turned upside down or sideways. My fix was to dismantle the buttons and use some clear silicone adhesive around the side of the button caps to keep them in place. To remove the button electronic plug simply push and turn to "unlock" the button electronics from the button housing. I took pictures to show how these buttons come apart and if you wanted to place other labels (A, B, X, Y) inside the buttons. These joysticks are better then the OEM for movement and buttons are responsive with a little "click" to them. I had to swap some wires around to make the LED light-up. It was easier to swap these on the button side backs while it was powered up. The backs of these buttons are huge and take up a lot of space on the OEM panel but the look is worth the work. ... show more
Reviewed in the United States on May 7, 2020 by A Person

  • The text on COIN and the player 1 and 2 buttons rotates
***READ THIS BEFORE YOU CONNECT THE BUTTONS** you do NOT have to swap wires to get the LED's to light up, you can remove the light/switch from the back of the button by holding the button body and rotating the back of it counterclockwise. pull the LED out, rotate it 180, and put it back in. That's all you have to do. The caps for the buttons with writing on them rotate independently of the body of the switch, my player 1 and 2 keep spinning around as do the coin buttons. Wish these didn't spin! Otherwise, everything else seems fine so far. Those of you wanting to put these in an Arcade1UP cabinet, the mounting plate for the joysticks didn't match up with the holes already existing in my MSH machine. I just swapped the mounting plates between them so I could use these joysticks. ... show more
Reviewed in the United States on February 6, 2020 by Nope

  • If light off, pull out LED bulb and turn it 180° and plug back in
This is a great kit for a DIY arcade project. Actually, there doesn't seem to be many alternatives listed on Amazon, but this kit has some quality components. Joysticks feel nice, buttons are a tiny bit stiff but also have a good quality click to them. Overall, great kit for my Raspberry Pi 4 RetroPie setup. Things I didn't like: -The 20 wires that come with the kit are too short! The wires don't reach to half of the buttons. I needed to make my own extension wires. I bought 24 AWG wire and quick connect terminals and cut and crimped 40 wires. It took me about 5 hours to make. -The joysticks and buttons kit cost me $21.72 for import fees to ship to Canada. Tips for installing: -If the lights for the buttons don't turn on, don't switch the wires, it's too much of a pain to unplug the wires - just unplug the LED diode light bulb, turn it 180° and plug it back in, a lot easier. I prefer to keep every button wired the same way. -I would also use 28mm holes for the buttons, and a 24mm hole for the joystick. ... show more
Reviewed in the United States on August 19, 2020 by VT

  • Works, frustrating installation.
Once installed, everything works. But, install was horrible- it was 50-50 if the polarity was as expected. I started putting it all together and decided to test it about halfway through only to find that half of them didn't light up. One of them just about broke when I disassembled it. From there on I barely attached the cables and tested each button before pushing the connector firmly in place. I can understand one or two being off, but this was ridiculous. That said, they all seem to be made by the same vendor so there aren't many options. And as I said - they do work. ... show more
Reviewed in the United States on May 30, 2021 by MCoupland

  • Not bad for what I got
The buttons are a little stiff but my kids and I got used to it. The kids press them down hard anyways, so that's not a big issue for us. The big issue is that the LED lighting is tough and make sure that you have a USB battery bank so that way you can test out to see if they light up first before you insert the plugs in tight. ... show more
Reviewed in the United States on January 4, 2019 by chuifam

  • Ok
The media could not be loaded. Wires could be longer I’ve used way easier kits from amazon that are better then this kit
Reviewed in the United States on August 11, 2021 by madhats

  • Basic 1UP Joystick/Button Set - Dull LEDs
Basic 1UP replacement buttons/Joystick. The LEDs in the buttons are weak. Had other sets look brighter. Wiring was not uniform. If the lights don't work, flip the 2 wires on the sides.
Reviewed in the United States on October 9, 2020 by Teresa Jones

  • Worked well with my raspberry pi 3!
These buttons and joysticks work as advertised. I hooked them up to a raspberry pi 3 running retro pie and I had no problems. I took off one star as the button leds are not consistently wired the same so it is slightly annoying to have to check every single button to see which way to hook them up. My package came with some spare parts which turned out to be great as one of the LEDs was flakey, but was very easy to replace with the included spare parts! ... show more
Reviewed in the United States on November 26, 2017 by Brian W Bianco

Can't find a product?

Find it on Amazon first, then paste the link below.