
VEVOR Screen Printing Press 4 Color 1 Station Screen Printing Machine Removable Pallet Silk Screen Printing Machine for DIY T-Shirt Printer


Buy Now, Pay Later
- – 6-month term
- – No impact on credit
- – Instant approval decision
- – Secure and straightforward checkout
Ready to go? Add this product to your cart and select a plan during checkout.
Payment plans are offered through our trusted finance partners Klarna, Affirm, Afterpay, Apple Pay, and PayTomorrow. No-credit-needed leasing options through Acima may also be available at checkout.
Learn more about financing & leasing here.
Selected Option
This item is eligible for return within 30 days of receipt
To qualify for a full refund, items must be returned in their original, unused condition. If an item is returned in a used, damaged, or materially different state, you may be granted a partial refund.
To initiate a return, please visit our Returns Center.
View our full returns policy here.
Recently Viewed


Style: Screen Printing Machine
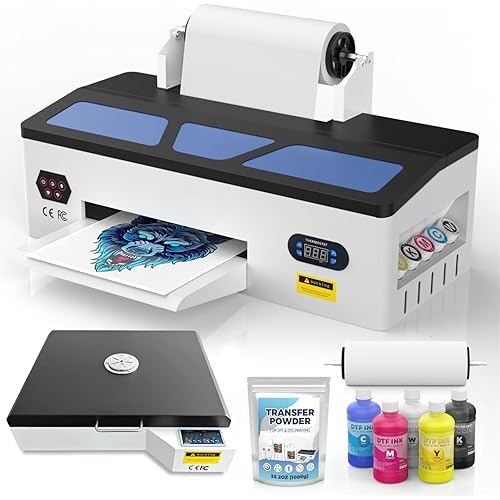
Features
- Premium Material: Screen printer is made of high-quality material and adopts advanced electrostatic spraying and electroplating. It is durable, easy to clean as well as no rust.
- Table Type Design: The table type combination design saves space and facilitates transportation.
- Sturdy Structure: The mechanical stress parts are precision machined and designed with different bearings to ensure long-term stable operation and precise positioning.
- Spring Device: The screen printing machine has two springs to adjust the tension to adapt to different weights and keep the screen frame balanced.
- Wide Application: Screen printing machines can be used for clothing, pillowcases, fabrics, metals, paper, copybooks, plastics, wood, glass, ceramics, leather, and other products that require photo lithography.
Brand: VEVOR
Material: Metal
Color: Blue
Item Weight: 42 Pounds
Upper Temperature Rating: 225 Degrees Celsius
Voltage: 110 Volts
Manufacturer: VEVOR
UPC: 768558083875
Item Weight: 42 pounds
Product Dimensions: 55 x 18 x 4 inches
Item model number: 4 Color 1 Station Screen
Material Type: Metal
Number of Items: 1
Size: 4 Color 1 Station
Manufacturer Part Number: Screen Printing Machine
Date First Available: December 17, 2019
Frequently asked questions
To initiate a return, please visit our Returns Center.
View our full returns policy here.
- Klarna Financing
- Affirm Pay in 4
- Affirm Financing
- Afterpay Financing
- PayTomorrow Financing
- Financing through Apple Pay
Learn more about financing & leasing here.
Similar Products


Top Amazon Reviews


