Search  for anything...

Speedball Art Products 4559 Diazo Photo Emulsion Kit

  • Based on 1,199 reviews
Condition: New
Checking for product changes
$29.99 Why this price?
Save $2.48 was $32.47

Buy Now, Pay Later


As low as $7 / mo
  • – 4-month term
  • – No impact on credit
  • – Instant approval decision
  • – Secure and straightforward checkout

Ready to go? Add this product to your cart and select a plan during checkout. Payment plans are offered through our trusted finance partners Klarna, PayTomorrow, Affirm, Apple Pay, and PayPal. No-credit-needed leasing options through Acima may also be available at checkout.

Learn more about financing & leasing here.

Free shipping on this product

This item is eligible for return within 30 days of receipt

To qualify for a full refund, items must be returned in their original, unused condition. If an item is returned in a used, damaged, or materially different state, you may be granted a partial refund.

To initiate a return, please visit our Returns Center.

View our full returns policy here.


Availability: In Stock.
Fulfilled by Amazon

Arrives Thursday, May 23
Order within 11 hours and 58 minutes
Available payment plans shown during checkout

Features

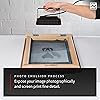
  • Photo emulsion is best for creating detailed or photographic type stencils for screen printing.
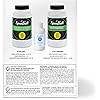
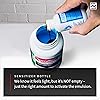
  • Speedballs Diazo Photo Emulsion is a 2-step process where the photo emulsion needs to be activated. To activate, the photo emulsion, sensitizer needs to be added. The sensitizer is a very thick oil and needs water to create the right consistency for adding it to the photo emulsion. (The sensitizer bottle will feel unfilled, but dont worry it is not empty!)
  • No need for a light safe environment or darkroom! Mix photo emulsion under normal light conditions.
  • Set contains 1 each of the following: 6.6oz (195ml) Diazo Photo Emulsion; 2.12g Diazo Sensitizer; 8oz (237ml) Diazo Photo Emulsion Remover and Instructions.
  • Conforms to ASTM D-4236.
  • The jar contains a dried solution. Please add water and shake so that the dried material dissolves into water and turns green.

Description

"Speedball's Diazo Photo Emulsion is ideal for creating detailed or photographic stencils for screen printing. No need for a light safe environment or dark room! Set contains 1 each of the following: 6.6oz (195ml) Diazo Photo Emulsion; 2.12g Diazo Sensitizer; 8oz (237ml) Diazo Photo Emulsion Remover and Instructions. "


Product Dimensions: 2.5 x 5 x 6.4 inches


Item model number: 4559


Is Discontinued By Manufacturer: No


Item Weight: 1.32 pounds


Manufacturer: Speedball Art Products Company


Date First Available: August 1, 2008


Frequently asked questions

If you place your order now, the estimated arrival date for this product is: Thursday, May 23

Yes, absolutely! You may return this product for a full refund within 30 days of receiving it.

To initiate a return, please visit our Returns Center.

View our full returns policy here.

  • Klarna Financing
  • Affirm Pay in 4
  • Affirm Financing
  • PayTomorrow Financing
  • Apple Pay Later
Leasing options through Acima may also be available during checkout.

Learn more about financing & leasing here.

Top Amazon Reviews


  • Beginner friendly
The product is great and instructions are easy to follow
Reviewed in the United States 🇺🇸 on March 28, 2023 by Chimunya Siankombwe

  • Great all in one product
This comes with everything you need to do your first silkscreen minus the screen and the ink. Speedball makes a quality product for an affordable price
Reviewed in the United States 🇺🇸 on February 15, 2023 by Jaysind13

  • so far so good
I power mixed the emulsion with a drill and got a lot of air bubbles - IDIOT. Next I had some trouble spreading the emulsion, but, that was due to my test screen not having near enough tension, and, it was just my first try. After my little mess with the test screen, I coated my production screen, A professionally built and screened aluminum frame. That came out pretty good. You need to be able to fully spread the emulsion and then screed off any excess quickly. I made a nice clear plastic spreading tray but ended up using a 3" plastic bondo spreader with a sharp point to finish spreading and then screeding off excess emulsion. I am making smaller screens though. Spread front of screen, then screed, spread back, then screed. Inspect your screen, spread more, then screed off excess from front side and back side. Press the screed into the screen pretty hard, if you are getting a proper thin coat, you wont get any lines from making multi spreading and screeding passes. I will tell you this, watching youtube videos with pros spreading emulsion with a single front and back pass is pure fantasy. You are probably NOT going to be able to do this with one perfect spreading pass in front and one perfect spreading/screeding pass in back, so don't even worry about it. Be ready to do multiple passes front and back, but be ready to get it done quickly. This process works 100 times better if you got a professionally done and screened frame with the screen stretched super tight. I stretched my first frame myself and found it tough to get high enough screen tension, then I bought a cheap but good aluminum frame with pre-streatched screen and OMG, it was so much more easy and better. Spread and screed off your emulsion quickly, as if you take too long the emulsion starts to thicken up and then it gets very hard to screed off the excess. Thankfully, I found this out on my first test screen so I got right to it and finished quickly on my money screen and it came out PERFECT. Nice even thin coating and when it fully dried it was exactly as needed, no more thickness then the screen itself, and, that is exactly what you want. If you get excess thickness on your coated screen you will have problems with excess paint loading when doing your screen printing. Excess thickness was the problem I had with my first screen, not made with emulsion, but with a sheet of sticky vinyl with letters cut out. It worked OK, but was hard to get a nice prefect thin layer of ink/paint on my products as the vinyl, seemed thin enough but in reality, it was thicker then it should have been and when the screen thickness was added, it was laying down to thick a layer of screen printing ink [paint]. I'm so looking forward to using my screens made with this emulsion, screen printing should work so much better. ~ ... show more
Reviewed in the United States 🇺🇸 on December 31, 2018 by Amazon Customer Robert

  • Great Stuff, follow directions!
don't try to just mix a little bit, it wont work well. Mix the whole thing, just like the instructions say and this product will work great. Every little detail came through in my print. This stuff glides on easy and dries fast. Exposed with a fluorescent lamp for 45 min and then the stencil part washed off easy. Use only enough to cover your screen. the rest will store for several months. Happy printing! ... show more
Reviewed in the United States 🇺🇸 on September 30, 2022 by JJ Madrigal

  • Takes some learning but it works
I am a beginner and watched tons of tutorials online on how to screen print. I chose this product for the cost and quantity (I didn’t need a lot). It took a lot of trial and error but I figured out what works for me and my light source. I felt like coating one side and then pushing it back and forth through the screen, ending with pushing through the inside of the frame provided the best coating. Then I let it dry for at least 10 hours before burning the image on. The remover spray works super well! A little goes a long way. ... show more
Reviewed in the United States 🇺🇸 on August 18, 2022 by Eggett

  • Daizo and Speedball make overall good stuff.
The first thing you want to do is check that nothing has broken, spilled, or dried. The emulsion with be thick like glue and blue in color. The remover will be thin and clear like medical alcohol or bleach. Both should have cardboard gasketed lids and foil caps on them. The sensatizer (tiny bottle) should be either dry and at the bottom, or thick and at the bottom. If any of the sensatizer is spilled out of the little bottle (along the threads or down the side) send the kit back for a new one immediately. The product is good if you get it undamaged, but Speedball uses incompetant monkey powered robots made from scrap pulled from the Robot Wars set to package everything so check your stuff. As for operation, when the sensatizer is added to the emulsion it turns a good medium (not quite emerald) green and will turn back to blue after it cooks out when you burn the stencil. Look for a light-medium blue hue and the uncooked parts under the negative image should have a yellow, jaundace like hue to them. When cleaning out the emmulsion make sure to wipe up messes immediately as the emulsion leaves yellow stains on nearly every surface known to man, including porcelin and the steel rim around my sink. Trial and error for new users will happen, just don't leave emulsion in a screen for a long period of time if you don't want a permenant stencil, and clean the screen completely before letting it dry if you don't want a permenant stencil (yes the emulsion remover may make the emulsion impossible to remove. Don't ask me how, I failed mad science 101). ... show more
Reviewed in the United States 🇺🇸 on August 26, 2011 by Kristopher C. Hunt

  • Easy to use Emulsion. Perfect for beginners.
An easy to use emulsion. If you’re new to silk screening, buy their light, their screen, and their emulsion. Then find yourself a good scoop coater and a piece float glass (available at Home Depot) about the size of the screen. The scoop coater doesn’t have to be Speedball brand. Mix the diazo and shake it up really really well. I usually let it sit for 2 hours shaking occasionally throughout that time. Then add the diazo to the bottle, mix in the diazo and you should have a dramatic color change in the emulsion to green. Scoop coat and dry your screens. Then put your transparency on the screen (keeping the orientation in mind), put the glass on top so the transparency does not move and then expose with the light and their 200 watt photo bulb. With this configuration it’s usually 7-9 minutes. ... show more
Reviewed in the United States 🇺🇸 on April 25, 2021 by df

Can't find a product?

Find it on Amazon first, then paste the link below.