Search  for anything...

Temptooth #1 Seller Trusted Patented Temporary Tooth Replacement Product

  • Based on 0 reviews
Condition: New
Checking for product changes

Buy Now, Pay Later


As low as $8 / mo
  • – 4-month term
  • – No impact on credit
  • – Instant approval decision
  • – Secure and straightforward checkout

Ready to go? Add this product to your cart and select a plan during checkout. Payment plans are offered through our trusted finance partners Klarna, PayTomorrow, Affirm, Apple Pay, and PayPal. No-credit-needed leasing options through Acima may also be available at checkout.

Learn more about financing & leasing here.

Free shipping on this product

Eligible for Return, Refund or Replacement within 30 days of receipt

To qualify for a full refund, items must be returned in their original, unused condition. If an item is returned in a used, damaged, or materially different state, you may be granted a partial refund.

To initiate a return, please visit our Returns Center.

View our full returns policy here.


Availability: In Stock.
Fulfilled by Amazon

Arrives Saturday, May 11
Order within 16 hours and 7 minutes
Available payment plans shown during checkout

Features

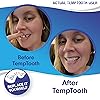
  • SMILE WITH CONFIDENCE: A smile is one of the first features that people notice. Dont let missing teeth keep you from smiling. Regain your confidence with the TempTooth Temporary Tooth Replacement Kit. The results of these teeth beads are completely natural, so no one will ever suspect a thing. Our kit is a great do-it-yourself option until you see your dentist or get a dental implant.
  • COMPLETE DIY KIT: This tooth replacement set comes with everything you will need to create up to 10 replacement teeth. Box comes with moldable polymer plastic beads that you can sculpt into a realistic tooth or crown in just minutes. These beads are FDA approved, high grade, and nontoxic, so theyre extremely durable. Also, patented step by step clear instructions and guide on how to make the tooth in a color brochure. Video link to a special website included to watch how it is made in brochure.
  • QUICK FIX FOR A FLAWLESS SMILE: Just warm up the teeth replacement beads with warm or hot water. Mold the material to fit into the gap where your missing tooth is on the upper or lower jaw. Once dried, the tooth will just snap into place no dental cement or glue required! The teeth can be stained with cold coffee or tea to match the rest of your smile.
  • 3D VIDEO WITH INSTRUCTIONS: We provide detailed instructions with your purchase and a 3D animated video that makes it easy to learn more about how to use our kit. Please note: Temptooth is meant to replace a single missing tooth or crown, but is not meant to replace broken or chipped teeth. It is highly recommended to closely follow the provided instructions for the most optimal results. Some customers may have difficulty making a tooth, as our product does require some craft-making skills.
  • SAFE FOR ORAL USE: We use only FDA-approved materials to ensure your safety. Additionally, our temp tooth repair kit has been third-party tested for safety and efficacy for oral use. Unlike other brands, our material isnt made in China. You can trust the quality of our kits knowing that our patented process has high standards, and you will love how real your fake tooth looks!

Description

No need to hide or cover up your smile due to missing teeth. Men and women can regain their confidence with TempTooth Temporary Tooth Replacement Kit. This kit provides everything you need for temporary fixing gaps or missing teeth. With moldable teeth beads made from non-toxic, medical-grade polymer plastic, you can create a tooth at home that looks natural and fits perfectly in a matter of minutes. No more waiting in long lines to see the dentist on short notice or paying expensive dental bills. Use this kit as a temporary solution until you can get a dental implant or another permanent solution from your dentist. Just warm up a tooth bead in hot water. Then, sculpt the material into the gap where your tooth is missing. Let the material dry. Once it’s ready, you can just snap the temporary tooth into place without dental cement or glue. Temptooth is the only tooth replacement product that includes patented, step-by-step video instructions to help guide you through the creation and insertion process. Each kit includes FDA-approved material that has been third-party tested for safety and efficacy for oral use. When it comes to tooth replacement kits, be wary of lookalikes because their material may be made in China. Trust the original temporary tooth replacement kit and avoid wasting your money on imitations that don't have the same safety standards as Temptooth. This is a do it yourself tooth making product. You, the customer, make your own tooth using our proprietary material and following our patented instructions. Most buyers are able to make a successful tooth, but it may not work for everyone. If you have trouble following detailed instructions or are not good with craft type projects, Temptooth may not be for you.

Brand: Temptooth


Number of Items: 1


Item Dimensions LxWxH: 3.8 x 2.8 x 1.5 inches


Unit Count: 1 Count


Item Weight: 9.07 g


Is Discontinued By Manufacturer ‏ : ‎ No


Product Dimensions ‏ : ‎ 3.8 x 2.8 x 1.5 inches; 0.32 ounces


Item model number ‏ : ‎ 1425


Date First Available ‏ : ‎ February 25, 2010


Manufacturer ‏ : ‎ Temptooth


Frequently asked questions

If you place your order now, the estimated arrival date for this product is: Saturday, May 11

Yes, absolutely! You may return this product for a full refund within 30 days of receiving it.

To initiate a return, please visit our Returns Center.

View our full returns policy here.

  • Klarna Financing
  • Affirm Pay in 4
  • Affirm Financing
  • PayTomorrow Financing
  • Apple Pay Later
Leasing options through Acima may also be available during checkout.

Learn more about financing & leasing here.

Top Amazon Reviews


  • I made a 3-tooth bridge with this product.
Absolute lifesaver. My temporary bridge fell out and I can't afford getting permanents. So I made my own bridge with Temp Tooth, eventhough the product is not sold for that purpose, as you can see from my photos, I brilliantly crafted my own bridge thanks to this product. It helps that I have the 2 stub teeth, but basically I used 14 beads for each tooth. I did one tooth at a time starting with the stub and worked my way across. The key to making a perfect bridge with this product is don't try to shape the tooth perfectly in your mouth, because you're going to do the shaping with a straight razor blade. Just get it to fit and get it the right size. The size and fit is the most important. Once you make the first tooth, put it in the freezer for about 30 seconds. That causes it to expand and solidify. Step 2, put the tooth you just made back in your mouth. If you did it right, it should go on the stub perfectly. Step 3, do the same thing for the other stub. Now you should have two false teeth that fit perfectly over your stubs. Now the fun part: creating the middle tooth and making the bridge. All you have to do is put the 2 false teeth in your mouth and hold them in place with your bottom teeth, then make the middle tooth and shape it between the outer 2 teeth. When you're doing this, make sure the middle one is somewhat hot so that it will stick to the 2 outer teeth. Also, make sure the teeth are in relative proportions to regular teeth. Remember, they don't have to be perfect at this stage, because you're going to make them perfect later with the razor blade. Now, once you got the middle tooth in between the other 2 teeth, pull all three out altogether slowly and make sure they stay together because they will be loosely stuck together. Take a tweezer and grip one end of the bridge with the tweezer. Then, dip the entire bridge in boiling hot water for 2 seconds. This will cause the bridge to stick together more tightly. Take it out, blow it real quick, and then immediately put it back in your mouth so that you don't lose the shape. Use your index and thumb fingers to press the front and back part together to get a tighter grip on your stubs. Also push on the part next to your upper gums to make sure that part is firmly against your gums.Repeat this step of putting the bridge in boiling hot water 1 or 2 times to make sure the entire unit is firmly stuck together. After each time, put it back in your mouth to reshape it. Now, put the whole unit in the freezer for about 30 seconds. This will cause it to solidify and expand. When you take it out, now you have a fully functioning bridge. All you have to do now is shape it to perfection with a razor blade. Just chisel two outer grooves to create the appearance of connecting teeth. And then cut away at the bottom of the bridge to create the appearance of the bottom of each teeth. If you get confused, you can look at a picture online of some teeth to get an idea of how it should look. The most important part of your chiseling is the bite. So if you have an overbite like me, you will need to cut away at the back of the bridge to give your bottom teeth room to chew. You may also want to cut away at the back of the bridge to give your tongue some room and to make it feel natural. If you did everything right, you will notice that the bridge stays in your mouth without falling out. However you will need some fixodent to make it hold all day for talking and chewing. To change the color, I soaked it in Lipton Black Tea for about 6 hours, and it came out perfectly like my other teeth. However, as you can see from my photos, the color will go away once you brush it. Anyway, what a lifesaver. I've talked to people in person and no one ever noticed the difference. This product easily saved me $3,000 that I don't have. Whoever made this product is a GENIUS!!! Thank you. ... show more
Reviewed in the United States on November 11, 2016 by Rowen Rowen

  • Good product! Easier than I thought but still challenging!
I have all 6 of my front teeth missing and need a bridge but I can’t afford it right now. I was able to make multiple with this product relatively easily! It took a lot of trial and error, but eventually I got it! The ONE thing I have a problem with is how white it is, and artificial coloring stains it VERY easy. I made Christmas cookies and ate the frosting with them in and it stained my teeth neon yellow. I had to make a new one because I couldn’t get the color out so I try to avoid eating anything artificial with them in. I’m lucky with how white they are because my top lip covers my teeth very well so it’s hard to notice. Still a very good product, they hold up really well! If you need a bridge I can give you a step by step process bellow. Making the bridge you need a METAL file, a nail buffer, and a razor blade/Exacto knife, scissors, dry erase marker. Follow the instructions on the box, it is very hard to ADD product, so you will want to use more than you might need in the beginning and cut it away. Obviously start with placing the beads in the hot water, waiting for them to be clear. I put them on a spoon and slowly put in the water so it was easier to pull out, form them into a “snake” about the length of the bridge you need, you will want to anchor this on 2 teeth on either side of the gap you have. Place it over the front of the teeth and gap and fold it backwards to form all around the teeth. Use your tongue to hold it in the back and your fingers to blend it with your gums in the front. Allow any excess to flow over the side. I used my finger nails to mark where to cut off the excess and help push it around my anchor teeth. You don’t have a lot of time until it starts to harden so you may have to start over until you can get the hang of it! Once you have the bridge across the teeth, it will look flat and that’s okay, wait for it to harden enough to hold shape and then run under cold water to finish the hardening process. This is a good time to take small scissors and cut of any big excess pieces. You will use the knife to get the smaller stuff off. Once hard put it back in to make sure it’s a tight fit and looks relatively even across with your other teeth. If you are happy take it out and start guessing where you will carve out each tooth. I used a dry erase marker while it was in my mouth to mark where each tooth would go. *Remember teeth are not perfect so these don’t need to be!* Now take the knife and start slightly carving. I started with “triangles” to mimic the natural curve to the bottom of teeth and a slight cap, and then carved as little as possible until I was happy. Once happy take your metal file and kind of smooth out and edges or tiny bits of plastic that are left. After the file it will be rough, so take the buffer and gently “buff” it to help smooth out the roughness from the file. Like I said you can always start over by putting it back in the water. When brushing teeth I take it off and brush it by itself, and I don’t wear it while sleeping but I left it in on accident one day and it was fine. I have made 2 bridges and still have more product. I do not recommend trying to make individual teeth and turning them into a bridge but that’s because I couldn’t figure it out. It is really hard to adhere them together. If you have a good fit but notice you can’t quite anchor it properly use some denture glue to help you. I hope this helped! ... show more
Reviewed in the United States on December 27, 2023 by Cheyenne Cheyenne

Can't find a product?

Find it on Amazon first, then paste the link below.