
Lifetime Storage Building 60237-11 x 21 ft. Tri-Fold Outdoor Garage Shed 60026


Buy Now, Pay Later
- – Up to 36-month term if approved
- – No impact on credit to apply
- – Instant approval decision
- – Secure and straightforward checkout
Ready to go? Add this product to your cart and select a plan during checkout.
Payment plans are offered through our trusted finance partners Klarna, Affirm, Afterpay, Apple Pay, and PayTomorrow. No-credit-needed leasing options through Acima may also be available at checkout.
Learn more about financing & leasing here.
This item is eligible for return within 30 days of receipt
To qualify for a full refund, items must be returned in their original, unused condition. If an item is returned in a used, damaged, or materially different state, you may be granted a partial refund.
To initiate a return, please visit our Returns Center.
View our full returns policy here.


Features
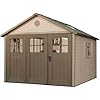
- Nominal Dimensions: 11ft L x 21ft D / Footprint: 10ft 4.25in W x 20ft 4in D / Exterior Dimensions: 10ft 3.5in W x 21ft D x 9ft 4in H / Exterior Roof Dimensions: 11ft 0.75in W x 21ft 0.75in D / Interior Dimensions: 10ft 0.5in W x 19ft 2.5in D x 9ft 2.25in (Maximum) / Square Feet: 200.8 / Cubic Feet: 1,573.6
- Weather-Resistant Powder Coated Steel Frame with 1in Double Walled Polyurethane Plastic Walls
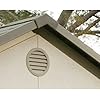
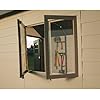
- Windows: Includes Three Stationary Door Windows and Six Latch and Lock Shatter-Proof Windows that Open Halfway for Ventilation
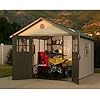
- Extra Large Tri-Fold Carriage Style Door: Features Internal Spring Latch, Interior Deadbolts, and Exterior Padlock Loop
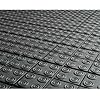
- Flooring: Constructed of Stain-Resistant Polyethylene Plastic
Description
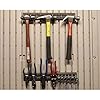
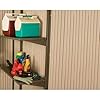
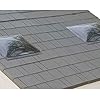
60026 Size: 11' x 21' Features: -Material: Steel, HDPE Polyethylene plastic.-Features 108'' x 72'' Tri-fold Door with Stationary Windows and Exterior Padlock, Six Proof Windows, Two Large Skylights, Two 30'' x 14'' Shelves, Two 16'' Peg Strips with Tool Hooks.-Comes with plenty of room to store your big stuff.-Shelving system and peg strips for organizing all the little stuff.-Keep it all safe, secure, and protected from the elements.-Carriage-style door design allows you to open up the entire front of the shed for easy access.-Four shatter proof windows open for ventilation.-Appreciate the spacious headroom of this design, seven windows and five skylights to let in plenty of natural lighting.-Convenient usability, long-lasting durability, and easy care maintenance.-UV-protected, stain- resistant, and rust resistant.-Best of all they never need painting.-For routine cleaning, simply spray down with a hose.-Compatible expansion kits to accommodate larger vehicles. Dimensions: -11' x 18.5': H x 132'' W x 222'' D.-11' x 21': H x 132'' W x 252'' D.-11' x 11': H x 132'' W x 132'' D. Warranty: -10-Year limited warranty.
Brand: LIFETIME
Material: Plastic
Product Dimensions: 252"D x 132"W x 111"H
Item Weight: 1503 Pounds
Style: Cottage
Item Dimensions D x W x H: 252"D x 132"W x 111"H
Item Weight: 1503 Pounds
Brand Name: LIFETIME
Manufacturer: Lifetime
UPC: 081483003658
Manufacturer Part Number: 60026
Model Number: 60026
Material Type: Plastic
Base Material: Plastic
Top Material Type: Hdpe
Frame Material: Alloy Steel
Style Name: Cottage
Door Style: Folding Doors
Water Resistance Level: Water Resistant
Ultraviolet Light Protection: Yes
Required Assembly: Yes
Frequently asked questions
To initiate a return, please visit our Returns Center.
View our full returns policy here.
- Klarna Financing
- Affirm Pay in 4
- Affirm Financing
- Afterpay Financing
- PayTomorrow Financing
- Financing through Apple Pay
Learn more about financing & leasing here.
Similar Products


Top Amazon Reviews


