Search  for anything...

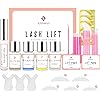
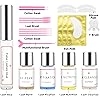
Lash Lift Kit, Eyelash Perm Kit, Professional Eyelash Curling Lash Extension Set, Glue Upgraded Version, Lash Extensions, Lash Curling, Semi-Permanent Curling Perming Wave Suitable For Salon

  • Based on 5,144 reviews
Condition: New
Checking for the best price...

Buy Now, Pay Later


As low as $5 / mo
  • – 4-month term
  • – No impact on credit
  • – Instant approval decision
  • – Secure and straightforward checkout

Ready to go? Add this product to your cart and select a plan during checkout.

Payment plans are offered through our trusted finance partners Klarna, PayTomorrow, Affirm, Afterpay, Apple Pay, and PayPal. No-credit-needed leasing options through Acima may also be available at checkout.

Learn more about financing & leasing here.

Free shipping on this product

Returnable until Jan 31, 2025

To qualify for a full refund, items must be returned in their original, unused condition. If an item is returned in a used, damaged, or materially different state, you may be granted a partial refund.

To initiate a return, please visit our Returns Center.

View our full returns policy here.


Availability: Only 10 left in stock, order soon!
Fulfilled by Amazon

Arrives Sunday, Sep 14
Order within 20 hours and 7 minutes
Available payment plans shown during checkout

Features

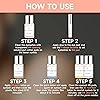
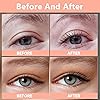
  • Professional-Grade Results: Achieve salon-quality lash lifts at home with our advanced formula for stunning, professional-grade results.
  • Easy Application, Remarkable Impact: Effortlessly enhance your lashes without the need for complex techniques a simple application for a striking transformation.
  • Long-Lasting Curl: Enjoy weeks of beautifully lifted lashes that withstand the elements, ensuring a lasting, eye-catching allure.
  • All-Inclusive Kit: Your complete lash lift solution in one box, featuring all the essentials for a hassle-free and rewarding experience.
  • Gentle and Nourishing: Our specially formulated kit is gentle on lashes, providing a nourishing lift that enhances your natural beauty without compromise.

Color: Pink


Brand: RONKIE


Material: Plastic


Item dimensions L x W x H: 5.91 x 3.94 x 1.97 inches


Handle Type: Standard


Product Dimensions ‏ : ‎ 5.91 x 3.94 x 1.97 inches; 4.59 ounces


Item model number ‏ : ‎ IKA-001


Date First Available ‏ : ‎ January 19, 2021


Manufacturer ‏ : ‎ RONKIE


Frequently asked questions

If you place your order now, the estimated arrival date for this product is: Sunday, Sep 14

Yes, absolutely! You may return this product for a full refund within 30 days of receiving it.

To initiate a return, please visit our Returns Center.

View our full returns policy here.

  • Klarna Financing
  • Affirm Pay in 4
  • Affirm Financing
  • Afterpay Financing
  • PayTomorrow Financing
  • Financing through Apple Pay
Leasing options through Acima may also be available during checkout.

Learn more about financing & leasing here.

Top Amazon Reviews


  • SO MUCH BETTER than professional lash lift!
This turned out AMAZING. There is a big learning curve, but it turned out a million times better than the pro lash lift I got. For reference: my lashes are stick straight and go straight down. They don't hold a curl unless I use waterproof mascara—a lot like Asian lashes (altho im not asian). I've been curling my lashes and wearing waterproof mascara since I was 12, so this was huge. I have small hooded eyes with deceptively long lashes. I used the second smallest size pad (M, I think); the S was too small for my lash length, but I didnt know that till I was gluing down my lashes and I was like "Hmm." If youve ever been told your lashes are long, theyre likely too long for the smallest size. Because my eyes are hooded, I might go the next size up next time. My inner lashes are curling into my hood on one eye (pictured for reference). This is bc of me and my inexperience, not the kit itself. I got a pro lash lift for $100 eight weeks ago—the AFTER result is what I have pictured as my "before." It was awful. She didn't leave the solution on long enough; my lashes (and hair in general) are stubborn and don't take product well. I also think she did a bad job gluing my lashes down, so it was just a mess. I had to wait 8 weeks to redo them to avoid damaging them. My results speak for themselves! Im not wearing mascara in any of the pictures. Do it yourself and get it done right for a fraction of the price. However, there is a LEARNING CURVE. Here's what I learned from using the kit: 1: the glue worked fine for me. In fact, it was too sticky. For those who say the glue doesn't work: oil on your lids or your lashes will make it not stick. Wash your eyes and lashes before using the kit. Wash your hands as well. I don't have oily lids at all, so I think that's why it worked well for me. But in order to remove the glue, I often had to use oil cleanser—which again suggests that oily lids/lashes will make it not stick. 2: apply the glue to the pad as well as your lid before sticking it down. Make sure it's applied perfectly before continuing. I had to re-stick it down a few times to make sure it was flush with my lash line, glued down at the corners well, etc. 3: The glue application is the MOST IMPORTANT PART. However you glue the lashes down will be how it perms, so if it looks bad, then redo it. I ended up having to take my lashes down, take off the pad, washing my lashes with oil cleanser then traditional cleanser, letting it dry, then starting all over again TEN TIMES across both eyes. No joke. I did it because the glue worked REALLY well for me and glued down like cement before I could fan my lashes out. This lead to my lashes clumping or laying in weird curves, but I couldnt separate them bc they were already glued together or glued down, etc. Be open to redoing it in order to get the best result! It was tedious but you don't want to end up with wonky lashes for 8 weeks that mascara and a lash curler can't fix. 4: the best way I found to press the lashes to the pad is: apply a generous amount of glue to the pad, then brush my lashes up with the spoolie in a combing motion, pressing down underneath the spoolie (at base of lashes) with the tiny applicator. Press applicator gently up lashes, starting at root moving to tip. The tiny little applicator gives the precision you really need to make sure the lashes are separated. If the applicator becomes sticky, it helped to kind of press and roll up the lash until I got to the end of the pad; then I could pull it off without pulling my lashes off at the same time. Repeat this motion on the same section until all the hair is pressed down. This ensured my lashes were fanned out and separated instead of clumped together. Some hairs won't stick down in time; reapply glue as needed in spots that need it; keep brushing with the spoolie and pressing down with the applicator till it sticks. Note: The y applicator is complete garbage; it didn't comb my lashes at all, so they clumped like crazy. I looked like SpongeBob. 5: after all your lashes seem glued down: no they are not lol. Do a second coat of glue in spots as needed, brushing lashes and pressing down with applicator to get those few random lashes that didn't get pressed down. 6: under eye pads just stabbed me in the eye. I didn't use them and didn't get solution in my eyes. I think if you cut them to fit, it'd work, but I don't know how to do that lol. I ripped them off every time I tried to use them. If you can use them, that's obviously preferable and power to you! 7: once your lashes are glued down, you're in the home stretch! Make sure they are CEMENTED to the pad. Glue is your friend. 8: have Saran wrap ready. Apply perm solution (I feel like I was pretty generous and really tried to glob it on cuz I know my lashes are STUBBORN); try to apply it to base and mid lengths without going to tips. Some of my lashes came unstuck at this point, but 95% were still stuck down. I think if id stayed away from tips and glued down better, no lashes would have moved. 9: apply Saran wrap to lashes: press down, then kinda pull up so the Saran wrap is pulling lashes up. This can help any hairs that became unstuck. 10: PRESS YOUR PALM TO EYE WHILE IT ACTIVATES. The heat helps I swear! Especially if you have stubborn lashes. 11: Wait the full 10 min if you have stubborn lashes. I kept my palm on my eye the whole time. No regrets. 12: take off Saran wrap, wipe off solution with cotton swab without moving lashes, then apply fixing solution. THIS IS WHAT LOCKS THE HAIR IN PLACE. Whatever shape your lashes are in with the fixing solution is how your lashes will look! So again, apply generously to your still-cemented lashes, apply Saran wrap by pressing and pulling up, keep your palm there for 10min, and relax. 13: wipe off solution, and you're in the home stretch! Apply tint now if you want to—that part got in my eye, so thats why my eye is red and irritated in my after pic. Apply nutrition coat, wait five min, then clean it off with cleanser (step 4). Press a cotton round (or toilet paper lmao) into your lashes gently to dry. Fan with spoolie to see your results ✨️ 14: SUPER SUPER IMPORTANT: you need to make sure you REALLY clean off the glue at the end! If you have leftover glue in your lashes, the fixation solution can stick to it, and IT WILL KEEP CURLING YOUR LASHES! You don't want that! Take your time and REALLY clean your lashes with the solution provided. I think part of why my lashes overcurled is because I didn't do a good job of this on one eye. Overall: big learning curve but AMAZING results. I'll be a repeat purchaser of this kit. I was considering using lash serums (like latisse) cuz I wanted my lashes to look fake and touch my brows. This lash lift kit gave me the exact effect I was looking for, no lash serum needed! ... show more
Reviewed in the United States on October 12, 2023 by Becca Becca

  • Work in small sections
Best tip I can give is to work in small sections when applying the glue and lashes to the pad. It’s SO much easier than trying to get all of your lashes arranged nicely before the glue dries. Also, do NOT over process! I’ve found that the shortest time works just as well and doesn’t cause breakage. The one time I left them to process for the longest suggested time, my lashes became brittle and broke off. I’ve used my kit 3-4 times and could easily use it again. ... show more
Reviewed in the United States on December 9, 2024 by Krista Krista

  • Añlergy
Does the job but the first few days I get an allergic reaction
Reviewed in the United States on December 5, 2024 by Elisa Navarro

  • The real deal
Watch a tutorial on YouTube before you start. I referenced it often. My lashes came out great! Take your time and don’t rush or be stressed. Glue your lashes down as much as you can. I realized the tops of my lashes during applying next steps and was glad I did!
Reviewed in the United States on December 10, 2024 by Amazon Customer

  • So bad
My lashes are long and have layers - maybe this is best for people with shorter eye lashes idk. I’m so bummed. I do everything my self at home and never had such a bad outcome with a product! I followed the directions, I watched YouTube videos. The problem is the actual product. And the lack of instructions. The under eye pads only got in the way & irritated my eyes. The silicone lash lifter does NOT stick onto your eye lid. No matter the amount of the glue. I saw that in previous reviews but just thought they were doing something wrong. I tried over and over and over using different techniques. The brush given to lift ur eye lashes onto the lifter is pointless. I ended up using my fingers. The perming serum smells sooo bad. I think it’s also the reason my eye lid is still swollen, 14 hours later. I did NOT get it on my skin either. However there’s no direction telling us how much to use. Maybe I used too much? Idk There’s no direction on how much to use of any of the products !!! (aside from the glue but the glue sucked, they advise to use a small amount & wait 30-60 seconds. That didn’t show any better results than doing it right away or waiting for over 60 seconds. The way they advise to remove the extra product between steps is useless. The “cleaning tool” might as well be thrown away when you open the kit They also tell you to use plastic wrap to set on your lashes in between steps - they don’t provide you with it ! I didn’t understand the point of it. It was just another pain in the ass. I gave one star because the idea of the kit is good. The products just suck. My lashes are slightly lifted today. Not worth the swollen eye lid. My curler does it better. Don’t buy, find a different kit w better reviews or buy your own products separately All you’d need is 1) the lash lifter 2) lash glue 3) perm solution 4) something to nourish them after 5) whatever tools you’d find helpful - prob cotton swabs would be best ... show more
Reviewed in the United States on September 17, 2023 by Taylor Taylor

Can't find a product?

Find it on Amazon first, then paste the link below.
Checking for best price...