Search  for anything...

Gila Heat Control 3-in-1 Adhesive Residential DIY Window Film Sun Blocking Glare Reduction 3ft x 15ft (36in x 180in)

  • Based on 374 reviews
Condition: New
Checking for the best price...

Buy Now, Pay Later


As low as $8.33 / mo
  • – 6-month term
  • – No impact on credit
  • – Instant approval decision
  • – Secure and straightforward checkout

Ready to go? Add this product to your cart and select a plan during checkout.

Payment plans are offered through our trusted finance partners Klarna, PayTomorrow, Affirm, Afterpay, Apple Pay, and PayPal. No-credit-needed leasing options through Acima may also be available at checkout.

Learn more about financing & leasing here.

Selected Option

Free shipping on this product

30-day refund/replacement

To qualify for a full refund, items must be returned in their original, unused condition. If an item is returned in a used, damaged, or materially different state, you may be granted a partial refund.

To initiate a return, please visit our Returns Center.

View our full returns policy here.


Availability: In Stock.
Fulfilled by Amazon

Arrives Monday, Sep 15
Order within 20 hours and 17 minutes
Available payment plans shown during checkout

Size: 3ft x 15ft


Features

  • SIZE: 3ft x 15ft
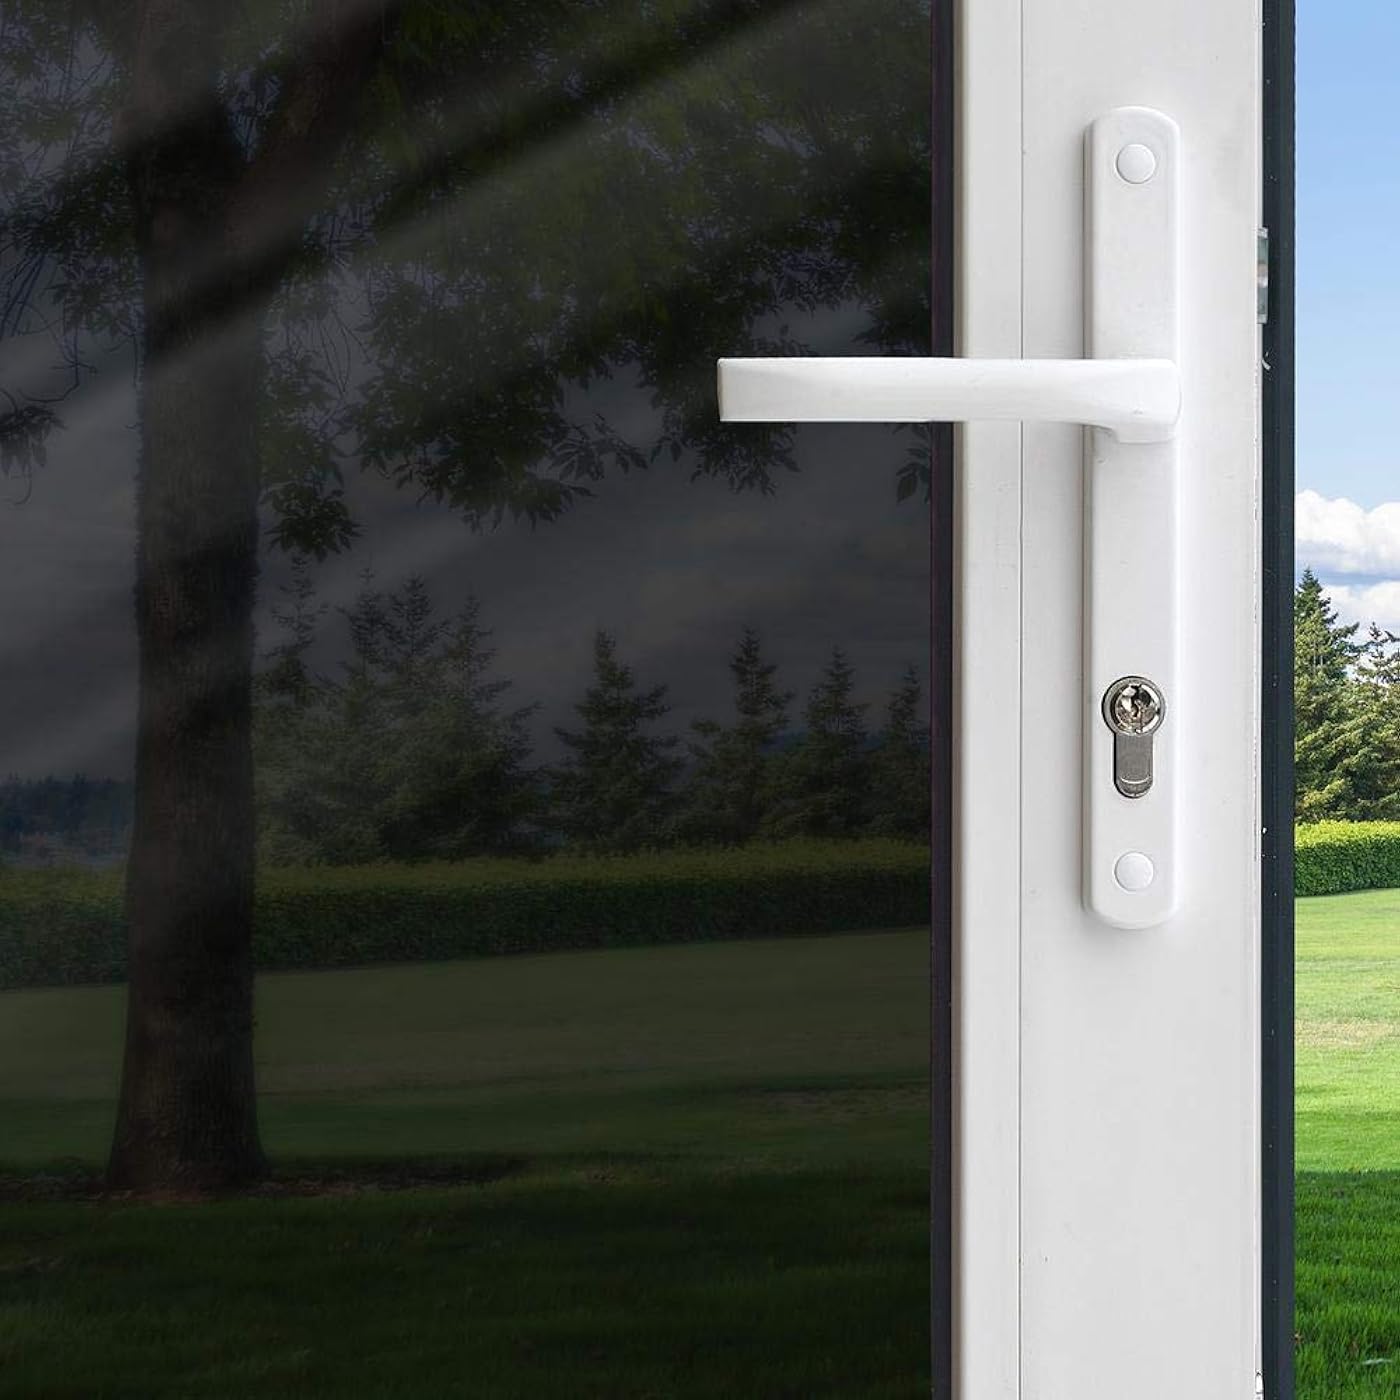
  • ADDS COMFORT & EFFICIENCY: Rejects up to 59% of total Solar Energy and reduces glare up to 72%, making interiors cooler and more comfortable
  • PROTECTS INTERIORS: Blocks up to 99% of UV rays, helping to keep your interior from fading.Suitable for curved surfaces
  • EASY INSTALL, LASTING RESULTS: Durable adhesive material is easy to handle and firmly sticks to windows for ongoing benefits
  • NEARLY INVISIBLE: Our best optical clarity as compared to other Gila Heat Control window films
  • LOW REFLECTIVITY: Ideal for homeowners or associations that prefer a non-mirrored exterior look
  • INSTALLATION TOOLS SOLD SEPARATELY: Gila complete window film installation kit (item RTK500) is recommended to complete your DIY window film project needs

Description

Gila® 3-in-1 Heat Control Window Film is an intelligently-designed heat control window film that will transform your windows. It combines advanced heat- and glare-rejecting technologies with low-reflectivity material to create a product that is effective and nearly invisible. This adhesive-based film is engineered to provide a fast, easy installation that adheres firmly to flat glass surfaces. No need for professional installers—this film is hassle- free and perfect for DIY (Do It Yourself) projects. The film reflects UV rays while allowing in natural light and maintaining your view of the outside. It’s energy-efficient, too. Blocking heat can lead to lower cooling costs and increase comfort in rooms with direct sunlight.

Material: Plastic


Brand: Gila


Color: Nuetral


Size: 3ft x 15ft


Product Dimensions: 180"L x 36"W


Installation Type: Static Cling


Ultraviolet Light Protection: Yes


Number of Items: 1


UPC:


Global Trade Identification Number: 07


Material: ‎Plastic


Brand: ‎Gila


Color: ‎Nuetral


Size: ‎3ft x 15ft


Product Dimensions: ‎180"L x 36"W


Installation Type: ‎Static Cling


Ultraviolet Light Protection: ‎Yes


Number of Items: ‎1


UPC: ‎733169853926 045162488907


Global Trade Identification Number: ‎07


Manufacturer: ‎Eastman Performance Films, LLC


Unit Count: ‎45.0 Square Feet


Part Number: ‎50167279


Item Weight: ‎1.15 pounds


Country of Origin: ‎USA


Item model number: ‎50167279


Is Discontinued By Manufacturer: ‎No


Style: ‎3-IN-1 Heat Control


Pattern: ‎Window Film


Item Package Quantity: ‎1


Included Components: ‎Installation Instructions (Wound Inside Roll), Window Film


Batteries Included?: ‎No


Batteries Required?: ‎No


Warranty Description: ‎2 year limited warranty.


Date First Available: June 10, 2016


Frequently asked questions

If you place your order now, the estimated arrival date for this product is: Monday, Sep 15

Yes, absolutely! You may return this product for a full refund within 30 days of receiving it.

To initiate a return, please visit our Returns Center.

View our full returns policy here.

  • Klarna Financing
  • Affirm Pay in 4
  • Affirm Financing
  • Afterpay Financing
  • PayTomorrow Financing
  • Financing through Apple Pay
Leasing options through Acima may also be available during checkout.

Learn more about financing & leasing here.

Top Amazon Reviews


  • Great value for keeping hot weather outside.
Size: 3ft x 15ft
I have some pretty large windows in the bedroom of my apartment, and they face the sun during the hottest parts of the day. Before I installed these, the heat was really becoming an issue during the afternoon, even running the air conditioning throughout the apartment. I live in Texas, and anything you can do to help reflect the sun's heat is worth every penny. Trust me, you'll spend this much money extra, every month on your electricity bill cranking that A/C. I first went to Lowe's to check out this brand of window film, and it was one of the only brands they carried. They didn't have this specific 3-in-1 heat control film in stock, and it was a little bit more expensive that on Amazon. One thing I do highly recommend, is be sure to check which version of the window film you're buying is the one that suits your needs. The privacy one will darken your windows, but it's not as reflective, and doesn't keep out UV sunlight as well as the 3-in-1. Just look through their different film options, because they do offer different films for different purposes. The kit has everything you need to install the film. Our windows were pretty dirty, and I made sure to clean them THOROUGHLY before applying the film. Unless you like the look of bubbling window tint, cleaning your windows is a must. I took a straight razor blade to the window to get stuck on gunk & paint splatter off; that window cleaner couldn't do by itself. If you really wanna go the distance, you can get packing tape to remove any left over dirt, debris, or fingerprint oil/residue. The cleanliness of your windows is the biggest determining factor of how well the window film will apply, and how long that film will last. This window film from Gila will literally last years of grueling sunlight & heat if applied properly the first time. Measuring your windows & cutting the window film appropriately is one of the harder parts of the application. Having a large, hard flat surface like a kitchen table or desk is one of the best options. When you cut the film, don't use your exact window measurement. Leave a couple inches extra space when you cut the film, so that way when you apply it, you can trim the excess. For example, if my window is 24" x 60", I would measure the film & cut it to be 25-26" x 62". This will give you plenty of room for error, so you can trim away any film that overlaps your window. This little trick is what Gila recommends, and it will help save you from having to re-apply the window film if you don't get it perfect the first time. I forgot to mention, Gila sells their own branded kit for applying this window film. The window film itself is just that. The Gila kit that is sold separately comes with a spray for applying the film to your window, a cutting tool for trimming the film, and a plastic straight edge tool for smoothing out any bubbles after the film is applied. If I'm not mistaken it also comes with a lint-free cloth for wiping off the excess liquid from spray. I bought this kit for the window film I used on my windows, and I highly recommend buying it as well. I used every single item from the Gila window film adhesion kit, or whatever its called, and it made the whole process much easier. When you've measured & cut the film like a recommended before, and you're ready to apply to your immaculately clean window, make sure to use the long straight edge to line up with either the left or right side of your window. This will be the edge that you did not cut, so it should line up perfectly with the length of your window. Once you've removed the plastic sheet on the sticky side of the window film, Gila recommends using their spray liberally on BOTH sides of the film. Watch the videos Gila has on their website, or on YouTube if you're confused about what any of this means, especially if you're DYI'ing it, and this is your first time applying window tint. The static from the window film helps it apply flat & seamlessly to your window once you're ready to apply. You've already used the Gila spray on the sticky side that applies to the window. There will be a few air bubbles, but as long as there's no massive air bubbles you should be fine. The biggest thing you want to avoid is any folds or creases when applying the film. This can be a little tricky around the corners of the window, especially with the excess film on the sides. Use the cutting tool to trim the excess, and you should have a nice smooth application of the window film. Use the plastic straight edge tool like in the videos to smooth out any bubbles or liquid from the spray. Using the Gila spray bottle on the outside (the non-adhesive side) of the window film helps when you're smoothing out the remaining air bubbles. Also, a helpful tip: smoothing out any remaining air bubbles can take some time depending on the size of your window, and how thorough you are with applying the film. Even once you've got all the air bubbles out, there will still be some spots on the inside of the window film. These look like air bubbles, and people often confuse this with not applying the window tint correctly. These flat spots are because the window film has not completely cured yet. Not sure if 'curing' is the best word, but I spent a long time trying to get all the air bubbles out when I did this. Those little spots WILL go away after a day or two, once the liquid spray has completely dried, and the window film has had time to 'cure', and adhere properly to the window. Don't tear the window film off and re-apply, because of little tiny round spots. If you smoothed out all the air bubbles correctly, these little round spots will go away. I don't know if Gila recommends it, but using a hair dryer or heat gun could help the window film cure to your window & adhere quicker. I didn't need to do this personally, but I'm sure a little light heat from a hair dryer wouldn't hurt. I know that was a lot to read, and if you're as OCD as I am, then you probably read all this before starting your window film project. Even if you just hit the main points, you should get a really nice application. My windows look so great, you can't even tell there's window tint on them. It literally looks seamless, like a dark window. I can't emphasize how well these work. Even during the hottest parts of the day, my room stays relatively cool, and I can definitely say its a lot better than before the window film. Gila is a great brand, I haven't used their car tint, so I can't say much about the durability to the elements, but for your average in home use, this film holds up. TL;DR, buy the window adhesion kit from Gila that is sold separately, I think its around $20. Watch the videos from Gila on YouTube about how to apply the window film, properly. You should be able to do yourself no problem. Measure twice, cut once! Having an extra person lend a helping hand is also a huge help. Hope this works as well for you as it did for me. If you need to keep the heat out of your apartment or house, this 3-in-1 Gila window film is worth every penny. ... show more
Reviewed in the United States on August 3, 2020 by Michelle w.

  • You can do 7' tall windows yourself with these tips
Size: 3ft x 15ft
I put up 5 rolls up this on 7' tall windows starting with their instructions but throwing away most of their advice as I learned what worked and didn't and I mastered doing it by myself. The material itself is good and this 3-in-1 is the same as sold at Lowes as "Heat Control". It's the only of theirs that doesn't look like a mirror and I needed it for a condo. Here are the challenges with this material: - it will stick to itself all too well, that's why they want you to spray the backside (non adhesive) - the top & bottom will peel off the window and stick to itself for about 10 minutes after application. You have to keep applying some type of pressure. - carrying around long lengths of this is extremely problematic without hitting anything and will cause a divorce if you try to get your wife to help - cutting the edges after you apply it will result in rips, uneven lines, unsightly gaps, and is just plain hard to do. This is much harder if you have a commercial type window where it's inset by as much as an inch. - the material will crease extremely easily - always remove the liner holding two points and keeping it taut. - even the slightest bit of paint or dust will cause an unsightly bubble. Clean thoroughly although I found the razor blade was overkill unless there was paint or caulk involved. Keep your working table and both sides of the film clean as dust will transfer. My first advice is to cut it to your exact needed size before you apply to the window. This is actually much easier to do than cutting it on the window. For a 7' window I couldn't lay it all out so I rolled up either end and worked on one piece at a time. Follow their instructions on using tape to secure the top & separate the liner. But every piece of tape you apply, fold back both ends because when doing it by yourself you don't have enough hands to use 2 to remove the tape so you want an easy grip from whatever end is easiest. Also, make your tape pieces long - longer is better like 2" because having it come off prematurely can be very tricky by yourself. If you have a large window that's too large to easily carry, don't remove the entire film. Just remove the top 2' and use scotch tape to hold the roll. Use at least 2 pieces on each end because having it unroll on you can be a disaster. Be careful to keep both sides of the entire length clean - don't let it touch the floor during cutting. Even though the dirt gets on the film that is thrown away, the dirt will transfer to the window especially if you're doing it yourself. I followed their DIY instructions of 1/4 tsp johnson's baby shampoo to a quart of water and it worked great. Get a BRAND NEW smaller size squeegee and do the center first, then work to the sides. Longer squeegees are difficult to apply even pressure required for a perfect job. Do only the top 2 feet first and make absolutely sure it's aligned properly so that when you unroll the rest it will be lined up. After you get the water out you can't squeegee it dry so you switch to a microfiber and a stiff edge. I found a painting tool at the dollar store that was about 12" x 6" and perfect. You wrap the tool with a fine microfiber towel and can use this to "squeegee" once the window is dry. In my situation I was applying to commercial windows and "Nanawall" doors. I realized late into the game that the black weatherstripping around the edges is actually easy to remove. This was crucial to making it easy. With the weatherstripping removed I could extend the film past the weatherstripping to make it invisible, but still allow for expansion/contraction. I realized this when I examined windows in our common areas that were professionally done. After you've got the top 2' sticking and dry, apply a few pieces of scotch tape to keep them from peeling. In my situation I could also put the top weatherstripping back to secure it. Now spray the rest of the window with as much water as it will hold. You have to do it more because normally you'd spray both the window & backside but you won't be able to get at the backside. Remove the tape holding the roll and carefully peel off the liner using the tips of your fingers while bunching up the liner in your palms. Do it evenly because the slightest crease on the film will show and can't be removed. You can easily pull up and release to remove any large bubbles. Doing it this way is much easier to remove all the bubbles before you begin than to just slap it all up there. Once it's all on there use the squeegee and dry microfiber cloth again doing the center first and then outward. For some reason the left & right edges never peel away. But the bottom edge will again want to peel away so use tape and keep using the microfiber every few minutes until it's completely dry. Don't do this in full sunlight - the window will dry too quickly. Do it in the morning / evening / wait for a cloudy day. ... show more
Reviewed in the United States on December 11, 2020 by On The Water

  • Great buy!
Size: 3ft x 15ft
Goes on easy and stays on. Blocks a lot of light!
Reviewed in the United States on June 8, 2025 by Josh

  • Works great to keep room cool - use lots of solution to install!
Size: 3ft x 15ft
Heat control in the room we installed it in is outstanding. We have 5 floor to ceiling windows in our family room and the afternoon sun made the room hot. We installed blinds and blackout curtains to keep the room cool but disliked how closed off it felt. After installing this film, we don’t even notice if the blinds are open. We have several more west facing windows we plan to apply this film to. I’m confident that the savings on our AC bill will more than make up for the cost of the film. Super happy with the product. It took us a couple of tries to get the installation process down. We ruined one (large) window worth of film by removing all of the backing at once. It folded on itself before we applied any solution and became a wrinkled mess. We removed about 12 inches at a time on the second attempt and got a wrinkle that we were unable to work out. The third time was the charm - we figured out that removing most of the backing material on our 68 inch tall window film made it a snap. Leaving some backing at the bottom kept the film from folding on itself. We sprayed LOTS of solution (or water if we didn’t have solution) on the window and the back of the film. Working the bubbles out was simple. Once we got the hang of that, each floor to ceiling window took about 15 min. ... show more
Reviewed in the United States on July 4, 2022 by mattyfaulk

Can't find a product?

Find it on Amazon first, then paste the link below.
Checking for best price...