Search  for anything...

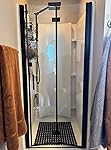
ELEGANT Semi-Frameless Pivot Shower Door 36 in. W x 72 in. H, Pivot Swing Shower Doors with 1/4 in. Clear Tempered Shower Glass Panel in Matte Black, Bathroom Glass Shower Door

  • Based on 267 reviews
Condition: New
Checking for the best price...
$227.99 Why this price?
Save $42.00 was $269.99

Buy Now, Pay Later


As low as $38.00 / mo
  • – 6-month term
  • – No impact on credit to apply
  • – Instant approval decision
  • – Secure and straightforward checkout

Ready to go? Add this product to your cart and select a plan during checkout.

Payment plans are offered through our trusted finance partners Klarna, Affirm, Afterpay, Apple Pay, and PayTomorrow. No-credit-needed leasing options through Acima may also be available at checkout.

Learn more about financing & leasing here.

Selected Option

Free shipping on this product

30-day refund/replacement

To qualify for a full refund, items must be returned in their original, unused condition. If an item is returned in a used, damaged, or materially different state, you may be granted a partial refund.

To initiate a return, please visit our Returns Center.

View our full returns policy here.


Availability: In Stock.
Fulfilled by Elegant Home Supply

Arrives May 23 – May 24
Order within 5 hours and 5 minutes
Available payment plans shown during checkout

Protection Plan Protect Your Purchase
Checking for protection plans...

Material Type: Pivot Door


Size: 36'' x 72''(Matte Black)


Features

  • Pivot Swing Shower Door: 36" W x 72" H. Walk-in Opening: 29 in. Hardware Finish: Matte Black. Single panel swing shower door fits your small bathroom design better
  • Flexible and Space-Saving: The semi-frameless shower door glass panel can swing outward up to 90 degrees, good flexible shower door for small spaces
  • Safety Clear Glass Shower Door: 1/4 inch (6mm) clear tempered glass shower panel - ANSI Z97.1 certified, not easy to break
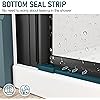
  • Great Waterproof Seal Strip: Seal strip on both sides of the glass. Magnetic strips are placed in the seal strip to strengthen sealing, prevent water leakage effectively, keeping your bathroom always tidy and clean
  • Humanized Design: Stable pivot shower door width can be adjustable from 35.5 to 37 inches, adjustment width of 19 mm on each side. The panel of the elegant shower door swings to one side to create an ample walk-through while saving space
  • Easy to Install: Pivot swing shower door is reversible for right or left door installation. Professional installation recommended

Brand: ELEGANT


Color: Black,Clear


Material: Pivot Door


Style: Modern


Item Weight: 64 Pounds


Brand Name: ELEGANT


Manufacturer: ELEGANT


Model Number: FP36-CO


Item Type Name: shower door


Color: Black,Clear


Style Name: Modern


Item Weight: 64 Pounds


Required Assembly: Yes


Material Type: Pivot Door


Frequently asked questions

If you place your order now, the estimated arrival date for this product is: May 23 – May 24

Yes, absolutely! You may return this product for a full refund within 30 days of receiving it.

To initiate a return, please visit our Returns Center.

View our full returns policy here.

  • Klarna Financing
  • Affirm Pay in 4
  • Affirm Financing
  • Afterpay Financing
  • PayTomorrow Financing
  • Financing through Apple Pay
Leasing options through Acima may also be available during checkout.

Learn more about financing & leasing here.

Top Amazon Reviews


  • First plan and think on your own, ignore parts of the manual, and voila, this thing is FANTASTIC!
Material Type: Pivot Door Size: 32'' x 72''
Don't be fooled; this is an absolutely beautiful and top-notch shower door that will look hotel-quality professional if you install it right. Reading through the reviews, there are a lot of complaints about the unit not fitting, being difficult to install with one person, the door not sealing, etc. These complaints have nothing to do with the hardware itself but the somewhat vague installation instructions and some specific steps in the manual that just don't make sense. In fact, they make the install far more complicated and the results far less than professional than they should and will be with just a little thinking and planning of your own, ignoring what the installation guide tells you. I've never installed a shower door before and the entire installation took me around five hours if I totaled up all of the little tasks I did over the course of a weekend. To do the installation right, you're going to ignore what the manual says about doing all of the caulking at the END of the installation. No, you're going to want to do the caulking more or less at the very beginning and then give everything at least 24 hours to fully cure and seal up BEFORE you start futzing around with the actual door, sizing the remaining pieces, and putting weight and stress on the whole assembly. These steps will not only save you time overall but will give you a much, much better watertight seal on everything and ensure that the shower door is completely level and sealed completely on all three sides. It also makes it easy to do the entire job by yourself: 1. Follow the initial installation instructions for installing the trim rail that goes against the tile wall and will ultimately hold up the hinged side of the shower door. Drill the holes that they tell you into the tile wall of the shower, make sure everything is perfectly level, and mark where the rails are going to go on the wall. Just trace each side with a pencil or whatever once you get the holes drilled and everything lined up. 2) Now ignore the installation manual. Don't screw the railing into the wall as they tell you. You'll do this shortly but not yet. FIRST, get the best 40-year mold resistant waterproof silicone caulk you can get at Home Depot or wherever. Don't get the clear stuff-it should match the color of your tile walls, which is usually just going to be white. The good stuff is usually around $12-15 per tube. 3) Lay down two nice thick beads of the caulking on the backside of the railing that's going to go against the tile wall. Lay each one down about 1/2" from the edge of the railing, so you'll have two beads running top to bottom all along the entire backside length of the rail. 4) Now, gently put the railing up against the wall, line it up with the pencil lines or whatever you did to mark the proper location, and then gently press and wiggle the rail tightly up against your tile wall. The two caulk beads are going to squish out all along both sides of the rail. 5) NOW it's time to put the screws in and tighten the railing against the wall. You've now created a uniform, 100% watertight seal behind the entire length and width of the railing; you've also distributed the very heavy weight of the door that's about to go up along the entire length and width of the railing, as opposed to just behind held up by the four screws they tell you to use. The rail is now way stronger and 100% waterproof on all surfaces, PLUS you don't have to go back and try to do perfect caulk lines at the end of the project. 6) Once you've fully tightened your screws and made sure the rail is in exactly the right position, you can clean off all of the excess caulking on both sides and then make it look absolutely perfect with a bit of soapy water at the very end. The caulking will be all but invisible at this point, but you'll know that it's 100% sealed on every single surface behind the railing and against the wall. You've now created the most professional-looking caulking job possible, all the while creating a much stronger overall mounting bracket for the heavy door that's about to come. 7) Now the most important part-- STOP WORKING, BE PATIENT, AND DON'T TOUCH ANYTHING FOR 24 HOURS. Let the caulking fully and completely cure before you do anything else. 8) The next day, you can then continue with what the manual tells you and get the door in to place, measure out the remaining railings, and get everything lined up perfectly. This process will be so much easier now as you have a rock-solid mounting rail that's locked into place on the tile wall. 9) Put the door-hinge railing into place and then get the door perfectly level. Tape it into place temporarily with a bit of duct tape or similar at the top and bottom. Now go over to the opposite side of the door and do all of the measuring and alignment for the two rails on that side. Repeat that basic step of coating up the stainless steel with caulking and putting them into place BEFORE you tighten down any screws into the wall. This makes the joint waterproof, super strong, beautiful and professional, and saves you the time of trying to caulk everything at the end of the project. 11) After you line everything up and get the door in exactly the position it's supposed to be and the railing on the opposite side that you'll attach to the wall, TAKE THE DOOR OFF, do the caulk-sealing procedure on the railing that goes on the opposite side of the wall you did yesterday, screw it into the wall, clean up the caulking before, and then once again STOP WORKING, BE PATIENT, AND DON'T DO ANYTHING FOR 24 HOURS. 12) Then the next day, all you have to do is hang the door back up in position on your now super-strong mounting rails that are 100% waterproof and already caulked. Finish up on the opposite side where nothing has to bear any weight and make sure the door is perfectly level and that the seals are perfectly aligned on the opposite side of the door, as well as underneath. 13) Now it's finally time to drill your holes and secure the door-hinge railing inside the wall-mount railing, but don't forget to caulk it up first so that it's got a completely waterproof seal INSIDE AND INBETWEEN those two railings you're about to stick together. Use clear silicone and not the white stuff from before. You only want to use the white stuff for where the stainless steel meets your white tile wall (or whatever other color). You want the caulking used when joining two stainless steel pieces to be clear and invisible. Do the same clear-caulking as you align the two rails on the opposite side of the door, screw them together in a couple of spots and you're done! Let everything dry for 12 hours ideally from that point. OTHER HOPEFULLY HELPFUL TIPS: The instructions tell you to "snap" the metal railing that has the door hinge into the metal railing that you mount to the tile wall. 1) it doesn't snap in the first place; it just fits inside the wall railing so don't be confused by that and 2) THE IMPORTANT TIP-- the door-hinge railing doesn't have to go ALL THE WAY INSIDE THE WALL RAILING. This is super important if the whole assembly seems to be a little too narrow for your shower opening. You can get another 1/2" or so in width by only placing the door-hinge railing PARTIALLY inside the wall-mount railing. Once you get the right width, then go ahead and drill the holes for the screws and remember, CAULK EVERYTHING FIRST before you actually tighten down the screws. This tip is also how you deal with a tile wall that isn't perfectly straight or level. See the pictures in my review. My wall wasn't straight to begin with so the opening at the top was a little over 33" but at the bottom it was about 32 1/2". There's lots of extra room to work with when you put the door-hinge railing into the wall railing or when you put the two railings together on the opposite side, so use all of that leeway on both sides to get the door perfectly level and the width of the whole assembly perfectly aligned, even if your walls are way out of level like mine were. I ordered the 32" model of this assembly. The opening for my shower was just over 33" and I had no problem making the assembly that wide to fit properly. ... show more
Reviewed in the United States on August 4, 2024 by Doug Colt

  • Bifold Shower Door That Transforms the Space
Material Type: Bifold Pivot Door Size: 32'' x 72''(Matte Black)
Purchased a DIY bifold shower door and couldn’t be happier. Installation was straightforward, and once in place, it feels solid with no wobble. The trim and glass quality are excellent, giving the door a sleek, modern look. It completely transformed my older shower, making it feel like a major upgrade. Perfect for a small bathroom since it folds neatly into the shower instead of swinging into the room. I also paired it with a rainfall shower head, and once I swap the arm and knob to black, the whole setup will tie together perfectly. Definitely worth the investment. ... show more
Reviewed in the United States on August 16, 2025 by Grump

  • It makes a fiberglass shower look nice.
Material Type: Bifold Pivot Door Size: 30'' x 72''(Matte Black)
A good look, fits, quality seems good, sturdy, one man assembly without much trouble. Only problem I see is the bottom of the door doesn’t seem to close tight, but it never leaks. You can force it closed.
Reviewed in the United States on March 24, 2026 by John

  • The instruction, I mean, its together...and its awesome, but it was a fight
Material Type: Bifold Pivot Door Size: 30'' x 72''(Matte Black)
This is a beautiful door. It took 3 people to put it together and take it apart and put it together again. The room we were putting it in is only about 30 sq feet and 7 of those are the stall shower. we put the door together and went to hang it, realized it wouldn't open out and had to take it apart to put it together the other way to make it open into the shower instead. I was impressed that something so simple was mind bendingly difficult to put the moving pieces together in the right order in your head and then in real life. Definitely not a one person job, you need someone to hold the doors together while the other person screws together the hinges. But I love it, it make the tile pop in a way that a curtain would have ruined. I am so glad I bought this. ... show more
Reviewed in the United States on December 15, 2024 by QueenCashew

  • Not the easiest but not the hardest shower door I've installed
Material Type: Bifold Pivot Door Size: 30'' x 72''(Matte Black)
The product looks great and feels premium for the price. It's not gonna feel real sturdy if it's expanded to fit the max opening so I recommend getting one to fit with the minimum specs or make your shower walls meet the min spec if possible. As others have noted, read the instructions but think about what is really happening while doing so. The instructions suck and aren't really clear. If there are any pieces put together in the box, don't assume they really go together because that was the wrong thing to do in my case. I'm not even a brain scientist and I figured it out. I can definitely recommend this if you have limited space and want the flexibility of a bifold door. I'll update this down the road if I experience problems with durability. ... show more
Reviewed in the United States on May 10, 2025 by Josh Barrett

  • Too good to be true
These doors seemed, and unfortunately are, too good to be true. They have poor fit and finish overall. The bottom drip ‘rail’ plastic piece leaves a gap between the two panes of glass when in the closed position (water get through), the plastic caps for the side rails simply don’t work. If you want to use then you’ll have to use your own adhesive. The door hinges are very stiff. You don’t get a handle for the inside of the door, just a tiny knob. Makes it difficult to manipulate from inside. Just poor all around. Run away. ... show more
Reviewed in the United States on April 17, 2025 by Will Collier

  • Nice product but instructions are incomplete and vague
Material Type: Bifold Pivot Door Size: 30'' x 72''
Nice product but instructions are very vague and incomplete. Does not include necessary information about assembling so we ended up screwing and unscrewing parts and pieces to figure it out on our own.
Reviewed in the United States on March 20, 2026 by Rick

  • Beautiful Door 30" for our 36" shower.6
Material Type: Bifold Pivot Door Size: 30'' x 72''
Beautiful glass door. Exactly what we needed after installing our shower. We love it. We hired a plumber & carpenter to install our new shower and the door fit perfectly!!!! They assembled the glass door easily. The only negative is the seal below is not fitted so we have water seep through and flows onto the floor. We have to wipe after each shower. The home is built in 1993 so the foundation maybe why the glass door doesn't seal the bottom completely. ... show more
Reviewed in the United States on June 29, 2025 by GAIL 808

Can't find a product?

Find it on Amazon first, then paste the link below.
Checking for best price...