Search  for anything...

2 Pieces Runleader Small Engine Timer, Digital Tachometer, Maintenance Reminder, Battery Replaceable, User Shutdown, for ZTR Lawn Mower Tractor Generator Marine Outboard ATV (2)

  • Based on 4,078 reviews
Condition: New
Checking for the best price...
$24.55 Why this price?
Save $1.44 was $25.99

Buy Now, Pay Later


As low as $6 / mo
  • – 4-month term
  • – No impact on credit
  • – Instant approval decision
  • – Secure and straightforward checkout

Ready to go? Add this product to your cart and select a plan during checkout.

Payment plans are offered through our trusted finance partners Klarna, PayTomorrow, Affirm, Afterpay, Apple Pay, and PayPal. No-credit-needed leasing options through Acima may also be available at checkout.

Learn more about financing & leasing here.

Selected Option

Free shipping on this product

FREE 30-day refund/replacement

To qualify for a full refund, items must be returned in their original, unused condition. If an item is returned in a used, damaged, or materially different state, you may be granted a partial refund.

To initiate a return, please visit our Returns Center.

View our full returns policy here.


Availability: In Stock.
Fulfilled by Amazon

Arrives Tuesday, Sep 16
Order within 7 hours and 50 minutes
Available payment plans shown during checkout

Item Package Quantity: 2


Features

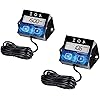
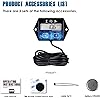
  • PACKAGE CONTENTS ---- 2 pieces hour meters, 1 large box containing 2 individually packaged hour meters, solving the need for maintenance of more than one engine.HM011F contains functions of tachometer, timer, service timer.
  • HOUR METER----when the engine is off, the display shows the total running time of the engine and remains visible. Total hours can be reset; 0.1 hour precision.
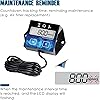
  • MAINTENANCE REMINDER----Programmable maintenance interval service timer (SVC), countdown to track service reminder time; when maintenance time is up, the service warning icon flashes to remind.
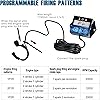
  • TACHOMETER----Accurately records the speed of the engine when it is running, helps to adjust the engine idle speed; can be programmed for different engine ignition modes.
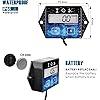
  • OTHERS----Easy to install; Contains detailed instructions for use; Internal replaceable CR2450 battery, data retention after battery replacement; operation button can be turned off, data retention after shutdown;2-year warranty.

Brand: Runleader


Material: Polycarbonate (PC)


Item dimensions L x W x H: 0.01 inches


Item Weight: 174 Grams


Manufacturer: Ningbo Jiangbei Run Leader Electronics Co., Ltd


Manufacturer: ‎Ningbo Jiangbei Run Leader Electronics Co., Ltd


Brand: ‎Runleader


Item Weight: ‎6.1 ounces


Item model number: ‎RL-HM011F


Batteries: ‎1 Lithium Metal batteries required. (included)


Manufacturer Part Number: ‎RL-HM011F


Date First Available: May 24, 2022


Frequently asked questions

If you place your order now, the estimated arrival date for this product is: Tuesday, Sep 16

Yes, absolutely! You may return this product for a full refund within 30 days of receiving it.

To initiate a return, please visit our Returns Center.

View our full returns policy here.

  • Klarna Financing
  • Affirm Pay in 4
  • Affirm Financing
  • Afterpay Financing
  • PayTomorrow Financing
  • Financing through Apple Pay
Leasing options through Acima may also be available during checkout.

Learn more about financing & leasing here.

Top Amazon Reviews


  • vey handy item
Item Package Quantity: 1
RUNLEADER Small Engine Hour Meter – A Must-Have for Every Small Engine! Wow—what an awesome little device! The RUNLEADER hour meter was an absolute breeze to install and works flawlessly right out of the box. This thing is a game-changer for anyone who wants to keep their small engines in peak condition. The maintenance setup is brilliant—it tracks your oil changes and other service needs with ease and even flashes to remind you when it's time for action. No more second-guessing or missed maintenance intervals. It takes all the guesswork out of the equation! But the real star? The built-in tachometer! Being able to monitor your RPMs means you can dial in performance and make sure your engine is running at peak efficiency and within safe limits. It’s an awesome feature, and for best results, I highly recommend double-checking the RPM readings against a certified meter during setup to fine-tune accuracy. I honestly couldn’t be more thrilled with this product. The install was quick, the display is clear, and the features are just what every small engine needs. I’ll be grabbing more of these for all my tools around the shop. Highly recommended—don’t think twice, just get it! ... show more
Reviewed in the United States on May 30, 2025 by Heidi Heidi

  • Effective, inexpensive and simple to install and use.
Item Package Quantity: 2
I was a bit hesitant to purchase these tacho/hour/maintenance reminder meters. I felt there was too much functionality for how they are priced. However, I really got tired to taking a stab in the dark as to when maintenance was required for my small engines on my portable generator and power reel mower. Now that they are installed I absolutely would not give them up - even if you're just looking at the engine speed. Setup: I used the adhesive backed hook and loop mounting arrangement that was supplied with the units. I didn't feel like drilling and tapping two small holes for the meter so I took the easier route. I cleaned the back of the meter with a pre-soaked (no alcohol - just soapy grease cutter version) shop towel and attached the fabric with the battery access cutout. It's 3M adhesive on the hook and loop so it's not coming off anytime soon. The coin-cell battery is preinstalled but you have to unscrew the cover and remove the isolator (a piece of plastic) so the battery makes contact with the tabs on the circuit board. No different than replacing a coin battery for any other device except the packaged versions have a sticker you have to remove. Once it shows that it's on your ready to program. Programming: I didn't have to make any changes to the presets but don't assume you won't. It all depends on your engine and the instructions are pretty clear on how to cycle through the steps. I did play around with it a bit just so I don't have to pull out the instructions that I will eventually misplace or lose. But, take your time and you will be rewarded on the first try. Installation: I cleaned off a spot on my equipment and placed the other part of the hook and loop on an area where I could get to the unit without performing any acrobatics and unfolded the spark plug cable (you can use two methods for sensing the spark - I won't go into details here because it's clear in the instructions). I decided to use the "wrap around the spark plug cable method" because I didn't want to d**k around with the ignition coil. My method was to zip tie the meter cable to the housing part of the spark plug wire (the part that attaches to the plug) and then make 5 turns around the cable then zip tie the trailing end of the meter wire to the spark plug cable. Make sure your turns are tight around the spark plug cable and bunched together in one layer - take your time because making sure the induction lead (meter cable) is wound tightly is important. With a pair of diagonal cutters or very sharp scissors cutoff all but 2-3" of the trailing meter lead (just in case you have to redo it and need a little extra in the future. Operation: Nothing to it here. Once I started the engines the unit automatically started reading the speed in RPM - kinda nice to see when you haven't seen it before - it's the small things that excite me. I checked my instruction manual and the meter indicated what the manual stated - give or take a few RPMs but nothing major. For example, full speed on my generator engine is 3600 RPM. The meter was reading 3590 - 3610 RPMs. I consider that a success. Cleanup: I placed some zip tie bases in a couple of spots so the meter lead would stay clear from the hottest part of the engine. But, keep in mind it is an air cooled small engine (speaking only for my two) after all and they are built tightly with only a bit of space in order for the internal vanes to push air over and around the engine. In Closing: Nothing major to discuss here but keep in mind the following: 1. Take your time (it took me roughly 30 minutes for the first one and no more than 15 minutes for the second install), 2. If you know the characteristics of your engine program the meter prior to installing it, 3. If you can avoid it try to keep the actual meter away from the hottest parts of the engine, 4. Make sure your meter lead is tightly bunched and wound, in one layer, around the spark plug cable, 5. Start your engine and enjoy the view, and lastly, 6. Go enjoy a cold, frosty beverage - mine is 60% Simply Lemonade and 40% Gold Peak sweet tea - my version of an Arnold Palmer. ... show more
Reviewed in the United States on August 5, 2024 by Rama S. Rama S.

  • The unexplainable way to wrap the wire around the spark plug wire for consistent rpm readings
Item Package Quantity: 1
Seems to work okay. The instructions leave a lot to be desired. It's hilarious that the instructions suggest to add or reduce wraps around the spark plug wire in order to get the rpms on this gauge correct. It's like, I'm buying a tech because I don't know what the rpms are! Anyways, I struggled to get this installed and reading "correctly." It was installed on a tach-less 4 stroke fuel injected outboard boat engine. I knew the rpms should be around 725 in gear -- presumably in water. Out of water, the rpms should read a touch higher I'd imagine. One way I installed the inducer wire on this gauge had it reading 400ish. Okay, more wraps. A couple more wraps and it's reading 1200. Less wraps. Finally, it settled around 900. Turn the engine off, fire it back up, it's now 600. Wtf. I searched Google and YouTube for answers and it's hilarious how many people have these tachs installed and they're clearly reading the wrong RPMs. The chainsaw idling at 6000 RPMs? Yeah, it's wrong buddy. And worse, no one seemed to show how to wrap the inducer pickup wire around the spark plug wire. I was trying to start with the end of the wire and begin wrapping from there. I think that's where my troubles started. I ended up finding a completely unrelated short of a guy installing a tach-less hour meter on his dirt bike and how he did the wire is how I ended up doing mine. Pic related. I kept a long tag end. 5 wraps around the spark plug wire and pulled tight back onto itself. This seemed to provide the best and most consistent rpm reading. If the thing auto-off'd I'd give it 5 stars. ... show more
Reviewed in the United States on May 20, 2025 by Us Us

  • necessary tool to correct rpm
Item Package Quantity: 1
My mower's B&S 4.75hp Quantum engine has slowed down over the years. i bought and installed a new throttle spring but it seemed to be running extremely fast. So I bought this tachometer. With 5 wraps around the plug wire and programmed 1P2R, the new throttle spring produced 8, 040rpm. As per the instructions, some 4 stroke 1 cylinder engines will need to be programmed to 1P1R if the reading is inaccurate. After changing to 1P1R the rpms read 4,020. I then put the old spring back on and read 2,6030rpm, which indicates the apparent slow speed. So I put the new spring back on and bent the throttle spring tab to reduce the rpms from 4,020 to 3,160. The engine now sounds more normal and the mower cuts and mulches much better. B&S specs 3200rpm for this engine so I'm confident I now have the correct speed adjusted. I don't have a need for the hour meter, but am satisfied with the tach. I also appreciate the ability to manually turn the Runleader off and replace the battery when needed. ... show more
Reviewed in the United States on July 20, 2025 by daBrewer

Can't find a product?

Find it on Amazon first, then paste the link below.
Checking for best price...