Search  for anything...

Thermaltake Core P3 ATX Tempered Glass Gaming Computer Case Chassis, Open Frame Panoramic Viewing, Glass Wall-Mount, Riser Cable Included, Red Edition, CA-1G4-00M3WN-03

  • Based on 3,175 reviews
Condition: New
Checking for the best price...
$153.99 Why this price?

Buy Now, Pay Later


As low as $25.67 / mo
  • – 6-month term
  • – No impact on credit
  • – Instant approval decision
  • – Secure and straightforward checkout

Ready to go? Add this product to your cart and select a plan during checkout.

Payment plans are offered through our trusted finance partners Klarna, PayTomorrow, Affirm, Afterpay, Apple Pay, and PayPal. No-credit-needed leasing options through Acima may also be available at checkout.

Learn more about financing & leasing here.

Selected Option

Free shipping on this product

This item is eligible for return within 30 days of receipt

To qualify for a full refund, items must be returned in their original, unused condition. If an item is returned in a used, damaged, or materially different state, you may be granted a partial refund.

To initiate a return, please visit our Returns Center.

View our full returns policy here.


Availability: In Stock.
Fulfilled by Amazon

Arrives Saturday, Aug 9
Order within 10 hours and 35 minutes
Available payment plans shown during checkout

Color: Red


Size: ATX


Style: P3


Features

  • Panoramic Open Frame Design: Take advantage of full panoramic viewing to give an unrivaled chassis presentation
  • Go Vertical: Includes GPU Float bracket allows vertical mounting options for 2.5 slot GPU solutions; (TT Gaming Riser Cable Included)
  • Tempered Strength: 5 millimeter Thick Tempered Glass window protects and reduces noise for everyday use
  • 3 way Placement Layouts: Designed for Wall, Horizontal or Vertical layouts for desktop locations
  • Easy Access: Supports 2x USB 3.0, 2x USB 3.0 ports with HD Audio ports

Description

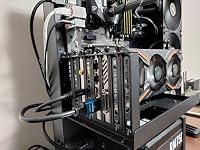
Take presentation to the next level with the Core P3 TG Open Frame chassis by Thermaltake. The fully modular design of the Core P3 allows flexibility for 3-way placement layouts (Wall mount, Horizontal and Vertical), dual GPU layout locations: Horizontal and Vertical (TT Gaming Riser Cable Included) and placement locations for Native AIO support and liquid cooling systems. Uncover greatness with the Core P3's panoramic viewing angle with its large tempered glass window to protect and present. Seeing is believing, the Core P3 TG brings the ultimate in PC hardware viewing wherever you mount or display..


Number of USB 3.0 Ports: ‎2


Brand: ‎Thermaltake


Item model number: ‎CA-1G4-00M3WN-03


Item Weight: ‎24.9 pounds


Product Dimensions: ‎18.5 x 13.11 x 20.16 inches


Item Dimensions LxWxH: ‎18.5 x 13.11 x 20.16 inches


Color: ‎Red


Manufacturer: ‎Thermaltake


Country of Origin: ‎China


Date First Available: ‎April 2, 2018


Frequently asked questions

If you place your order now, the estimated arrival date for this product is: Saturday, Aug 9

Yes, absolutely! You may return this product for a full refund within 30 days of receiving it.

To initiate a return, please visit our Returns Center.

View our full returns policy here.

  • Klarna Financing
  • Affirm Pay in 4
  • Affirm Financing
  • Afterpay Financing
  • PayTomorrow Financing
  • Financing through Apple Pay
Leasing options through Acima may also be available during checkout.

Learn more about financing & leasing here.

Top Amazon Reviews


  • Amazing Case and With Minor Flaws and HORRIBLE Instructions
Color: Black Size: ATX Style: P3
This case is a very well thought out design, with some minor flaws. I primarily bought this case as I wanted a new AIO now, but want to go custom loop later when I build a new system. This case seemed perfect for my current needs. PROS: - Great build quality: The entire case and glass is very well packaged to protect everything, and I didn't have a single flaw in my case. No scratched paint, dented sides, blemishes, bad threads, or anything like this. - Great cooling: I was worried that not having airflow across my motherboard VRMs would become a problem, but my temps have dropped a bit from my last case with a Cooler Master T4 Heatsink with Noctua NF-F12 120MM Fan that was paired with 4 120MM Rosewill case fans. Those four Rosewill fans are not longer used, so the heat just rises out with my setup. Mind you I am currently only cooling a 7700k at 4.5 GHz and a GTX 1080, but are not overclocked. - Design. Standing up this case looks great, but you could easily take off the side panel and metal rod mounts and set the case on its back and use it as a test bench. You can also mount it on a wall or to a desk with a VESA mount, but considering how heavy a full build is, I would never try it. - Glass: The smoked tempered glass is perfect. Acrylic is too cheesy for such a nice a build. - PCI-E Riser Cable: It works flawlessly with my GIGABYTE GTX 1080 WindForce 3X OC. I was no difference in 3DMark scores with it installed directly to the PCI-E slot or using the riser cable, so it appears I got a newer cable or got very lucky, as they are known to be a huge problem online. CONS: The Thermaltake website and spec sheets list full 420MM radiator support. While my Arctic Freezer II 420 mounted fine, the radiator cannot be mounted perfect. There is a support piece in the upper right front of the case that slightly blocks the top right radiator screw just enough that it forces you to drop the entire radiator down slightly. Once I got to the bottom I could not thread in the bottom two screws for my radiator as the holes didn't line up. They are correct on the case, but because the radiator had to be shifted down slightly it won't line up. I also had one screw right behind a USB 3.0 front header that I couldn't mount because the cable was perfectly in the way. I have 9 out of 12 screws mounted though, so I have no fear of the radiator coming off or sliding around. - Cable management: This case has so much room in the pack I was able to fit 2x 3.5" HDDs in the mount and randomly stuff 3x 2.5" SSDs in to the back with room to spare. - Pointless dust filter: If you use this thing for water, the dust filter in the back of the case becomes 100% useless. It would only protect the cable management area where drives are mounted anyways in an air setup, and that is with the flow backwards from looks the best. - Instructions: My god are the instructions useless. The diagrams are horrible and don't explain anything. They are useful for checking you got all your necessary hardware as it has a parts list, but beyond that they were more harm than good. I STRONLY suggest you watch multiple YouTube videos for the install, as I watched over 5 and not a single one got everything right. Watching those, along with the following tips will greatly help. ASSEMBLY TIPS 1.) If your motherboard has a CPU power connector up on the top of the board like most you need to remove the bottom HDD mount bracket from inside the case to run the cable behind it for better cable management. There are 4 screws for this on the motherboard side of the case. You don't need to remove the motherboard for this, there are two each side and that panel removes. I ran the cable underneath this bracket and reinstalled it. You can also do this without removing the bracket BEFORE you install your motherboard. 2.) If mounting GPU vertically, make sure you don't mount the power supply sideways, there are two PSU brackets included in the kit. You can install the PSU with the fan facing towards the glass, but only with a Micro-ATX board and no vertical mounting. The case has hardware to do it both ways. 3.) Make sure to attach the small support post to the power supply bracket BEFORE you install a power supply if you are going to install your GPU vertically with the riser cable. The power supply will block you from making this install. Use the flat screw designed to go into the recess on the PSU bracket so it mounts flat to your PSU. 4.) Be very careful with the threads. The case is very thick, but case steel tends to be very soft. Some of the powder coat is in the threads, so if you feel any resistance at all, back your screw out and check them. I ended up just slowly backing the screws out and back in a few times when I had this issue, and it only happened 2-3 times across the entire build. 5.) Carefully go through the hardware. There were 4 rubber plugs and washers that I thought were supposed to be anti-vibration mounts for a custom water pump, but they are actually rubber bushings and washers for the tempered glass panel. The plugs go into the glass to protect it, and the washers go on the thumb mounts for the glass. Totally protects the glass from any damage or vibration. Also make sure you are using the right screws for the right threads -- the manual is actual nice for this on the inside front pages, it lists how many of each screws or parts there should be -- but more importantly it lists exactly what it should be used for. You don't want to strip out a thread on this nice case. This case is my favorite I have ever had, and it is probably close to my 20th or so. I don't see myself needing a new case for a long time, and if I ever did change to a new one for any reason, this case would make a very good test bench, or maybe even a good closet wall mounted media server! ... show more
Reviewed in the United States 🇺🇸 on March 2, 2022 by khaosdvorak

  • Fantastic!! Thermaltake components had some flaws...
Color: White Size: ATX Style: P6
The machine looks AWESOME!!! Cools very well. And should be able to upgrade as much as my son will want to for years. This was a first build for my son and I. The case is huge!! and heavy!! This is great for building giving plenty of room for all components, wiring, and future upgrades. There were issues from a first time builder and someone that likes instructions.(please read below build list and issues) Maybe these are normal but seemed to be not normal for a beginner that reads instructions and tries to learn from other videos. And wants things to look the best the first try. Parts List: - Thermaltake Radiator TH360 ARGB Intel LGA1700 Ready All-in-One Liquid Cooling System 360mm, White (buying TT not best choice in hindsight! and will explain later) - Thermaltake Toughpower GF1 850W 80+ Gold SLI power supply for easy installation. (buying TT not best choice in hindsight! and will explain later) - ASUS Prime Z690-P Wifi ATX motherboard - 3 Corsair LL Series RGB LED Fans - 5 more 120mm Case Fans This was a fun experience with my son on his 15th birthday. Neither of us had built a computer and I wanted to ensure there was plenty of upgradability with the case and this was an awesome choice. We did have some issues with the build and wanted to mention them for any other newbies. IO Shield USELESS: As we started the build we had completed the motherboard and wanted to install the IO shield, not only did it not fit even after trimming the shield with tin snips once the motherboard was installed it was a half inch or so away from the back of the case which would have the cables nearly impossible to get fully connected. This was possibly my biggest issue with the entire build (case/ATX motherboard not fitting perfect) and ended up not using the IO shield at all. Once the radiator was installed on the top you are unable to reach the screws to remove the motherboard if you want to upgrade you will need to remove the liquid cooled radiator to change the motherboard. Radiator installation: Again, trying to stay with the TT brand components, with the radiator.("to have perfect fit") We mounted the radiator as I mentioned on the top with the coolant lines coming from the right. We ended up having to mount the cooling plate on the CPU sideways with the TT logo being sideways.(didn't work any better with lines from radiator from the left or mounting to radiator the back of case) The instructions with the radiator were AWEFUL, one page and pretty much only pictures. Mounting the coolant pump with the lines on the bottom, was also against the "instructions" we were getting from a build video. Other than being sideways it looks AWESOME! Fans also have a controller box and not a "splitter" to connect to the motherboard easily. Power Supply: When installing the Power Supply (Again, Thermaltake brand) the plate seemed to have to be installed inside out with the rough edges and stamping facing out of the case. Wall Mounting: Did I mention this thing is HEAVY??!!! There is a wall mount support that is located under the back panel and where the parts box was stored. Make sure you screw it back well when you get the box out! Again, if you mount this thing IT IS HEAVY. (sorry, said it again) and you cannot access the screws with the motherboard installed. ... show more
Reviewed in the United States 🇺🇸 on October 21, 2022 by Matt

  • Really want to like this case
Color: Black Size: ATX Style: P3
***UPDATED REVIEW*** Okay so I originally gave this case a two star review, but now updating it to a 5 star. Original issue I had with the case was that the PCIE bracket does not hold a PCIE 4 cable, only the pcie 3 cable that came with the case. I reached out to their support, and got a message almost instantly. The issue I had was that I was using a PCIE 4 with a 90 degree angle. They pointed out that I need a normal pcie with no angle, and should fit. Haven't ordered the new cable yet, but thought the case deserves an updated review due to the stellar customer service from TT, and the case is very pleasant, and appears to be of good quality (the cable was the only irratant for me). I will update again if I have any further issues with the new cable I am going to order. Previous review: I really really want to like this case. Quality is good, and case looks really good. By and large, everything went together smoothly with no issues, until I got to the pcie riser cable for my GPU. Here is the problem, the case came with a pcie 3 riser cable but I wanted to use a pcie 4 cable instead. Ordered two sets of pcie 4 cables and both will not fit on the included pcie bracket. Holes don’t match up. First cable I ordered was by linkup and wouldn’t work. Then I returned it and order a thermaltake pcie 4 riser cable thinking it should work (you would think) on their cases, but nope same issue. Pcie 4 cable holes will not match up. The original pcie 3 cable that came with the case works perfectly, but what about the people that want to use pcie 4 or even 5 in the future for future proofing? Seems really dump that they can’t provide a bracket that supports pcie 4. This is a big deal for me. I will try to get a hold of the manufacture tomorrow to see if they have a workaround, and I will revise my review when I hear from them. ... show more
Reviewed in the United States 🇺🇸 on October 26, 2022 by Danny Ali

Can't find a product?

Find it on Amazon first, then paste the link below.
Checking for best price...