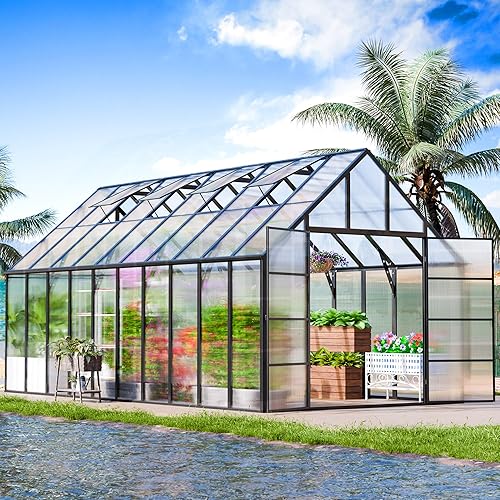
Search  for anything...

Palram HG6012 Snap & Grow Hobby Greeenhouse, 6' x 12' x 7', Silver

  • Based on 245 reviews
Condition: New
Checking for product changes

Notify me when this product is back in stock

$999.00 Why this price?

Buy Now, Pay Later


As low as / mo
  • – Up to 36-month term with PayTomorrow
  • – No impact on credit
  • – Instant approval decision
  • – Secure and straightforward checkout

Ready to go? Add this product to your cart and select a plan during checkout. Payment plans are offered through our trusted finance partners Klarna, PayTomorrow, Affirm, Apple Pay, and PayPal. No-credit-needed leasing options through Acima may also be available at checkout.

Learn more about financing & leasing here.

Selected Option

Free shipping on this product

This item is eligible for return within 30 days of receipt

To qualify for a full refund, items must be returned in their original, unused condition. If an item is returned in a used, damaged, or materially different state, you may be granted a partial refund.

To initiate a return, please visit our Returns Center.

View our full returns policy here.


Availability: Unavailable
Fulfilled by Amazon
Available payment plans shown during checkout

Size: 6' x 12' x 7'


Features

  • Crystal clear virtually unbreakable polycarbonate roof and walls panels that provide 100% UV protection and over 90% light transmission directly onto plants
  • Reinforced, doublewall & rust resistance aluminum frame
  • 78 sq feet growing space and 6.8' of head room
  • Includes adjustable roof vent, rain gutters, lockable door handle and galvanized steel base
  • 5 Year Limit Warranty

Description

Size:6' x 12' x 7' Extend your growing season from early spring seedling to late fall harvests with the Palram - Canopia Snap & Grow greenhouse. Snap and Grow greenhouses are designed for easy assembly using an exclusive SmartLock connection system that eliminates the need for most tools and hardware. Frame pieces lock together without the need for screws and the clear polycarbonate panels slide into the frame and snap into place. The crystal-clear polycarbonate panels provide over 90% light transmission, will not yellow over time, are virtually unbreakable, and block 100% of harmful UV rays. The 6’ wide series features an extra-tall double-hung Dutch door for easy entry and provides flow-through ventilation when the adjustable roof vents are opened. An integrated gutter system channels rainwater to the roof corners for collection. Palram - Canopia Snap and Grow greenhouses are compatible with a wide variety of Palram - Canopia accessories, including custom shelves, plant hangers, shade cloths, irrigation systems and trellising. Protect your plants from extreme weather and pests, with the smart, easy-to-assemble Snap and Grow 6’ Series greenhouse from Palram - Canopia. Manufacturer Contact Information


Product Dimensions: 148.8 x 75.6 x 82.5 inches


Item Weight: 162.8 pounds


Manufacturer: Palram


Country of Origin: Israel


Item model number: HG6012


Is Discontinued By Manufacturer: No


Frequently asked questions

This product is currently out of stock. Please check back later for shipping info.

Yes, absolutely! You may return this product for a full refund within 30 days of receiving it.

To initiate a return, please visit our Returns Center.

View our full returns policy here.

  • Klarna Financing
  • Affirm Pay in 4
  • Affirm Financing
  • PayTomorrow Financing
  • Apple Pay Later
Leasing options through Acima may also be available during checkout.

Learn more about financing & leasing here.

Top Amazon Reviews


  • Great Product for Patient People
Size: 8' x 8' x 9'
Let me say first that I am pleased with this product. There are some things that aren't wonderful, but I would buy it again. Here's the story: I ordered it and it came a day ahead of the promised delivery date. I happened to be standing in the driveway when UPS arrived. I waited with some amusement to see how a UPS driver wrangles a 150 lb box out of a UPS truck. After some huffing and puffing. He managed to get it on a hand truck and roll it up the driveway. I just had him drop it there and my son and I carried it to the back yard. The box is a two person carry. This is a two person project. Do not attempt to build it yourself. You need four hands for some steps. 1. Make sure your plot is dead level. If it's not, you will never get some pieces to line up. I got stumped a couple of times and then realized that a corner had shifted. I was working on soft soil. When something doesn't line up, check your level. 2. The design is ingenious and the instructions are equally cunning. They were designed by Satan himself. When in doubt, put the instructions down, walk away, drink a beer, come back to it later. The drawings are a puzzle. Be patient. 3. There is a diagram of a tool that you do not have in your tool box. It has a 7 mm nut driver on one end and a little plastic nudger end at the other. It is actually included in one of the many bags of black plastic parts. You will understand what I'm talking about when you see the picture in the instructions. Look in the parts bag, not in your toolbox. 4. Did I mention that you need four hands? You need four hands. My adult son and I worked on it for 5 hours on a Saturday until we got stumped by the nudger tool picture. I worked on it for 4 hours the second day. I may have finished it in that 4 hour session, but my second set of hands got bored with the project and vanished. I worked on it for about an hour for the next four consecutive evenings. Total time was about 13 hours for 1.5 people. Two fairly intelligent adults with minimal mechanical skills could build this in about 8-10 hours. 5. There are pictures that suggest that you wear work gloves. You need to wear work gloves. The polyvinyl cuts like no paper cut you have ever experienced and the aluminum edges may bite. Wear gloves. 6. Bendy bits: The frame is made of lightweight material which is easy to manipulate and build with. This is good. It's also bendy and pliable, which is bad. MANY parts were bent. I have a vise that I used to straighten the doors which were bent and pliers for other pieces. I also have a little bit of practice bending sheet metal in a hydraulic press and the patience of Job. You can bend most of the bent pieces back to true with some time and patience. You are purchasing a 150 lb box of mostly straight aluminum bits. You will get bent pieces in that box. Do not fret. Bend them back. 7. I was really worried about how flimsy this thing seemed while I was building it. It will frame up nicely and be very stiff and true. Do not forget step one. Make sure you install all of the braces that are included. 8. Anchor kit. I live in the infrequent hurricane zone but we do get Nor' Easters and frequent weird wind storms. My neighbor had a 12' x 12' aluminum shed that ended up on top of a tree. You're probably going to want to anchor this sucker if you live somewhere prone to wind. They sell a Palram anchor kit. I went to a hardware store and bought steel cables, tackle and anchors for about $10 less, and I think my anchors are probably more stout than the Palram kit. 9. My biggest regret is that the roof vent does not secure firmly, and the doors can be finicky when closing. They close reasonably well, but could be easier to close. I am going to have to rig some sort of chicken wire cover for the vent window, which will have to remain open virtually all summer. I intend to make it varmint proof, so a little engineering will be required. The roof vent was one of the bent items that I had to straighten and it doesn't want to shut 100% closed. This is a minor flaw that I will tinker with all Spring and it will be okay in the end. 10. I put mine on a raised planting bed and installed a gravel floor. I'm attaching some pictures. Enjoy. ... show more
Reviewed in the United States on March 8, 2017 by The Saucers

  • Sturdy structure that can be adapted to winter use along with a few caveats. (Experience feedback added)
Size: 6' x 8' x 7'
[We normally do not write reviews until we have owned a product for a decent period of time. This is an exception as we are only a month out from receiving our greenhouse kit. However, cold days near and some of you may need to make a time-pressured decision. We discuss, below, some aspects of winter use based on prior ownership of a greenhouse that was used during the cold months. See added feedback at end of this review.] We owned a greenhouse, bought at Harbor Freight, that cost substantially less then the one I'm reviewing here. That greenhouse had several problems: high winds sometimes "ripped" panels out, air leaks, sliding door that frequently jammed, vent window that did not shut snugly, replacing door gasket was a many hour job, and so on. Thus, we were looking for a replacement that could stand up to the winds and cold weather that are native to Albuquerque. We read the reviews here and other places and finally ordered the 6x8 to replace our other greenhouse. We did so in fear and trembling given the numerous bad reviews with descriptions of structural issues. The reviews that reported success were convincing, however. Now here is where we parted ways with most of you: We did not try to build it ourselves though we have done many complex projects successfully. We know an extremely talented builder, also a very handy man, who wanted our old green house so a deal was struck - the old greenhouse for his installing the new one. (We paid for additional supplies.) Let me be more specific about the talents of this builder: he built and lives in a 9,000 sq ft plus home that he did almost all the construction; his job now and in the past has always involved building and assembling both indoors and out. And he isn't afraid to read instructions until understood. I'm harping on the talents brought to the job because many people with "tool" hobbies believe they can throw this project together easily. Many can't and they provide bad reviews in frustration. My advise is simply that if you are not comfortable with messy constructions that require a lot of patients and the stamina to backup and do it the other way, get some professional help to put this puppy together. Also note that the instructions are just pages and pages of pictures - no descriptions - so you must figure out what is meant. Puzzle solving is fun but hours and hours a day for several days? Now I am going to list what is good about this kit and the resulting greenhouse: * We followed the initial instructions and went through all of the parts and compared shapes, part numbers, and amounts to those shown in the instructions. On our first call to the manufacturer, we left a message. They called back and we discussed discrepancies between our count and the instructions'. Several days later, the replacement and/or additional parts showed up at our house. We called after completing construction to order more parts to help us hang things from the ceiling and mount a thermostat. We were charged a reasonable amount and those parts showed up a few days later. So all of our interactions with service were positive! * The transparent plastic pieces that comprise the sides and doors are substantial and are locked in place so I believe that our occasional 50+ MPH winds will have little effect. Locked in place means fit in groves on all sides and those grove areas covered by additional hardware. We have had a recent blow near 40 MPH with no problems. * There are a large number of "truing" gadgets that force edges, walls, and roof into appropriate inter angles and strengthen the joints. * We had a 6x8 wood border secured to concrete from our old greenhouse. You MUST install same if you will experience high winds. This is not optional. This kit comes with proper skirts and what-nots so this doesn't look bad. Some care is needed here - it is important that connecting walls make right angles and non-adjacent walls be parallel. This must be done before installing most of the truing gadgets. It is also necessary that you make sure the screws through the wood into the concrete can coexist with the screws through the bottom of the greenhouse into the same wood. * The door swings open; it does not slide. It is a two-part Dutch door and the parts can open independently. There is a mechanism that holds the door open so that it will not slam around in the wind and latches to tightly lock either or both parts. * The long sides of the roof, where the roof meets the sides, have little gutters. On the front and back side of each gutter are places to attach tubes to lead the water away. This is a thoughtful extra that might be really important if your green house is in a place that easily accumulates deep water. * One of the top plastic covers contains a vent mechanism with proper hardware to seal it shut or hold it rigidly open. * A lot of covering mechanisms are supplied to hide the various crufty joints where multiple pieces come together in weird ways. In other words almost all the joins look quite professional. * Because of several things mentioned above, this greenhouse feels really solid and we expect none of the problems we experienced with our former one. Before signing off, I want to mention a few perhaps atypical things that we are doing with our new greenhouse. We called the manufacturer and ask about winter use. The reply was "This is a three season greenhouse." So like our former one, this one will be insulated. Pieces of insulation are cut to fit between the vertical supports that form the walls and each piece will extend from the floor to the beginning of the roof. We have also brought electricity to it to support a light bulb, a control thermostat, and an electric heater. This is the same arrangement as in our former greenhouse. We also put insulation in the floor cavity and covered it with fake wood boards across the whole floor area. In addition, all bottom metal parts of the green house (those touching the bottom wood frame) have been sprayed with some sort of rubbery substance that should inhibit oxidation where the rubber meets the water or snow. I must say the whole thing looks totally wonderful and I'm expecting it to have a long life and survive whatever nature throws at it. ADDED 1/29/2017: Our greenhouse has been operational for the first several months of winter so I can comment on it through experience and also note a slight change in the anticipated winter-proofing. I should note that our winter goal is merely to allow plants to survive the cold weather. We are not trying to grow tomatoes or tropical orchids in winter. So the goal of insulation and heater is just to prevent temperatures below 40 degrees F. Change in insulation: We did not cut up insulation sheets and lay along the walls as anticipated above. Rather, we followed a suggestion from someone at the manufacturer. We took bubble wrap (fairly large bubbles), cut it to size to fit the panes (about half of a panel) of the plastic siding, moistened the bubble side, then pressed it on the inside of the plastic panes, bubbles facing the outside. This almost worked but some of the wrap loosened so we got little velcro buttons with sticky outsides. We put buttons on the four corners of each plastic pane and the corresponding points on the bubble wrap pieces. This arrangement has worked better than we expected and recommend it to you. Experience: This winter has had some unusually cold nights and high speed winds. The combination of floor insulation (see above), bubble wrap, and heater have maintained desired temperatures despite some nights in the low teens! I'm impressed. We have also experienced winds that were reported at 35-50mph and were knocking parts out of the trees. The greenhouse has been solid as a rock; but, note ours is attached to a wood frame on the bottom and that frame is screwed into the concrete. The only wind-related problem was when we left the door open, held by a hold-the-door-open gizmo that is part of the kit. That gizmo, a plastic strap, was snapped by the high wind. Note that it was idiotic of us to leave the door open in such windy conditions. The good news is that the manufacturer sent us a replacement at no charge. ADDED 5/20/2017: In response to a request via a comment attached to this review, I've added three photos. One shows the bubble wrap insulation from inside the greenhouse, the second shows various electric gizmos including the heater and control thermostat, and the third shows some of the fake wood floor which covers a layer of insulation. It's fairly hot now days so there are no plants on the inside. ... show more
Reviewed in the United States on October 1, 2016 by Dragoneer

  • If you like to fail at building things, this is the one for you!
Size: 8' x 20' x 9'
Don't do it. Just. Don't. It comes in nearly 1000 pieces. And won't withstand ANY wind. Period. I've spent the last 2 weeks breaking my back trying to translate those vague instructions. They're literally just pictures of mystery pieces. You have to figure it out. Once you start, and get the hang of the instructions it starts to sort of come together. It's more of a 3 person task, but only if you totally hate the other two people. Because this thing was designed by some demon for the seventh level of hell. The instructions tell you to use a spray lubricant. Don't ignore that. You'll never get two pices together without it. Save your money and invest in a prefab house. Please, listen to your mother, she will tell you not to buy this, as I am telling you not to buy this. I'm going to include pictures of my utter failure so you can prepare yourself for what's to come if you decide you know better than anyone else....you've been warned though. ... show more
Reviewed in the United States on August 5, 2017 by Dawn H.

Can't find a product?

Find it on Amazon first, then paste the link below.