Search  for anything...

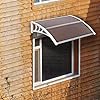
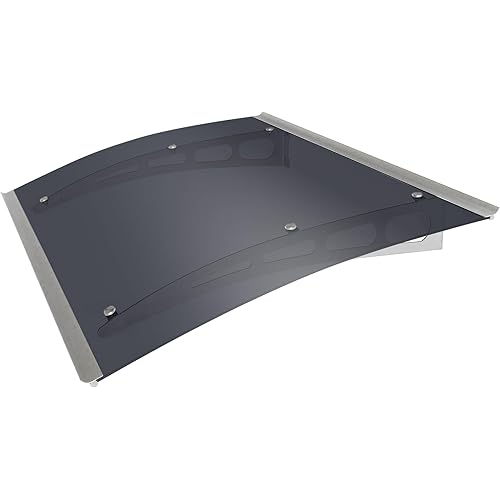
Outvita Window Awning Door Canopy 40"x30", Polycarbonate Cover Front Door Outdoor Patio Awning Canopy UV Rain Snow Sunlight Protection Hollow Sheet, Brown Board & White Bracket

  • Based on 662 reviews
Condition: New
Checking for product changes
$39.99 Why this price?
Save $10.00 was $49.99

Buy Now, Pay Later


As low as $9 / mo
  • – 4-month term
  • – No impact on credit
  • – Instant approval decision
  • – Secure and straightforward checkout

Ready to go? Add this product to your cart and select a plan during checkout. Payment plans are offered through our trusted finance partners Klarna, PayTomorrow, Affirm, Apple Pay, and PayPal. No-credit-needed leasing options through Acima may also be available at checkout.

Learn more about financing & leasing here.

Selected Option

Free shipping on this product

This item is eligible for return within 30 days of receipt

To qualify for a full refund, items must be returned in their original, unused condition. If an item is returned in a used, damaged, or materially different state, you may be granted a partial refund.

To initiate a return, please visit our Returns Center.

View our full returns policy here.


Availability: In Stock.
Fulfilled by Outvita

Arrives May 21 – May 26
Order within 13 hours and 19 seconds
Available payment plans shown during checkout

Size: 40" x 30"


Color: Brown Board & White Bracket


Features

  • EASY TO ASSEMBLE - OUTVITA window awning strong aluminum bars and plastic frame that make the canopy easy to assemble and install according to our instruction with the words and pictires. The purpose is to help you eliminate the trouble of installation, which can perfectly save your time. We suggest two people hang it up.
  • DURABLE MATERIALS - Patio door window awning canopy is made of a 5mm clear hollow polycarbonate panel, plastic firm bracket and aluminum bar, this awning resists rusting and corrosion from the elements. Seamless surface, no water leaking, looks sleek, lightweight sturdy.
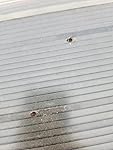
  • PROTECTION FUNCTION - OUTVITA awning door canopy can protect you from rain, snow, sun, and harmful UV rays throughout the year. It becomes a shelter and you can enjoy the rain scene without getting wet or any leaking water. Moreever, our awning perfectly blocks the sunlight and ultraviolet rays in summer days.
  • SENCE APPLICATION - The modern and elegant style of our awning can be used for residential or commercial application, for example, it can be placed on lower doors, windows and patio in the courtyard. Note: Please confirm whether the size you measured is correct before purchase. If you have any questions, please don't hesitate to contact us.
  • FASHION DECORATION - Neutral in color, these door awnings match nearly any home or outdoor decor. You can hang lights, small potted plants or other lighter decorations on the brackets to make your garden look more beautiful. Please kindly note that the product color may slightly vary due to photographic lighting sources or your monitor settings.

Material: Aluminum, Plastic, Polycarbonate


Color: Brown Board & White Bracket


Size: 40" x 30"


Brand: Cu Alightup


Item Weight: 2.45 Kilograms


Material: Aluminum, Plastic, Polycarbonate


Color: Brown Board & White Bracket


Size: 40" x 30"


Brand: Cu Alightup


Item Weight: 2.45 Kilograms


Product Dimensions: 1.24"D x 1.55"W x 0.36"H


Style: Modern


Fabric Type: Aluminum


Assembly Required: Yes


Operation Mode: Manual


Pattern: Solid


Item Weight: 5.39 pounds


Manufacturer: Outvita


Country of Origin: China


Item model number: AL-YP-0520


Frequently asked questions

If you place your order now, the estimated arrival date for this product is: May 21 – May 26

Yes, absolutely! You may return this product for a full refund within 30 days of receiving it.

To initiate a return, please visit our Returns Center.

View our full returns policy here.

  • Klarna Financing
  • Affirm Pay in 4
  • Affirm Financing
  • PayTomorrow Financing
  • Apple Pay Later
Leasing options through Acima may also be available during checkout.

Learn more about financing & leasing here.

Top Amazon Reviews


  • Useful as canopy for window wells - assembly tips
Size: 80" x 40" Color: Clear Board & Grey Bracket
First, all the pictures from different sellers are the same because they are all selling the same thing. So buy the one which, including shipping if charged, is the lowest priced. I am using these to keep rain out of my basement window wells. Even though there is a drainage system and sump pump, I'd rather avoid relying on that. So I bought two 120" versions and two 80" versions for my four basement window wells which are of two sizes; the latter are shown in today’s rainy day picture. They were simply assembled and placed over the gratings without a permanent attachment other than the bottom of the mounting bracket can fit through two of the grating's rails. I may mount them on pieces of lumber just to elevate the back and increase the slope, plus add some weight for wind resistance. Paraphrasing some tips from another Amazon customer which appear at a different listing: 1. The bracket(s) with the extra holes for the self-tapping "short screws" must go in the middle, not as end pieces. Also, be sure to peel off the protective plastic from both sides of the boards. 2. Install the short screws where there are holes in the plastic brackets. You don't need to make extra holes anywhere. The diagram shows additional places on the bottom of the end brackets, but there are no holes for those and they aren't necessary. Meanwhile, the metal channel pieces which the screws are supposed to engage through the plastic are NOT drilled. You'll need a power drill and 3/32" bit to insert through the holes in the brackets and then to make pilot holes for the screws in the metal channels beneath. 3. My own addition to the helpful hints: The polycarbonate sheet boards are very hard to install in the "H bar" pieces which join two of them together. To ease the process, first spray the entire length of each “H bar” at its side openings, which the boards slide into, with silicone spray. Make sure that equal lengths of the ends of the boards project out from both sides of the "H bar." 4. It helps to have a second person working with you to keep the leading edges of the boards inside the slots of the “H bar” so they don’t come out as they slide along. 5. There will be extra screws. Just be sure to use a long screw to attach and cinch down tightly each side of each plastic bracket into the mating metal channels, and make your pilot holes for the short screws in the side of each underlying metal channel for each place where there is a hole in the bracket AND there is the actual end of a metal channel beneath. Ignore the outer holes in the end brackets on the side with the round-edged channel where nothing is underneath. Only the middle bracket(s) need two short screws since a metal channel comes in at both sides of those brackets. 6. Know that these are not 120" and 80" long as shown in some listings; they are about four inches shorter, and front to back, also a few inches shy of the 40" shown. Not important for most awnings, but when you are expecting to cover a 120" or 80" by 40" window well grating, there will be some open area at the sides and also the back nearest the house if you position the awning to avoid the rain water which runs off and then down the front, from falling into your window wells. You can project a short width of plastic carpet runner atop and beyond the rear edge, overlapping the back of the boards and held in place with some rocks, to make up the inch or two distance to the house wall, and you can also double some of that material to jam into the unused outer channel of the two plastic end brackets and then drape a small length out to cover the sides. That is a good idea in any case, to keep critters like mice and tarantulas (I've had both) from falling through the grates and down into your window wells. Will be adding those strips later. I may also place small blocks of wood under the bottom of the wall side of the brackets to improve the slope and thus the drainage. As with most repetitive jobs, there’s a learning curve. The first one of these which I assembled, a three-section awning, took me almost half a day. The second of those took less time. The last ones, both two-sections, each took just a little over an hour this morning. ... show more
Reviewed in the United States on March 15, 2023 by bagpiper bagpiper

  • You will need a couple of extra people!
Size: 118" x 38" Color: Brown Board & Black Bracket
I bought the 12-footer, so it was like trying to mount a large lasagna noodle. Get additional people if you get the long one like I did. I did give it 4-stars because it is doing the job I bought it for. I needed something over the side walk through door of my garage. A couple thing about this thing: 1) The mounts on the wall brackets are ridiculously long and if you are mounting it to soffit face on the edge of a roof, you will need to drill different holes for the lower bolt. 2) The mounting bolts they give you are stupid. Go to a hardware store and buy some 2 inch long 1/4 inch diameter galvanized lag screws with 1/4 inch flat washers. Drill a small pilot hole for each bolt and let the lag bolt pull itself into the wall as you install each one. 3) You will be fighting the assembly as you raise it up because the panels are continually popping out of the groves of the brackets, creating a huge problem, even with all the assembly screws they provide. A trick that I found was to use bungy cords temporally between the brackets on the bottom side of the awning to help stabilize the unit and keep it all together as you raise it up into place. The assembly is moderately awkward and the installation is even more awkward. One person can assemble it, but you will need help. The longer the unit is, the more help you need. ... show more
Reviewed in the United States on August 11, 2023 by darren beanard darren beanard

  • Back door awning
It fits perfectly and was very easy to install. However the seam at the middle has just enough of a gap that it leaks when it rains. I had to put some clear waterproof tape over the gap to prevent it leaking.
Reviewed in the United States on August 7, 2023 by Diana Reyes

  • Great awning for the price
Size: 118" x 38" Color: Brown Board & Black Bracket
This is a decent awning; I'd be inclined to say a great awning for the price. Assembly takes no time at all (I bought the single-panel and the 3-panel), so let me provide some basic assembly and installation advice... 0: Yes, step 0- start with a working area big enough to support the WHOLE assembled awning AFTER assembly 1: spray bottle of water- moisten edges of corrugated poly panels prior to sliding the clear "joiner" piece that connects the 2 poly panels. This makes assembly far easier. No need for silicon, which will make things harder to clean and wayyyy harder to grip. 2: 2 sets of hands will make it easier provided you are working with somebody who communicates well. MY wife is and does, and it took maybe 5 minutes for the single-section awning and less than 5 minutes for the 3-section. Why the difference? I assembled the single-section first. 3: Feel free to start screws with a power tool (my M12 Impact worked fine) but I still finished screwing the assorted screws using a stubby screwdriver 4: if you opt to use the mounting hardware, do so at your own risk. I knew from the get-go it likely wouldn't work, given my home's stick-built (2x4/OSB/vinyl siding) construction. The expanding sleeve-n-bolts hardware would work find on stone, brick, block, or maybe a log cabin... On stick-built construction, don't bother. Head to your big-box hardware store and buy some lag bolts, preferably black epoxy-coated. You might be able to get by with 3", but I'm thinking most folks would use 4" or longer lags. They simply work, allow easy removal if needed, and color-match the mounting brackets perfectly 5: now for the actual mounting... a- You can either put up either the middle section or one side, then work with a partner to add each section... meaning joining the new assembly to the mounted one and then leveling and mounting without damaging anything fragile.... I feel this complicates the assembly and creates a lot of risk for damaging the composite brackets, bending the aluminum, or simply breaking something. Holding a bracket while a partner tries joining the sections, plus marking/mounting... no thanks. b- build a framework to put the completely assembled awning in place and then use shims to level, then mark for holes, slide the assembly forward, drill the holes, and then use the lags (or whatever hardware tickles your fancy, including OEM), and be done with things in a couple minutes. I chose method "b"... I had scrap lumber so I built some wood "boxes" 3 feet deep, 2 feet wide, and a smidge over 7 feet tall, laid some 10-foot boards across the 2 "boxes" (since the awning is over 8 feet wide) and used other scraps as "sliders" directly underneath the brackets, then lifted the whole awning into place on the sliders and used shims to level. Once it was level, I marked the spots to drill, broke out a 3/16" drill bit, and made some holes in my wall. I then slid the awning back to the wall and screwed in the 8 lags. We're talking zero effort, no wiggle-waggle or struggling to join together awning sections while also marking holes or screwing in lags. Sure, juggling awning sections may be your cup of tea, built making an ad-hoc "scaffolding" simplified the process for me and my wife is very happy with the results. ... show more
Reviewed in the United States on September 4, 2023 by Peter Bachman Peter Bachman

  • Takes two persons to assemble
Size: 40" x 30" Color: Clear Board & White Bracket
Although the video looks as though this awning is easy to snap together, the plastic cover has to be bent into the shape to put into a track that does not have a lot of extra room. Be very careful measuring the width of the door or window that you are placing this on because it is very unforgiving of a door that is too wide. It is a simple design and better looking than the 1950's aluminum styles seen on homes that you want to remove because they are so ugly and the alternatives are quite expensive. We wanted to find a simple modern design that was not too expensive and this works for now, until we can afford to pay ten times the price. ... show more
Reviewed in the United States on July 17, 2023 by Scots Irish

  • Give it to you straight
Size: 40" x 30" Color: Clear Board & White Bracket
Let me begin by saying they look great once installed, and really gave my house a more updated look. They work well as intended, but a little on the flimsy side, time will tell as to how they hold up through storms/wind. The day after installed it rained and we didn't get soaked immediately when we came out the door. We had time to actually open an umbrella, and not have rain enter our home. The directions are left up to you to decipher. Pro tip: I found it better to attach the back brace to the mounts, line up and mark my holes. Then drill the holes a slight bigger than the screw, as they will tighten up later. Next, take one side of the mount off from above mentioned, and feed the polycarbonate through the rails. Once that is in place correctly, take your center piece and feed it through the previous panel. Followed by the last panel being fed into place. Next, take you front brace and install one side. Lastly, take your remaining mount and install. (this is a 2 person project in my opinion). Now that the canopy is completed install to the holes previously drilled. If you failed to think this project out, and depending on location to place it, you will not be able to screw in screws closest to a wall. Also, given the flexibility of the polycarbonate panels it is near impossible to install while on the house. I bought 2 of these and after a slight learning curve on the first one, I had the second one completed in less than 20 minutes. ... show more
Reviewed in the United States on April 16, 2023 by Andrew Perry

  • Looks good
Looks great but madea little cheap. First one i got lasted 2yrs. Bought it again cause looks good when up and helps when raining.
Reviewed in the United States on August 4, 2023 by Trevor Lynham

  • Pretty cheap BUT Works!
Size: 40" x 30" Color: Clear Board & White Bracket
If U just want something that doesnt break the bank, it works! Hubby always seems to have to modify- i.e. had to buy diff, larger screws but its up and doing the job! You cant tell it was cheap once its up! It looks pretty good. I would recommend- just dont know how long it will last. Post note: I live with(married) a builder so everything is "cheap" nowadays. But after living in unfinished places for yrs- I just want something "done" and functional...that appears attractive- if it doesnt out live me, well thats too bad🤭I am now sacrificing integrity for convenience and budget. (sorry to those master builders who made things to last - only the wealthy now can afford it) ... show more
Reviewed in the United States on August 26, 2023 by susi e

Can't find a product?

Find it on Amazon first, then paste the link below.