Search  for anything...

Lodge LGP3 Rectangular Cast Iron Grill Press, Pre-Seasoned, 6.75-inch x 4.5-inch

  • Based on 14,903 reviews
Condition: New
Checking for product changes
$19.90 Why this price?
Save $9.60 was $29.50

Buy Now, Pay Later


As low as $4 / mo
  • – 4-month term
  • – No impact on credit
  • – Instant approval decision
  • – Secure and straightforward checkout

Ready to go? Add this product to your cart and select a plan during checkout. Payment plans are offered through our trusted finance partners Klarna, PayTomorrow, Affirm, Apple Pay, and PayPal. No-credit-needed leasing options through Acima may also be available at checkout.

Learn more about financing & leasing here.

Selected Option

Free shipping on this product

This item is non-returnable

View our full returns policy here.


Availability: In Stock.
Fulfilled by Amazon

Arrives Monday, May 20
Order within 14 hours and 50 minutes
Available payment plans shown during checkout

Style Name: Grill Press


Features

  • One 
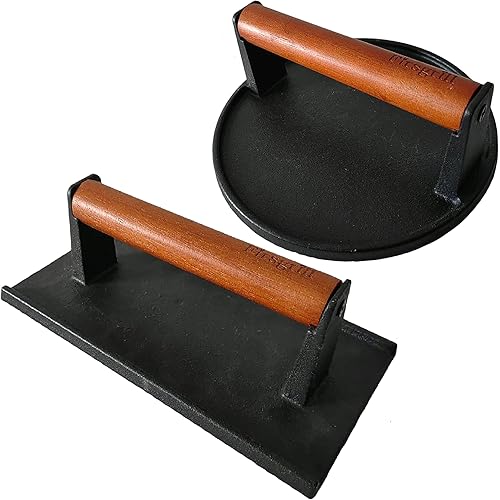
Lodge Pre-Seasoned Cast Iron Grill Press With Cool-grip Spiral Handle, 6.75 Inch x 4.5 Inch
  • Cool-grip Spiral Handle provides a safe, comfortable grip
  • Unparalleled heat retention and even heating
  • Use in the oven, on the stove, on the grill, or over a campfire
  • Great for induction cooktops.Item shape: Rectangular

Description

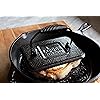
On the stovetop or grill, the Lodge Cast Iron Grill Press keeps bacon from curling and presses out unwanted grease from burgers. When preheated, the press also significantly speeds up cooking time. The heavy-duty cast iron base with a rustic hammered finish provides excellent heat retention for consistent, even cooking, and the spiral handle allows for a safe, comfortable grip. This grill press is safe to use in the oven, on the stove or grill, and over a campfire. The Lodge Cast Iron Grill Press is made for decades of cooking and comes pre-seasoned for an easy-release finish that improves with use. Assembly requires a flathead screwdriver and an adjustable wrench or pliers. Includes one Lodge Cast Iron Grill Press, 6.75 Inch x 4.5 Inch. Made in America. Care instructions for cast iron: 1. Wash with warm water. Add a mild soap, if desired. 2. Dry thoroughly with a lint-free cloth or paper towel. 3. Oil the surface of the pan with a very light layer of cooking oil while warm. Hang or store the cookware in a dry place. ;For the stovetop or the grill, this press pushes out the excess fat in burgers or chicken, eliminates the curl in bacon or ham, and retains the heat in grilled sandwiches. Made of heavy cast iron and weighing about 3 pounds, the grill press uses its heft to do the work. The press measures 6-3/4 by 4-1/2 inches and has a unique hammered finish. A cool-grip spiral handle keeps hands comfortable when working over a hot grill.--Cristina Vaamonde. For the stovetop or the grill, this press pushes out the excess fat in burgers or chicken, eliminates the curl in bacon or ham, and retains the heat in grilled sandwiches. Made of heavy cast iron and weighing about 3 pounds, the grill press uses its heft to do the work. The press measures 6-3/4 by 4-1/2 inches and has a unique hammered finish. A cool-grip spiral handle keeps hands comfortable when working over a hot grill.--Cristina Vaamonde

Brand: Lodge


Material: Cast Iron


Special Feature: Oven Safe, Induction Stovetop Compatible


Color: Black


Capacity: 3 Pounds


Brand: Lodge


Material: Cast Iron


Special Feature: Oven Safe, Induction Stovetop Compatible


Color: Black


Capacity: 3 Pounds


Compatible Devices: Smooth Surface Induction


Product Care Instructions: Oven Safe


Maximum Temperature: 100 Degrees Celsius


Handle Material: Iron


Item Weight: 2.9 Pounds


Is Oven Safe: Yes


Model Name: LGP3PLT


Has Nonstick Coating: Yes


Is Dishwasher Safe: No


Product Dimensions: 1.18 x 6.65 x 11.1 inches


Item Weight: 2.88 pounds


Department: unisex-adult


Manufacturer: Lodge


Country of Origin: China


Item model number: Lodge Flat Iron Grill Press


Is Discontinued By Manufacturer: No


Date First Available: April 14, 2006


Frequently asked questions

If you place your order now, the estimated arrival date for this product is: Monday, May 20

This item is non-returnable:

This item is non-returnable

View our full returns policy here.

  • Klarna Financing
  • Affirm Pay in 4
  • Affirm Financing
  • PayTomorrow Financing
  • Apple Pay Later
Leasing options through Acima may also be available during checkout.

Learn more about financing & leasing here.

Top Amazon Reviews


  • I Love All Things Lodge!
Style Name: Grill Press
This was easily put together. I mean I watched my husband do it and it looked easy. I'm not an assembler of anything... It's very heavy and sturdy. I haven't smooshed anything with it yet but I can't imagine anything going wrong unless I leave my fingers under it. I love the way it looks!
Reviewed in the United States on March 12, 2024 by James

  • This thing is heavy! And that’s why I like it!!!
Style Name: Round Grill Press
This review is for the 7.5” grill press. You need to accept that this is heavier than most other grill presses, even at this size. That weight comes in very handy when you’re trying to sear a steak, or when cooking a large package of bacon. It’s also great when you’re cooking sandwiches or making paninis, because you can easily get 1 - 2 underneath. Mexican food? Yep. For a single burger, it’s a bit overkill, but it definitely does the job well. I wouldn’t 2 at the same time for smashburgers, and you want to space out the patties due to the size of this thing. Now people will ask, “does it stick?”. It can, but that can happen with any press regardless of what it’s made of (don’t believe the marketing hype of some of the other brands). You’ll quickly learn that all you need to do is to put the press on the grill or griddle for about 2 minutes for the surface to heat up a bit and you’re good. “How hard do you need to press?” Not very. That’s the point of why this thing weighs close to 5lbs. Cleaning is a breeze. Sponge and water. One of those chainmail cleaners if things get gnarly. Yes, this is seasoned. And yes, you will see a spot where it looks like it’s worn or maybe even a little reddish. That’s normal and it’s from the manufacturing process. Nothing wrong with the press, and you can clean and season that spot as part of your normal maintenance. When it comes time to season it, wear a pair of disposable gloves (optional) and/or a rag or towel you don’t mind getting covered in oil. Just apply whatever seasoning oil you prefer and coat the thing. Once you’re done place it on a baking pan in the oven and heat at 375 for about an hour. I don’t recommend using paper towels due to them tending to leave remnants while applying oil. Last comment/question I hear a lot of is “does it get too hot to hold?”. It’s metal, so depending on the heat source and how long you leave it in contact, yes the handle can get toasty (welcome to the principle of thermal conductivity). In normal use, you’re not going to have a problem. It’s a LOT of metal to heat up, and those springs on the handle keep you from directly touching the handle. In normal use, it might get a little warm, but you’ll never have an issue. That’s my not-so-short review. Hope it helps! I’ve found this to be a great addition to my kitchen, both indoors and out. One last bit of advice - don’t use this with any kind of non-stick griddle or pan. This thing is cast iron and it will scratch the heck out of the non-stick surface. ... show more
Reviewed in the United States on April 1, 2024 by Yoda117

  • A worthy uni-tasker (w/tips and recipes).
Style Name: Panini Press
I have been on a cast iron craze lately. I have been collecting Lodge products, and eventually it came to this little uni-tasker. I waffled a bit....like I said, it is a uni-tasker. Some reviewers say they use it for other things like grilling chicken and such. But I was looking to straight up make paninis. In the end I just decided to go for the bull and get it. And boy am I glad I did! You have a few options in how you can use this item...the Lodge grill pan is the best since the ridges in the bottom of the pan match those on the panini press. However, if you don't mind too much if the bottom of your panini does not have ribs you can use a plain flat bottom skillet (make sure your skillet is big enough in diameter!) The third option is the one I am using at the moment, which is the Lodge pro 2 burner griddle. I use the ribbed side, which does not match the panini press (the ribs are narrower and spaced further apart) but accomplishes the general idea. I do plan on getting the ribbed grill pan at some point, but for now things work well this way. So, when the product arrived I gave it the usual 2 or 3 extra pre-seasonings using palm oil shortening in a 350 degree oven. Then it was time to get to work. I placed my pro 2 burner griddle on med. high heat (I have an electric stove, so used the 5 1/2 mark on the front and rear burner knobs) to pre-heat for about 10 minutes. I placed the panini press on a third burner to pre-heat by itself using the same setting, 5 1/2. Made up the panini using olive oil brushed on the outside of the bread, set it down on the griddle and (with a gloved hand!...don't forget the handle will get very hot!!!!!) waited about 3 minutes. The press stuck a bit to the bread on top a bit (I continue to have this minor issue, and I think it is not because of the seasoning lacking, but just the way the ribs kind of like to hold the bread a little bit), but I took a butter knife and used that to kinda just hold the bread lightly while I pulled out...pop, press came off just fine. Alas the bread on top was mildly toasted, but not browned (tasted just fine, and was like white toast, but definitely not what you expect from a panini). The bottom, however, was just fine, excellent, perfect in every way. This led me to believe the press was either not hot enough to begin with, or that I needed to compensate for the fact that the minute it goes on top it is losing heat where the pan underneath always has heat. So the next time I made a panini I pre-heated the bottom pan as normal (5 1/2 setting), but the press I heated to a higher temp (7 1/2). With 10 minutes of pre-heating it actually started to lightly smoke, so I could tell I had it much hotter. And sure enough this time the top and bottom came out an even dark brown. The actual process of grilling the panini only took about a minute and a half to two minutes. Dark, brown, delicious! So that is the biggest tip I can give. Pre-heat your panini press to a decent degree higher than your bottom pan. One other thing to note has to do with cheese. When using sliced cheese or at least a light amount of shredded you should have no problems. However, I made a panini today using a good mound of shredded cheese, and while the whole sandwich was warmed all the way through the cheese deep in the middle did not melt to that stringy, classic "grilled cheese" kind of consistency. So a little experimenting in that scenario may be needed. So here are some "recipes" (I hesitate to really say they are such since, well, it is just a grilled sandwich after all.) So far they have all been using homemade artesian bread from my Lodge dutch oven. It is a buttermilk, cheddar and herb bread that is proving awesome for paninis (and if anyone wants the recipe I can gladly post it here if they like along with instructions on how to make great bread in your dutch oven!) Actually, I must correct myself....one batch of panini were made on store bought, fresh made artesian sourdough (available from the bakery at Hannafords). Tasted good too, but the Buttermilk/cheddar/herb bread is better in my opinion. Turkey/Bacon/Cheddar/onion panini: Get some sliced turkey from the deli. Some nice sliced sharp cheddar. Cooked bacon slices. Sauté up some onions (by all means use raw onions, but onions sautéed in butter have such a wonderful sweet flavor and texture!) Take your bread slices (about 1/2" thick slices work best) and brush on some olive oil one side of both slices. Assemble your panini w/ olive oil sides facing out. Place on grill/pan, plop on the panini press and cooked to desired color on the bread is reached (should not take more than a few minutes) using the instructions/tips noted above in main review. Bacon/Cheese/onion panini: Take some bacon slices. Get a fine variety of shredded cheese. In this case I used cheddar, jack and a quesadilla cheese. Once again bring out my favorite style onion, the sautéed kind. To get the best results lay down half your cheese on the bottom slice, stack on your bacon, onions, and then the other half of your cheese followed by your final slice of bread. The cheese on both sides helps to "glue" everything together when all melted. From here on ditto above. Roast beef/mushroom/Cheddar panini: Pretty self explanatory. Get some sliced roast beef from your local deli. Sauté up some mushrooms (yeah, I know, sautéing vegetables adds more work...but trust me, it is WORTH it!). Sliced mild or sharp cheddar (I don't care much for swiss cheese, but I assume it would also make a nice substitution here). From here on ditto above. Some other ideas I am planning on trying at some point: Bacon/sun dried tomato (processed into a paste)/spinach/cheddar Sautéed green pepper/sautéed onion/sautéed mushroom/cheddar Italian sausage/sautéed onion/sautéed pepper/mozzarella/marinara sauce ... show more
Reviewed in the United States on December 11, 2012 by Brian K. Miville

  • Sturdy and heavy
Style Name: Grill Press
Dose the job well, no wood or plastic to melt so can be kept on the grill permanently
Reviewed in the United States on February 4, 2024 by Mr T

Can't find a product?

Find it on Amazon first, then paste the link below.