Search  for anything...

KETOTEK Digital Thermostat Outlet Plug Temperature Controller Outlet Socket 120V Heating Cooling Control 110V 15A Celsius Fahrenheit Display White

  • Based on 794 reviews
Condition: New
Checking for the best price...
$21.99 Why this price?
New Year Deal · 15% off was $25.99

Buy Now, Pay Later


As low as $5 / mo
  • – 4-month term
  • – No impact on credit
  • – Instant approval decision
  • – Secure and straightforward checkout

Ready to go? Add this product to your cart and select a plan during checkout.

Payment plans are offered through our trusted finance partners Klarna, Affirm, Afterpay, Apple Pay, and PayTomorrow. No-credit-needed leasing options through Acima may also be available at checkout.

Learn more about financing & leasing here.

Selected Option

Free shipping on this product

FREE refund/replacement until Jan 31, 2026

To qualify for a full refund, items must be returned in their original, unused condition. If an item is returned in a used, damaged, or materially different state, you may be granted a partial refund.

To initiate a return, please visit our Returns Center.

View our full returns policy here.


Availability: In Stock.
Fulfilled by Amazon

Arrives Tuesday, Feb 3
Order within 15 hours and 54 minutes
Available payment plans shown during checkout

Protection Plan Protect Your Purchase
Checking for protection plans...

Style: Non-backlit Style


Features

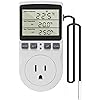
  • Plug-and-play design, easy to use. Simply plug in your heating/cooling device, set your desired start and stop temperatures, and let the KETOTEK thermostat plug do the rest. This thermostat plug automatically switches between heating and cooling modes based on your settings and control the device to work. Power supply: 100~250V AC; Output: Max 15A/120V.
  • Temperature control function with 1C/2F control accuracy. Wide temperature range: -40C to 120C (-40F to 248F) with control accuracy of 1C/2F. Just set Start Temperature and Stop Temperature, then enjoy automated temperature control without complex wiring. For heating mode, set Start Temperature < Stop Temperature; For cooling mode, set Start Temperature > Stop Temperature.
  • Timing function This thermostat plug outlet also has F01~F04 modes for cycle timing and countdown: F01 Cycle Timer mode; F02 CD ON mode, F03 CD OFF mode, F04 CD ON and CD OFF mode. You can choose F01 mode to auto-cycle the device ON/OFF at set intervals, or choose F02~F04 modes to set countdown for device ON/OFF. Set range: 0~99 hours 59 minutes. Please note that temperature control function and timing function cannot be used at the same time.
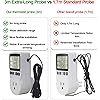
  • Versatile function This temperature controller outlet plug is equipped with a 3-meter NTC 10K temperature sensor for rapid response, preventing temperature drift. It works in both Fahrenheit and Celsius. The built-in memory function retains the settings in case of power outage. This thermostat plug supports temperature calibration for ultra-precise adjustments. And it has a reset function, ensuring a fresh start whenever needed.
  • Wide Range of Application Made in fire-resistant and durable materials for long-term stable operation, this temperature controller plug is suitable for various applications requiring precise temperature control and management, such as greenhouse, reptile, incubator, terrarium, freezer, refrigerator, heater, fermentation, heat mat, and other temperature-controlled system.

Color: white


Brand: KETOTEK


Voltage: 120 Volts


Product Dimensions: 2.28"L x 1.54"W x 4.72"H


Display Type: LCD


Operating Temperature: ‎248 Degrees Fahrenheit


Manufacturer: ‎KETOTEK


Part Number: ‎KT3100-US


Item Weight: ‎7.2 ounces


Product Dimensions: ‎2.28 x 1.54 x 4.72 inches


Item model number: ‎KT3100


Style: ‎Non-backlit Style


Power Source: ‎AC


Mounting Type: ‎Wall Mount


Special Features: ‎Temperature Display


Usage: ‎Heating


Included Components: ‎1*Thermostat Plug Outlet; 1*Manual


Batteries Included?: ‎No


Batteries Required?: ‎No


Date First Available: July 8, 2017


Frequently asked questions

If you place your order now, the estimated arrival date for this product is: Tuesday, Feb 3

Yes, absolutely! You may return this product for a full refund within 30 days of receiving it.

To initiate a return, please visit our Returns Center.

View our full returns policy here.

  • Klarna Financing
  • Affirm Pay in 4
  • Affirm Financing
  • Afterpay Financing
  • PayTomorrow Financing
  • Financing through Apple Pay
Leasing options through Acima may also be available during checkout.

Learn more about financing & leasing here.

Top Amazon Reviews


  • Save your money
Style: Non-backlit Style
I bought this less than a year ago. It seemed to work perfectly last winter but this year it cuts the power to my heater long before it reaches the programmed temperature which makes it worthless.
Reviewed in the United States on November 10, 2025 by devster

  • Great product. Lousy instructions.
Style: Non-backlit Style
I got this product the other day and read the instructions and started playing with it. The instructions appear to be good but what you don't know is that they leave out a critical detail that you need, which precludes the use of the 4 timing functions. I was -> <- THIS close to returning it. That's why I gave this 3 stars. I went to lots of trouble to figure out how to use this device, to the extent of reading a bunch of reviews on Amazon and Ali Express and experimenting a good bit. And, I'll tell you exactly how it works. The product has a temperature control mode which can do heating or cooling. The instructions say up to 15 A resistive (like a heating element or lamp) and only 2 A inductive (anything with a motor like a refrigerator, freezer, air conditioner, or fan). 2 A inductive (in the USA) is only 240 W. This is NOT enough power to run a window air conditioner. It is enough to run a small refrigerator, freezer, or a pretty good fan. The unit appears to remember settings over a short term power failure. I have not tested it for long term power failures. If the device isn't behaving like you think it should, press the lower dark spot between the buttons which is a reset button. Here are my descriptions of what the buttons do: MODE - short press - Switch modes if there's not timing cycle engaged. If you are programming some digits, MODE ends the programming, or you can wait for a timeout. MODE - long press - This is what the manual doesn't tell you. This will engage or disengage a timing cycle after you've set the digits. SET - short press - Engage setting mode (settable digits flash). Switch digits to set. SET - long press - If in temperature control mode, change from Fahrenheit to Celsius and back. Here's how to use each mode. Use MODE to get into each mode if there's not a timing cycle engaged. If a timing cycle is engaged, you must disengage it to change modes. Do not initially plug in your heater or cooler or fan or turn it on. The outlet may go ON as soon as you enter temperature control mode. A blue LED above the reset button lights up when the outlet is ON. Temperature Control Mode - active if you see 3 temperatures in either degrees F or degrees C and a heating or cooling icon. If the start temperature is lower than the stop temperature, you are in heating mode. The heating icon will show up. In heating mode, the outlet may go ON immediately if the measured temperature is below the stop temperature. The measured temperature does not have to be between the start temperature and the stop temperature for the outlet to go ON. If the start temperature is higher than the stop temperature, you are in cooling mode. The cooling icon will show up. In cooling mode, the outlet may go ON immediately if the measured temperature is above the stop temperature. The measured temperature does not have to be between the start temperature and the stop temperature for the outlet to go ON. To set the unit press MODE until the three temperature readings appear. Press and hold SET if necessary to change from Fahrenheit to Celsius and back. If I say press something, that means press and release. Press SET. Some digits should start blinking. Press, or press and hold UP or DOWN to set the digits. Press SET to go to the next set of digits. Set them the same way. Press the MODE button to end setting or wait for a timeout. Place the temperature sensor where it can measure the temperature of the space or object or liquid you're interested in. I DON'T know if the sensor is waterproof. To set heating mode, set the start temperature below the stop temperature. The outlet may immediately go ON if heating is required. Plug in and turn on your heater. If the heater has its own thermostat, set it to maximum temperature or continuous ON. To set cooling mode, set the start temperature above the stop temperature. The outlet may immediately go ON if cooling is required. Plug in and turn on your cooler or fan. If the cooler or fan has its own thermostat, set it to minimum temperature or continuous ON. The unit either runs in heating or cooling mode. It does not switch modes automatically. The unit should maintain the desired temperature range by cycling the heater, cooler, or fan on and off. If you want to force the outlet to go off manually, you can enter a timing mode without engaging it. The unit has 4 timing modes. Press MODE to get into each mode if there's not a timing cycle engaged. If a timing cycle is engaged, you must disengage it to change modes. The timing modes do not do time of day or day of week. They are only time intervals. F01 Cycling Timer is the first timing mode. The unit turns the outlet on for the time specified in ON and off for the time specified in OFF then repeats. Press SET. Some digits should start blinking. Press, or press and hold UP or DOWN to set the digits. Press SET to go to the next set of digits. Set them the same way. Press the mode button to end setting or wait for a timeout. Set the ON time and OFF time as desired. Then, which the manual leaves out, you must engage the mode. Press and hold MODE to engage the timer. The outlet should turn ON and the ON timer should start counting down 1 minute at a time. Note that the ON and OFF timers do not show the set point while running. They show the current countdown. When the ON time reaches zero, the outlet should turn off and the OFF timer should start counting down. When the OFF timer reaches zero, the cycle should repeat. If you wish to disengage timer mode, press and hold MODE. You will then be able to switch to other modes again. I have not tested the remaining modes, but here's what the manual says they do (paraphrased): F02 Count Down ON - output turns ON after the countdown ends. F03 Count Down OFF - output turns ON UNTIL the countdown ends. F04 CD ON CD OFF - output turns ON after the ON countdown ends, then the output turns OFF after the OFF countdown ends. Hopefully, this will help you use the device to the fullest. If you have read this review, and now you know how to use the device, I do recommend the device itself. It seems to work well. I have only tested it briefly, and have not done long term testing. Ron ... show more
Reviewed in the United States on January 21, 2022 by R. Frazier

  • This has worked great for our heater application
Style: Backlit Style
Working great so far. using it to control a Ceramic heater for my well pit. It have multiple settings and ways to control what you need for your application as well, not just on or off.
Reviewed in the United States on December 17, 2025 by Andy

  • Inaccurate temperature
Style: Backlit Style
This is very easy to use and set up. However, the temperature reading is inaccurate. I had it next to two other temperature gauges which both read pretty much the same and this one was about 6⁰f off
Reviewed in the United States on December 11, 2025 by Brady

  • Where is the on / off switch for the thermostat itself?
Style: Backlit Style
Seems to work well. Only thing it needs is a simple on / off switch. I am using it for a shop for a portable space heater, and when i'm not in the shop, I don't want the heat on. I cannot find a simple way to turn it on / off without just unplugging the heater from the temp controller.
Reviewed in the United States on December 19, 2025 by Gilbert Willson

  • Just excellent
Style: Non-backlit Style
I've took to keeping a space heater in my room lately. The furnace never comes on when it is cold in this room, and when it does, it stays on so very long after it gets uncomfortably hot. So I closed that vent and got a space heater. Problem is. When the "heat" kicks off. The "fan" keeps going. That sucks in two ways. First it way to noisy. Then, the cold air from the fan hurts my head. BUT. turn the thermostat on my heater all the way hot. And use this little gem as the thermostat. And when it turns "off". No more fan. And this is accurate to a tenth of a degree fahrenheit. AND the temperature sensor (thermocouple), is no longer in the heater. Or even the plug. It is on the end of a 3 meter wire. Put that sensor up on the wall and enjoy a "true" 70.4 degrees fahrenheit. You get to set your "turn on" and your "turn off" temperature. So, in my scenario. Kick on at 70.2 and off at 70.4. That is a pretty tight tolerance, yes. And when the snow blows. That heater is on and off, every couple minutes. And when your thermocouple is accurate to a tenth of a degree. A person can do that. This is a must have for my situation. It will also go down. If you put the thermocouple in a refrigerator the the electronics are not functional. Maybe you are going to use it in the garage. It will go into "cooling" mode. If the "start temperature" is higher than the "stop temperature". That setting is automatic. Easy peasy. But as for settings. FIRST THINGS FIRST. You need to pick your measurement scale (fahrenheit or Celsius). You gotta long press "something". The "set" button?? maybe, i don't remember?? ... show more
Reviewed in the United States on January 4, 2023 by Michael

  • Great temperature-controlled outlet (see details). Recommended
Style: Non-backlit Style
Buying appliances in the middle of a supply chain crisis is no fun. When I purchased an extra refrigerator a year ago, I was lucky to find one at all. Unfortunately, I didn't get one that was "garage" certified, which meant I lost a bunch of perishables when my garage got too cold (the ambient thermostat will turn off the fridge when it gets too cold). The solution was the combination of a Diophros 1500W Space Heater, and a KETOTEK Digital Thermostat Outlet Plug. I'm only using the temperature control mode of the KETOTEK, but it's working great. I'm turning on my "dumb" space heater at 10C, and it shuts off at 12C. That's enough to keep the ambient thermostat on my fridge happy, and I won't have to waste a ton of energy on the heater when it's warm enough without it on. The thermocouple seems accurate, and it's great that you can locate it away from the outlet. I don't love that the design of the unit blocks other outlets on my power strip (it blocks 4 of them, due to the specific nature of my power strip). I also don't like that the blue LED is so bright, as it makes the LCD hard to read without direct lighting. Those are minor quibbles, though, as the KETOTEK is an inexpensive and reliable method for keeping my fridge working when the garage is cold - without wasting energy when it's warm enough for the fridge to operate normally. Recommended ... show more
Reviewed in the United States on January 23, 2022 by Dad, the engineer

Can't find a product?

Find it on Amazon first, then paste the link below.
Checking for best price...