Search  for anything...

EPOXY Resin Crystal Clear 1 Gallon Kit | 1:1 Resin and Hardener for Super Gloss Coating | for Bars, Outdoor Table Top, Countertop, Art | Safe for Use on Wood, Metal, Stone, Plastic, Marine Sealer

  • Based on 5,387 reviews
Condition: New
Checking for the best price...
$68.98 Why this price?
Save $21.01 was $89.99

Buy Now, Pay Later


As low as $11.50 / mo
  • – 6-month term
  • – No impact on credit
  • – Instant approval decision
  • – Secure and straightforward checkout

Ready to go? Add this product to your cart and select a plan during checkout.

Payment plans are offered through our trusted finance partners Klarna, PayTomorrow, Affirm, Afterpay, Apple Pay, and PayPal. No-credit-needed leasing options through Acima may also be available at checkout.

Learn more about financing & leasing here.

Free shipping on this product

Non-returnable. Transportation of this item is subject to hazardous materials regulation

View our full returns policy here.


Availability: Only 1 left in stock, order soon!
Fulfilled by Amazon

Arrives Saturday, Sep 27
Order within 15 minutes
Available payment plans shown during checkout

Features

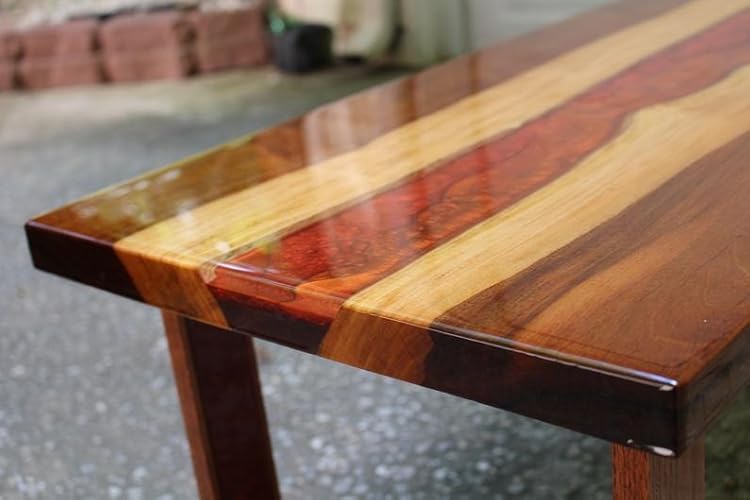
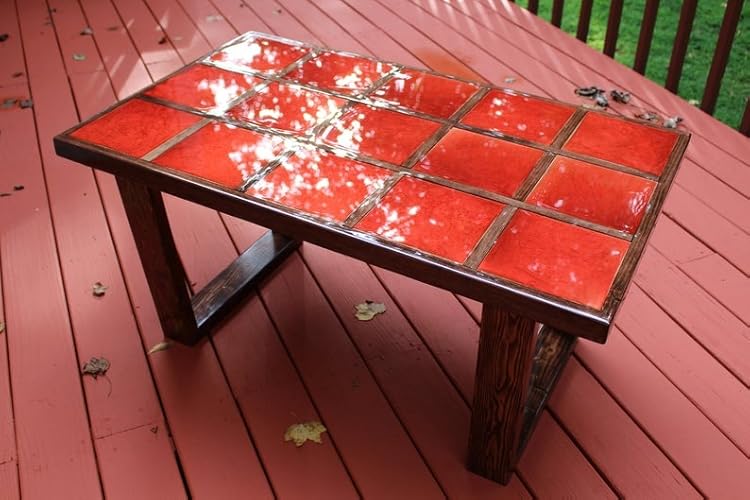
  • FLAWLESS CRYSTAL CLEAR COATING - Achieve crystal clear, flawlessly transparent epoxy coatings with our ultra high performance 1 gal. resin and hardener kit! This premium professional grade epoxy goes on smooth and dries evenly to eliminate crawling, trickling, craters and "fish eyes".
  • CUSTOM DIY PROJECTS, ARTWORK, SURFACES - Create customized works of one-of-a-kind artisan craftsmanship. Perfect for DIY projects, countertops, bar tops, tabletops, river tables, jewelry, vehicle surface sealing, coffee tables, arts & crafts and nearly endless creative possibilities!
  • UV, SCRATCH AND WATER-RESISTANT - We're committed to the highest quality engineering and production standards. Our dedicated research & development team has meticulously perfected the East Coast Resin epoxy formula for superior UV-resistance, scratch-resistance, and moisture-resistance when compared to other industry brands.
  • SAFE AND ODORLESS - Surfaces coated with our premium epoxy are 100% safe for food to touch, and durably maintain their structural integrity over time without breaking down or leaching chemicals. Our odorless formula requires no mask and makes it easy to breathe and work in comfort all day long.
  • EXTRA EASY TO APPLY - With East Coast Resin epoxy, you don't have to be a pro to achieve professional results the very first time! Our smooth-coating resin & hardener kit is straightforward and easy to apply - even as a first-time novice or beginner hobbyist. Detailed instructions are included with each kit.

Description

PREMIUM EASY-ON EPOXY FOR SUPER GLOSS COATING Are you looking for a flawlessly glass-clear epoxy that will make surfaces, countertops, and craft projects vibrantly come to life? Do you want to guarantee DIY project perfection without the hassle or do-over? Achieve professional-level, crystal clear results with this stunning surface epoxy from East Coast Resin! EPOXY MADE EASY Anyone can do it! Our kit contains one part resin and one part hardener. Mix in a 1:1 ratio, pour, and then smooth with a foam spreader. Detailed instructions come with each kit. Knock out multiple projects in a day with ultra fast 30 to 35-minute work times. Minimal bubbles that naturally appear during coating can be quickly heated and burned off with a blowtorch or heat gun. DURABLE – RESILIENT – LONG-LASTING Formulated with superior UV and moisture protection that resists yellowing, rain, humidity, and is ideal for long-term outdoor applications. Durable and extra hard-setting to resist scratches and scoring. SAFE FOR USE ON: ✅ Wood ✅ Veneer ✅ Aluminum ✅ Stainless ✅ Tile ✅ Carbon fiber ✅ Fiberglass ✅ Canvas ✅ Ceramic ✅ Painted surfaces ✅ Tabletops ✅ Porcelain ✅ Concrete ✅ Stone ✅ Rocks ✅ Cork ✅ Pennies ✅ Bottle caps ✅ Artwork ✅ Acrylic paint Bring surfaces to life and perfectly personalize every new project... Click ‘ADD TO CART’ or ‘BUY NOW ‘ Today!

Brand: East Coast Resin


Specific Uses For Product: Art, Countertop, Craft, Furniture, Table Top Coating, Tile Repair, Wall Art


Material: wood, veneer, aluminum, stainless steel, tile, carbon fiber, fiberglass, canvas, ceramic, painted surfaces, tabletops, porcelain, concrete, stone, rocks, cork, pennies, bottle caps, artwork, acrylic paint See more


Item Form: Liquid


Special Feature: Crystal clear, UV-resistant, scratch-resistant, water-resistant, safe for food contact, easy to apply, and versatile for various surfaces and DIY projects See more


Is Discontinued By Manufacturer ‏ : ‎ No


Product Dimensions ‏ : ‎ 9 x 4.5 x 10 inches; 8 Pounds


Item model number ‏ : ‎ CCER1


Date First Available ‏ : ‎ September 15, 2014


Manufacturer ‏ : ‎ East Coast Resin


Best Sellers Rank: #210,247 in Tools & Home Improvement (See Top 100 in Tools & Home Improvement) #204 in Household Polyurethanes, Shellac & Varnish


#204 in Household Polyurethanes, Shellac & Varnish:


Customer Reviews: 4.6 4.6 out of 5 stars 5,387 ratings


Frequently asked questions

If you place your order now, the estimated arrival date for this product is: Saturday, Sep 27

This item is non-returnable:

Non-returnable. Transportation of this item is subject to hazardous materials regulation

View our full returns policy here.

  • Klarna Financing
  • Affirm Pay in 4
  • Affirm Financing
  • Afterpay Financing
  • PayTomorrow Financing
  • Financing through Apple Pay
Leasing options through Acima may also be available during checkout.

Learn more about financing & leasing here.

Top Amazon Reviews


  • Awesome Product - Be Proactive in your application.
I purchased this product to coat my custom copper countertops. I used a thin copper sheeting and the corners started lifting and were sort of sharp. I theorized that this product would coat the corners and edges to eliminate the sharp corners and it worked. This product is SUPER glossy and if I did this again, I would look for a matte product but if you are looking for crystal clear super shine results, this product is awesome. I will be using this product a ton and plan to use it to coat my workbenches in my shop to create an ultra-hard work surface. Here is my story and some application tips. I waited a while (6 months) before using this product in order to allow the copper to Patina a little longer. Once I was ready, I waited even longer because their application instructions made it seem like it was a PIA process. When I finally decided to do this, I looked up videos on epoxy countertop applications that were not specific to this manufacturer and it turns out that all epoxies are mostly the same. I found a technique that worked very well and was super simple so here are my tips. Tools I used are 1/8" notch trowel (like the one you use for thinset and mortar), paint mixing stick, drill with mixing attachment, timer, resin paper (to protect surfaces from run-off), GOOD - not cheap - painters tape; 24 oz disposable mixing buckets (with measurement indicators), large (at least 60 oz) durable mixing container, foam brush; propane torch and/or heat gun), acetone, shop rags, 100% alcohol or denatured alcohol (for prep), tack cloth, work light (or adequate overhead lighting; NOTE - I had 32 square feet to cover and found that 30 minutes was a perfect amount of working time so I would not do anymore surface area than this per mix; READY TO GO? - Clean surface with alcohol first; be VERY detailed in covering up areas below to protect from potential run-off; DO NOT use tools that you want to keep, everything you use will require excess cleaning time to restore so plan on throwing this stuff away afterwards unless you do not mind having hardened epoxy on it; make sure that your torch OR heat gun is actually working and that you have a back up plan ready to go if your heat source fails (or runs out); Have acetone and rags ready to use for clean up of spillage; make sure that your surface is 100% free of debris and dust - use a tack cloth if you want to be absolutely certain; ensure that you have adequate lighting to spot imperfections during application; Before mixing and applying, triple check your work and run-off protection - ALSO, use painters tape to outline edge the bottom of your work piece, just make sure that the tape is NOT hanging over the edge - this ensures that your drips on the sides will not create epoxy icicles which are not the funnest thing to remove; make sure that you have a STURDY container for mixing - I mixed mine with a drill and compound mixer attachment and I used a very thin container to mix it in, the product is thick at first and when I mixed it with a drill, the mixer attachment grabbed on to the product and twisted the mixing container out of my hands and spilled a large amount of product onto the surface I was mixing on - I should have used a bigger and thicker container to mix in and should have mixed it on something that I did not care had spillage; mix a 1:1 ratio that yields 3 fluid oz of mixture/square foot of surface (don't forget to include the sides of the workpiece in your calculations) and mix with a drill for two minutes; after mixing is done, set a timer for 20 minutes to alert you that you only have 10 more minutes of working time, Pour mixture along the center of the work piece (apply what you think you need but try to be conservative, a little goes a long way, you can always add more, this helps avoid waste and run-off), spread product from middle to edges with the notched part of your notch trowel, once the top is fully coated, run the trowel from front to back towards edges to get excess to run over edges, run your work light over the entire piece to look for areas that were not coated and coat as necessary, run foam brush over entire work piece to smooth out application and cover missed spots, let product be for 2 minutes, use torch or heat gun to go over ENTIRE surface (keep flame about 6 inches away from surface AND keep in mind that heat will cause any adhesive below to fail or loosen so do not keep a heat source on one spot for more than a second; wait two minutes and repeat heating (even if you do not see bubbles); set a timer for 30 minutes, after 30 minutes has gone by, heat the entire work piece a final time; wait 24 - 72 hours before putting anything on it (24 hours is enough time, but why not be super certain?); Repeat as necessary. ... show more
Reviewed in the United States on December 9, 2018 by Scott Vazinski

  • Great product - user friendly especially for first timers!!
With some assistance, built a bar in my basement from pallets I collected from work. After deciding on my design, I thought about my finish. Since I like the rustic look I thought I try the char method. I was happy with that but now I wanted to step it up a notch. I thought an epoxy resin finish was the way to go! I researched which product to use & through all the reviews I read on many decided on this one. I am happy I did! I watched a bunch of videos on doing it because I now had this project I was already pleased with but didn’t want to screw it up - there’s no do over. I actually delayed starting it because of the what ifs. I got myself together, gave myself the entire weekend to do nothing other than complete this. My takeaways on using this is READ DIRECTIONS THOROUGHLY & then read them again. Heed the warnings & you’ll have incredible results. My surface totaled 18sq ft - I used 2 one gallon kits (& could’ve used maybe another half of one). Be prepared— have all your measurements, supplies, floor coverings, & cleaners at hand & you won’t go wrong. I started around 10am on Saturday & did my last pour around 6:30 Sunday. I wanted to do the pours with in the 4-12 hour range as to not have to sand & clean surface. Use a timer to track your mixing time, work steady & swiftly- don’t overwork material. Be vigilant on air bubbles more will surface when you look away. LOL Overall- I liked this product & I love how my bar looks!! ... show more
Reviewed in the United States on November 12, 2018 by Kelly Kelly

  • In my opinion this is the best choice for professional projects
Hi guys First time I bought this epoxy in 2018 and since then I have used this epoxy on a few tens of river & epoxy tables. In my opinion this is the best choice for professional projects. May be my advices and my opinion will be useful for beginners. First of all, about the properties of this epoxy. This epoxy really creates deep and beautiful gloss finish. The main condition - you must follow all the rules set out in the manual. The hardness. I use two types East Coast Resin, this epoxy and epoxy for tabletops with bigger hardness. My customers don't have questions or complaints about scratches. At the same time I need to say that Shore D for ANY epoxy is similar, 76-82. This means any epoxy can be damaged. Any. All we dream to get perfect epoxy tabletop. You exactly will get perfect tabletop. The payment - carefully and scrupulously go with the manual. This is not easy. but quite doable. I would recommend to learn the manual by heart. Professionalism is always hidden under a million invisible nuances. Here I have to say that ease of using and high quality finish are inversely proportional. I never had yellow or pink spots with this epoxy. But I know how to get yellow shade. You need to break the rule of using. If you will leave mixed epoxy in a can, after 7-8 minutes the epoxy will heat up to a high temperature and turn yellow. Room temperatures below 72 will promote rapid boiling and yellowness. I saw the negative review but this is mistake of using. How to use the epoxy correctly? Temperature in the room 75-85. The minimal temperature is 72. Make sure before mixing that hardener and epoxy have correct temperature and your table top also. Hold please correct temperature during 24 hours after pouring. Hold the temperature at night. Always use gloves and I would recommend a respirator. When you will mix an epoxy don't use a drill or quick mixing. Mix in the first container - 3-4 minutes Every 30 seconds, you can gently scrape off the sides of the container with no power. This is only valid in the first container. Pour slowly into a second container. Stir for 1.5 - 2 minutes. DO NOT scrape the SECOND container. If you are a beginner, work with volumes no larger than 64 ounces. DO NOT wait for the epoxy to heat up in the container. Or you are more likely to get a yellow tint DO NOT scrape the container WHEN POURING the epoxy onto the surface. Never try to create a thick layer. Not more than 1/4 in. It's easier to create several layers than to get overheat and, as a result, possible yellowing. The most difficult for beginners is a seal coat when bubbles will appear after application. This is air from wood. A torch will be useful. In my opinion a torch better than a heat gun. A flood coat is some easier. I would recommend to create two layers of flood coat. There may be too much information here, but as a result you can get a perfect surface. Best wishes guys! ... show more
Reviewed in the United States on March 2, 2021 by Oleksii Oleksii

Can't find a product?

Find it on Amazon first, then paste the link below.
Checking for best price...