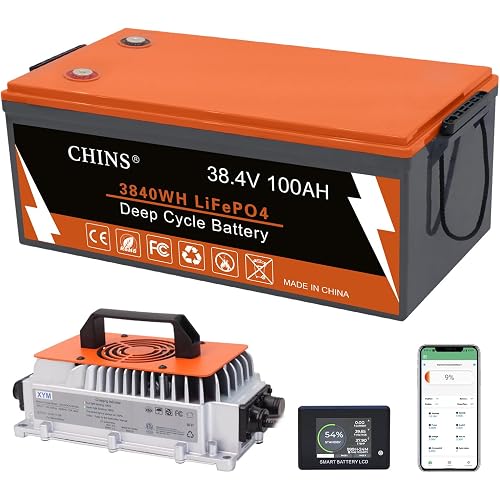
Search  for anything...

48V(51.2V) LiFePO4 Lithium Golf Cart Battery Built-in 200A BMS,with Mobile APP,Touch Monitor and retention strap,6000+ Cycles,Perfect for Golf Carts(GFA48V-100AH With Charger)

  • Based on 292 reviews
Condition: New
Checking for product changes
$1,099.99 Why this price?
Save $200.00 was $1,299.99

Buy Now, Pay Later


As low as / mo
  • – Up to 36-month term if approved
  • – No impact on credit
  • – Instant approval decision
  • – Secure and straightforward checkout

Ready to go? Add this product to your cart and select a plan during checkout.

Payment plans are offered through our trusted finance partners Klarna, PayTomorrow, Affirm, Afterpay, Apple Pay, and PayPal. No-credit-needed leasing options through Acima may also be available at checkout.

Learn more about financing & leasing here.

Free shipping on this product

30-day refund/replacement

To qualify for a full refund, items must be returned in their original, unused condition. If an item is returned in a used, damaged, or materially different state, you may be granted a partial refund.

To initiate a return, please visit our Returns Center.

View our full returns policy here.


Availability: In Stock.
Fulfilled by Cloudenergy

Arrives Sunday, Jul 20
Order within 13 hours and 6 minutes
Available payment plans shown during checkout

Features

  • 24 hours Customer ServiceCloudenergy provides technical support and online customer service with fast feedback within 24 hours. If you have any product-related issues or questions, please get in touch with us directly, Cloudenergy support team is always here for you.
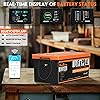
  • 3-in-1 PackageCloudenergy 48V (51.2V) 100Ah Lithium-Ion Golf Cart Battery, the kit comes with everything! Comes with a high-performance 58.4V 20A Li-Ion quick charger, a 2.8-inch LCD touch screen (for real-time battery information), and a 78.74-inch battery mounting strap to make battery installation easy and secure!
  • Built-in Bluetooth 200A BMS Cloudenergy golf cart 48V 100Ah lithium battery built-in Bluetooth BMS, easy to monitor the battery information, and both high-performance charging and discharging protection, With a great 10.24kw power,constant discharge 200A(Peak 400A 35S, 600A 3S). BMS configured with low-temperature cut-off technology can effectively prevent over-charging, over-discharging, over-current, short-circuit and over-temperature.
  • 6000+ deep cycles & 80% DODCloudenergy 48V 100Ah LiFePO4 battery provides more than 6000 deep cycles compared to traditional lead-acid batteries only about 300-600 cycles, which extends the battery lifespan more than 10 times. 6000+ deep cycles using life and 80% depth of discharge are also better than many LiFePO4 battery of other brands.
  • Safe and Reliable Power SourceCloudenergy golf cart 48V 100Ah batteries are designed for 48V golf carts, utilizing high-density A-grade cells for high energy(Support 2C Discharge) and performance,The battery case is made of ABS, which is fireproof shockproof and IP67,Compatible with all major brands of golf cart controllers on the market,they are ideal for golf carts,electric vehicles,Trolling Motor,marine engines and other applications.

Brand: Cloudenergy


Size: GFA48V-100AH With Charger


Product Dimensions: 10.59"D x 20.55"W x 8.66"H


Number Of Cells: 16


Resistance: 20 Milliohms


Terminal: M8


Automotive Fit Type: Universal Fit


Manufacturer: Cloudenergy


Brand: ‎Cloudenergy


Size: ‎GFA48V-100AH With Charger


Product Dimensions: ‎10.59"D x 20.55"W x 8.66"H


Number Of Cells: ‎16


Resistance: ‎20 Milliohms


Terminal: ‎M8


Automotive Fit Type: ‎Universal Fit


Manufacturer: ‎Cloudenergy


Model: ‎GFA48V-100AH With Charger


Item Weight: ‎82.7 pounds


Country of Origin: ‎China


Item model number: ‎GFA48V-100AH With Charger


Batteries: ‎16 Lithium Ion batteries required.


Manufacturer Part Number: ‎GF2024046


Date First Available: April 26, 2024


Frequently asked questions

If you place your order now, the estimated arrival date for this product is: Sunday, Jul 20

Yes, absolutely! You may return this product for a full refund within 30 days of receiving it.

To initiate a return, please visit our Returns Center.

View our full returns policy here.

  • Klarna Financing
  • Affirm Pay in 4
  • Affirm Financing
  • Afterpay Financing
  • PayTomorrow Financing
  • Financing through Apple Pay
Leasing options through Acima may also be available during checkout.

Learn more about financing & leasing here.

Top Amazon Reviews


  • Installing battery on Club Car Precedent
Installing Cloud Energy LiFePO4 in a Club Car Precedent This is how I installed it. So far, I am very happy with it. Other stuff needed for install: 48 to 12 volt converter with key wire 20 amp port charger plug 24 inch negative 4 AWG battery cable about 12 feet of 16 AWG wire battery terminal insulating covers 20 amp extension cord battery strap to remove old batteries 8 stainless self tapping screws various electrical connection pieces and electrical tape heavy duty Velcro for mounting LCD Upon receiving new battery, Cloud Energy recommends testing the voltage and charging the battery to 100%. Use the included LCD display screen to test the voltage. The LCD battery connector has a very small notch to guide it the correct orientation. Using a flashlight to properly see and orient the notch is helpful. The battery can be fully charged by installing the post bolts and using the battery charger. Save the circular plastic post protectors and remove the posts and put the plastic pieces back before installing the battery. 1 switch to tow mode and turn off key 2 remove old batteries 3 Using dremel or multi-tool, remove plastic divider at bottom of battery compartment. Make flush with bottom of compartment. Cut back two protruding plastic pieces on rear side of compartment to ensure adequate width for new battery 4 Remove two screws from top of plastic moulding on forward side of battery compartment. Remove two screws from each of the two side plates. 5 Pull up on plastic moulding just enough to pull mat from under moulding bottom edge and from under side plates. Curl mat back to allow access to three screws holding down kick plate at bottom of moulding. Remove screws. 6 Remove plastic ring around charger port in kick plate. Insert a pick or similar tool in side holes to release ring. Remove screws holding charger plug to kick plate. Pull charger plug and wires into battery compartment. While pulling up on plastic moulding, pull out kick plate. 7 Remove one screw holding metal plate on back of battery compartment. Pull plate up and forward to gain access to controller and bms computer area. Follow charger plug wire harness through metal plate and unplug at two connecting points. Pull charger plug wires forward through metal plate. Unclip and save wire protective covering. The charger plug assembly can be discarded. Follow cart negative cable wire through metal plate to post on controller. Remove bolt and place the 24 inch negative terminal cable (purchased) under the old negative cable eye and tighten bolt back over both cable eyes. Run the new negative cable down to the base of the metal plate and pull through aside the other wire harnesses. Slide a portion of the saved wire covering over the new negative cable where it exits the metal plate (to protect it from abrasion from the edge of the metal plate). Use electrical tape or other means to cover (insulate) the eye of the old negative cable. Return the metal plate back to its original position and replace screw. 8 The original 6 8 volt battery setup allowed Club Car to use two of the batteries for the 12 volt accessories (actually running them at 16 volts). With only one 48 volt battery, a 48 to 12 volt converter is required if you have 12 volt accessories. Install the purchased 48 to 12 volt converter (with key wire) on the right (passengers) side of the rear wall. Mount it horizontally. Follow the converter instructions for wiring. The accessories negative cable comes out of the largest wire harness running through the bottom of the metal plate. It has a bullet connector. Unplug the connector and cut it off so that the wire can be connected to the converter accessories negative wire. Tape off the other (receiving) side of bullet connector and slide the wire out of the way, through the metal plate. Run the key wire through the bottom of the plastic moulding and in the right channel under the floor mat. Remove the dash cover by removing two screws on either side and a small screw from the top. Rotate the dash cover down out of the way. Connect the key wire to the blue wire coming from the on-off key mechanism. When preparing the converter wire harness, make sure that you leave enough wire to go around the new battery to reach the terminal posts which will be on the left side of the cart. Run the battery LCD wire through the bottom of the plastic moulding next to the converter key wire. Run it past the key wire and past the steering column. Pull through about 1.5 feet extra so that the LCD can be brought close for easy reading. Remove the old battery status indicator and clip and insulate the ends of its wires. Run the LCD wire through the old battery status indicator hole. Velcro the LCD indicator to a position above the steering column. The dash cover can now be reinstalled. 9 Run the hold down ratchet straps under the hold down bars and leave enough slack on both sides to accept the battery. Install the battery with the terminal posts on the left (driver side) of the cart. Double up end of ratchet straps to shorten straps and tighten. 10 Install the battery charger on the forward wall (drivers side). Install it vertically with the AC cord on the bottom. The screw holes fit on two different columns, leaving air space behind the charger (good for cooling). 11 Install the purchased 20 amp port charger plug in the kick plate. Re-install the kick plate and three screws. Plug charger into port charger plug receptacle. Re-install floor mat and replace four screws in side plates. Replace screws in top of plastic moulding. 12 Slide terminal insulating covers over negative and positive cables. Attach negative and positive cables to battery with cart cable closest to battery, then charger cable and accessories cable last. 13 Clean up wire runs and secure with zip-ties. Make sure that wires do not touch sides of charger. ... show more
Reviewed in the United States on September 20, 2024 by Sailor Rick Sailor Rick

  • Great all in one kit
Replaced some aging lead-acid batteries in my Yamaha Drive/g29 48v cart. Range had dropped to only about 8-10 miles and it was lethargic up hills. Kit arrived quickly and well packed. Has everything you need and the total conversion only took about 2 hours start to finish. The battery and it's charger only take about half the space under the seat, freeing up a fair bit of storage room. The kit included 2 tiedown straps, not just one as shown, and the battery display also came with a mounting bracket, which was a nice bonus too. The cart is much more spritely. Acceleration is improved, gained about 3mph on the top speed, and much less speed loss when going up hills. The weight loss is also very noticeable. It actually made the ride a little jittery since the suspension was intended to carry 350lbs of batteries, but lowering the pressure in the tires helped smooth it out again. This cart has regen braking, which also still works as it did with the lead acids. No additional resistors or anything needed, which some other lithium replacements need or you forego your cart's Regen ability or add extra components. The display is handy to keep an eye on the battery level and how many amps your cart is pulling. This stock motor/controller pegs out at about 120 amps going up hills with 3 people onboard, and cruising at 20mph on flat ground, pulls 60-70 amps. 100 amp batteries would probably be ok for most stock carts, but having 200 amp continuous means there is a lot more headroom. Have had zero cut-outs. Range seems to be 40-45 miles or so. Was running it around the (Hilly) neighborhood all afternoon and still had 55%. Huge improvement from the tired lead acids. Even when they were new, you could only get about 15 miles and they would be down to 50%. The other benefit here is you can actually use 100% of the battery capacity, and you get consistent power the whole time, unlike leads that you shouldn't drain below 50% unless absolutely necessary, and performance noticeably fades as the battery drains. Build quality also feels better than expected. Hardware is good quality, no "rough edges", impressive for the price. Battery and charger are both fully waterproof, which not all of these options are. I just removed the stock charger connector, leaving the empty charge port flange. To charge, I just fish the charger's cord out and plug in an extension cord. Use at least a 14 gauge cord, as the charger pulls about 13 amps. Having the charger onboard is handy, so can top up anywhere there's an outlet. Full charge time is also as advertised. It takes about 1 hour per 20%, or just over 5 hours to go 0-100. Photos show before and after, a lot of extra space now. Update after appx 1yr- things had been smooth sailing, the first glitch was after about 9 months when the battery was low, but still showing about 20%. The cart suddenly died, the display instantly went to 0% and indicated output was disabled. I towed the cart back the last mile, and it charged up fine. I made a note to just not let it drop under 25%. Then only a few weeks later, it did the same thing though still indicating 40%. I'd also started having an issue with the charger occasionally not working, or it would charge for a minute or two, then stop. Unplugging and replugging would eventually get it going, but it was getting more finicky each time. I reached out to Cloudenergy support on their website, not expecting much. It'd been nearly a year, and I couldn't find any sort of explicit warranty given. Hey, it's a "cheap" battery, perhaps that was coming home to roost. To my surprise I got a response only a few hours later just asking for the Amazon order # and they'd get a new charger shipped out totally free. They also said a firmware update was available for the BMS that should help with the incorrect battery % readouts. They walked me through getting a (different) app to connect to the battery, and then using a special login so they could access it and do the update. We coordinated over Whatsapp and (Jovy) was very helpful and clear. Only a few minutes and it was done. Was just told to do a full charge to 100% to "reset" the calibration. They also said if the cart cut out again with plenty of charge indicated, to reach back out and they'd replace the entire battery, however they looked at all the cell voltages via the app and didn't believe one was bad and it was just a miscalibrated BMS. I have had the issue since and have run it down to 20% charge, so I'm inclined to believe that was it. So A+ customer support for sure. The new charger showed up only about a week later. Looking into this a little more, here's some nerdy details as to why that might happen. My cart has a step-down converter for the 12v lighting and accessories. This converter draws a small amount of power all the time, even if no accessories are on. (Unless the "tow" switch is flipped). It's not much, but adds up if the cart sits for several weeks without being charged. The BMS on these batteries sets 100% at a target voltage, then counts amp-hours out to calculate percentage remaining (as voltage drop on lifepo4 cells is very minimal across the charge range). However, it can't detect very small loads- so that tiny vampire draw of the 12v converter manages to "sneak out" a fair amount of juice over a few weeks, that the BMS is unaware of, resulting in it showing an erroneously high state of charge. The solution is to either wire the DC converter to only have power when the key is on, or flip the "tow" switch if the cart is going to sit for a while, just what I started doing. From what I read the newer firmware still mainly counts amp-hours out, but then does cross that against some predetermined average voltage levels, so if a discrepancy arises, it will err on the side of caution and report the lower as that slight phantom drain is fairly common in golf carts, particularly off-course ones that have extra accessories added and I'm not the first to have this issue by any means. ... show more
Reviewed in the United States on September 22, 2024 by Ryan Whitehouse Ryan Whitehouse

Can't find a product?

Find it on Amazon first, then paste the link below.