Search  for anything...

MakarttPro Acrylic Powder 2oz – Long-Lasting, Durable Formula for Nail Extensions & Nail Art, Easy for Salon & Home Use (Elegant Beige, 2oz)

  • Based on 602 reviews
Condition: New
Checking for inventory...

Notify me when this product is back in stock

$15.99 Why this price?
Save $103.90 was $119.89

Buy Now, Pay Later


As low as $3 / mo
  • – 4-month term
  • – No impact on credit to apply
  • – Instant approval decision
  • – Secure and straightforward checkout

Payment plans are offered through our trusted finance partners Klarna, Affirm, Afterpay, Apple Pay, and PayTomorrow. No-credit-needed leasing options through Acima may also be available at checkout.

Learn more about financing & leasing here.

Selected Option

Free shipping on this product

FREE 30-day refund/replacement

To qualify for a full refund, items must be returned in their original, unused condition. If an item is returned in a used, damaged, or materially different state, you may be granted a partial refund.

To initiate a return, please visit our Returns Center.

View our full returns policy here.


Availability: Unavailable
Fulfilled by Amazon
Available payment plans shown during checkout

Color: Elegant Beige


Size: 2 Ounce


Features

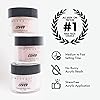
  • Ultra-durable: Our acrylic cover powders are specifically formulated to provide exceptional strength and durability, delivering long-lasting, chip-resistant protection for your nails. Whether you're looking for a reliable solution for everyday wear and tear or seeking to enhance the longevity of your nail enhancements, our cover powders are designed to withstand the rigors of daily life while maintaining their impeccable appearance.
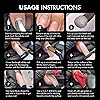
  • Smooth application: Experience the ease and precision of applying our acrylic cover powders. The finely milled texture ensures a smooth application process, allowing the powders to glide effortlessly onto the nails for a seamless, flawless finish. Say goodbye to clumping, uneven coverage, and frustrating application struggles with our cover powders, achieving professional-quality results has never been easier.
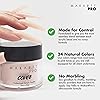
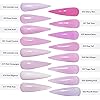
  • Versatile shades: Dive into a world of endless creativity with our diverse range of acrylic cover powder shades. From timeless neutrals and classic hues to bold, vibrant pops of color, our collection offers an array of versatile options to suit any style, occasion, or mood. Whether you prefer understated elegance or statement-making nail art, our cover powders provide the perfect canvas for your artistic vision.
  • Superior adhesion: Trust in the superior adhesion of our acrylic cover powders to ensure your nail enhancements stay firmly in place. Engineered to promote optimal bonding with the natural nail and other acrylic layers, our powders minimize the risk of lifting, chipping, or peeling, allowing you to enjoy consistently flawless, long-lasting results. With enhanced adhesion, you can have confidence in the durability and resilience of your nail enhancements.
  • Professional quality: Elevate your nail game with our premium-grade acrylic cover powders, designed to meet the exacting standards of professional nail technicians and enthusiasts alike. Crafted with quality and performance in mind.

Package Dimensions ‏ : ‎ 2.09 x 2.05 x 1.93 inches; 2 ounces


UPC ‏ :


Manufacturer ‏ : ‎ MakarttPro


Best Sellers Rank: #62,112 in Beauty & Personal Care (See Top 100 in Beauty & Personal Care) #34 in Acrylic False Nail Powders


#34 in Acrylic False Nail Powders:


Customer Reviews: 4.6 4.6 out of 5 stars (150)


Brand Name: MakarttPro


Package Size Name: 2oz


Manufacturer: MakarttPro


Unit Count: 2.0 Ounce


UPC: 799443876388


Manufacturer Part Number: COVR012


Color: Elegant Beige


Finish Types: Glossy


Item Weight: 2 Ounces


Frequently asked questions

This product is currently out of stock. Please check back later for shipping info.

Yes, absolutely! You may return this product for a full refund within 30 days of receiving it.

To initiate a return, please visit our Returns Center.

View our full returns policy here.

  • Klarna Financing
  • Affirm Pay in 4
  • Affirm Financing
  • Afterpay Financing
  • PayTomorrow Financing
  • Financing through Apple Pay
Leasing options through Acima may also be available during checkout.

Learn more about financing & leasing here.

Top Amazon Reviews


  • Only acrylic brand I use
Color: Blossom Beam Size: 2 Ounce
Love this acrylic it melt perfectly
Reviewed in the United States on May 16, 2026 by Britt Nicole

  • BUTT TERRR RYYYY!!!
Color: Pink Whisper Size: 2 Ounce
I mean, yes! This powder is so buttery like.. forget the price because it’s worth it!!! You literally control every part of this product and don’t have to worry about it running to your side nail or anything
Reviewed in the United States on April 13, 2026 by Beaudeeful Som

  • Good shade
Color: Soft Pink Size: 2 Ounce
The exact shade I’ve been trying to find.
Reviewed in the United States on February 15, 2026 by Sinnia

  • Great Acrylic Powder, Generally! Unless You Have Adhesion Issues Like I Do😭 I Found A Fix!! Great Acrylic Powder, Generally! Unless You Have Adhesion Issues Like I Do😭 I Found A Fix!!
Color: Vanilla Cream Size: 2 Ounce
The photos really can't do these justice. Firstly though please note that I installed these nails 2 days ago, and did quite a lot of filing to make them look this way. With my method though, they look almost sculpted when viewed from the side. I'll detail everything below. What I used: * Custom acrylic powder mix of Young Nails Speed Clear and Makartt Pink Silk, fifty- fifty ratio. * Young Nails Low Odor monomer. * Size 10 Kolinsky brush. * TPO/HEMA free etc top coat. * E file. * 180 grit hand file. * Flame bit. * Standard barrel bit with 180 band. * Cuticle nippers. * Young Nails Protein Bond. * Acetone nail polish remover. * 70% rubbing alcohol. I used the Leilani nails, from KISS. They have a natural smile line, line of nails in short square and these medium coffins/ ballerina and they are the best natural looking falsies I've ever had or seen that aren't hand- sculpted, costing hundreds of dollars per install!!! The review section over there is just full of raving fans- me included- but, honestly, equally as important is this acrylic powder, and I'll explain why below. Before anything, I fully washed then sanitized my hands and tools with alcohol. I gave myself a cuticle remover treatment, pushed back my cuticles, then gave myself a Russian manicure. Yes, some say that's bad but I promise you, they're incredibly healthy and beautiful when done well and carefully. I've been doing them for years and as long as I'm gentile, there's no issue or risk of infection or injury. Nail Career Education has a great video about this method on her YouTube now. Anyways... After that, I thoroughly cleaned my nails with the polish remover, let them dry, then finished them with an alcohol wipe before applying primer. I chose the nails for my fingers, leaving enough estimated room for the acrylic that would go under them and ensuring that I chose a size a little bigger than my nail beds to give my nail beds a slightly elongated look when finished, where possible. Then, with the hand file, I shaped each nail at the cuticle area to match my cuticle shape as closely as possible. Time to apply the acrylic! To get a natural, light pink base that would blend seamlessly with the press ons' pink, I mixed my new custom pink. Makartt has fantastic colors but the adhesion on me hasn't been great in the past, so I now mix their powders with the clear from Young Nails. It is flawless. I apply to the whole of my nail bed and extend it a little past my nail free edge, let it set for about 5-10 seconds, and when our starts to look matte or firm, I install the press on by laying the cuticle edge down first and pushing it firmly back into it meets my cuticle edge, pushing it until it's almost under the cuticle fold. This is what makes it look like it's really my nail, growing out of my hand. The angle is about 45° as I lay the nail down onto the rest of the acrylic, which starts thin at the cuticle line and gets thicker towards the finger tip, as this creates an apex where otherwise there really isn't much of one to speak of, and ensures that I get even coverage for the entire pink part of the press on, which avoids the awkward delineation for it to be seen where my fingertip actually ends under the press on nail. If you use clear gel or glue on extended nail bed French tips, you know exactly what I'm talking about lol! Once this is done, I gently press all angles and make sure I'm happy with the apex height, and double check that the whole nail is secured. Then I clean up any spillage of acrylic around the nail and move on to repeat the process with the next nail. After all the nails on that hand are done, I go back to the first nail of that hand that I did, and grab my hand file. On the under edges of the sides, I file until from the root to the free edge, the angle is straight or slightly up, like what you see in the photo with my thumb. You'll notice that all the nails have down turned side edges. I find that ugly, sloppy and unsophisticated personally, so I give all my nails that more European under shape instead. So, once that's done, I grab my drill with the sanding band and carve down my cuticle area. This way, I can get it very thin, which means I'll barely notice it when it grows out, and my hair won't get caught. It also helps prevent lifting, which is great for me, since I'm prone to lifting and greenies. This step additionally helps me define the apex a bit, too. I finish this step by using my flame bit to finish carving out my final cuticle line shape- for me, that's rather oval as opposed to the more soft square shape these nails tend to come with. The last major step is that I use the sanding band bit to trim and carve the side walls areas right by my cuticle areas. This gets rid of extra acrylic and press on nail material that I might have missed, and guarantees that I walk away with the perfect, crisp cuticle and side line fit and shape, like I really just spent a few hours in a salon chair getting sculpted acrylics. You can see up close on my right index finger the results of my filing and cuticle routine. When all of that is finished, I've spent about 30 minutes of my life, and there's very little left to do. I use the hand file to remove the manufacturer plastic usually left at the free edge of each nail, then wipe each nail and fingertip down thoroughly and carefully with my rubbing alcohol on a lint free hand towel. After my nails and fingers dry, I head over to my finishing station, where I've got my nail charms, top coats etc and my lamp. I, for this set, chose to wear them glossy, so I painted my pinky, being very, very mindful of my cuticle area and shape. I baked it for 60 seconds, then repeated with a second coat. I did the same for the rest of my fingers after, one by one completing them. Doing it this way greatly reduces exposure time and risk to raw gel products, which can be very dangerous, and it gives my nails extra volume, making them look even more plush, inviting and professional- since most press on nails are too thin where they shouldn't be and too thick where they needn't be. This way, I also am sure that my top coat applications stay just where I want them, no more rushing to clean up running gel after I paint another finger, or messing up the top coat because I bumped it on something. When all of the sealing and plumping with my top coat is done, if I want to wear them matte, I'll grab my buffing block and go to town on them. Doing this, I achieve a flawless bare, natural nail look and over the years, dozens of strangers have stopped me to ask how tf I grew such perfect, natural, strong, opaque nails. Sometimes I add charms like for this set. Pro Tip: apply charms with brush on glue only because then you can use the brush on Makartt nail remover to gently remove the charms and use them again!!! Phew. There you have it! Oh yeah, another thing to consider is that using my method gets me easily 2-3 weeks of this set before I need a fill. That's one big benefit of the Russian manicure. With this method, too, you can absolutely do an acrylic fill. You just need to file down the grown out edge, clean up your Russian manicure, sanitize the finger, then apply primer and fill with acrylic as usual, making sure to give yourself great apexes to rebalance the nail structure and avoid breakage later. The Leilani tips are fantastic for filling because when they grow out, you'll get a more dramatic, elongated oval nail bed appearance, which looks like the European preference in sculpted nail bed shapes. It's sexy and dramatic, but if you don't wanna wait, just adhere your Leilani nail up higher on your nail with acrylic and process like you're doing a fill right from the install. I do this sometimes when I want to make even more of a statement with them. ... show more
Reviewed in the United States on September 8, 2025 Reviewed in the United States on September 8, 2025 by Artemis

  • Arylic
Color: Vanilla Cream Size: 2 Ounce
So buttery
Reviewed in the United States on April 8, 2026 by DangerLiz

  • I love it !
Color: Vanilla Cream Size: 2 Ounce
It’s perfect for beginners!
Reviewed in the United States on July 17, 2025 by I really wanted to get something special for my grandma and I did ! This looks absolutely amazing ! I wish I would have taken a picture before I sent it to her but thank you so much ! This really is something she’s going to cherish and it’s absolutely stunning ! I can’t get over it !

  • I love this color and curing! I love this color and curing!
Color: Vanilla Cream Size: 2 Ounce
Vanilla Cream: This is a great color for the perfect pink natural application. Good for a French imo! Great work! Warm Caramel: This is the perfect color for brown colored stickers. Likely would do well under chrome and foil. I can’t wait to experiment more with these two!
Reviewed in the United States on November 8, 2024 Reviewed in the United States on November 8, 2024 by Iesha

  • Professional product Professional product
Color: Blossom Beam Size: 2 Ounce
Compre este polvo de uñas en conjunto con su liquido y es espectacular, el secado es lento lo que facilita el trabajo a las principiantes
Reviewed in the United States on February 27, 2026 Reviewed in the United States on February 27, 2026 by Rosabel Alsina Perez

Can't find a product?

Find it on Amazon first, then paste the link below.
Checking for inventory...